Wi-Fi problems can be obnoxious, but there are some simple ways to fix most wireless problems without a degree in computer networking. If you'd like to share your Windows 8 PC's wireless Internet connection with other PCs, that's also easy. This works whether you want to share a tablet's cellular data connection, a wired Ethernet connection, or even another Wi-Fi connection.
Troubleshoot Your Wi-Fi
First, try rebooting your computer. Yes, it may seem silly, but rebooting fixes a surprising amount of problems. For example, if you've run into a bug with the driver for your WiFi hardware, rebooting will reinitialize the driver and possibly fix the problem.
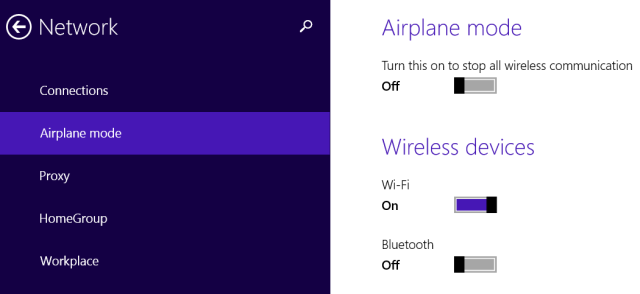
If your Wi-Fi icon is grayed out, your PC could be in airplane mode or Wi-Fi could just be disabled. To check this, swipe in from the right or press Windows Key + C to open the charms bar. Select the Settings charm and select Change PC settings. In the PC Settings app, select the Network category, select Airplane mode, and verify airplane mode is off and Wi-Fi is on.
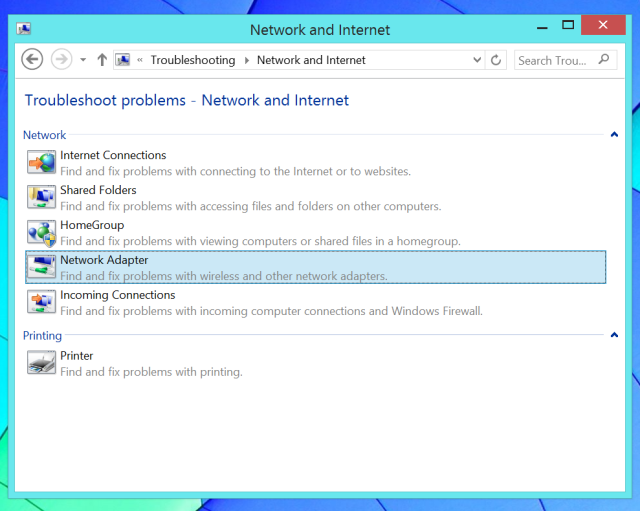
Microsoft includes a Wi-Fi troubleshooting wizard with Windows to simplify the often-tedious process of troubleshooting the many things that could go wrong with any network connection. It will test quite a few things and automatically fix any problems it detects.
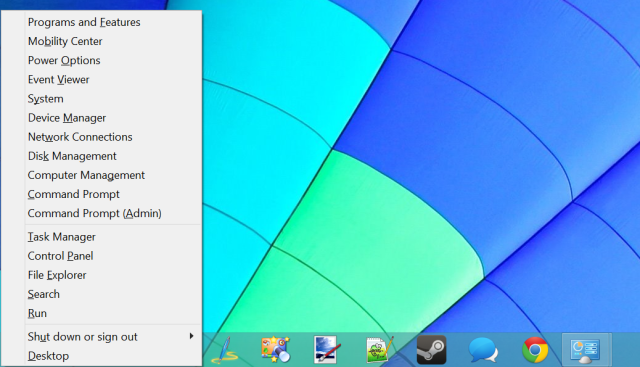
To run the troubleshooter, open the desktop Control Panel by pressing Windows Key + X and selecting Control Panel. Click View network status and tasks under Network and Internet, and then click the Troubleshoot problems link. Try both the Network Adapter and Internet Connections troubleshooters.
Be sure to check your laptop for any Wi-Fi switches. Some laptops have physical switches that you can toggle to enable or disable Wi-Fi. If you accidentally nudged such a switch into the Off position, your Wi-Fi won't work until you set the switch back to On.
If you can't receive a Wi-Fi signal with any device, you may also want to try rebooting your wireless router. if you have issues with signal strength, you may need to position and tweak your wireless router for optimal Wi-Fi coverage.
You may also want to download and install the latest drivers for your Wi-Fi hardware from your computer manufacturer's website. This normally shouldn't be necessary, but it's possible that older versions of the drivers have bugs that newer versions have fixed. If Wi-Fi doesn't work after you upgrade an old computer to Windows 8, you may just need to install drivers first.
Share Your Wireless Internet
You can turn your Windows PC into a wireless hotspot, allowing other Wi-Fi-enabled devices to connect to it. This is useful in a variety of different situations. Some examples:
Scenario: Your Windows 8 PC is plugged into an Ethernet port in a location that doesn't offer Wi-Fi.
How to get Wi-Fi: Share the wired Ethernet connection with other wireless devices.
Scenario: You can only connect a single device to a network; perhaps you're using a hotel Wi-Fi connection that only allows you one device per room.
How to get Wi-Fi: Share that single connection with your other wireless devices.
Scenario: You have a Windows 8 tablet with a wireless cellular data connection.
How to get Wi-Fi: Share that data connection with your other devices, effectively tethering them to the Internet through the Windows 8 PC.
This is fairly easy to do, but it requires using a hidden command because Microsoft hasn't exposed this feature through a graphical interface. This feature is called a "virtual hotspot," as it allows you to both connect your PC to a Wi-Fi hotspot and create a Wi-Fi hotspot with just a single piece of Wi-Fi hardware.
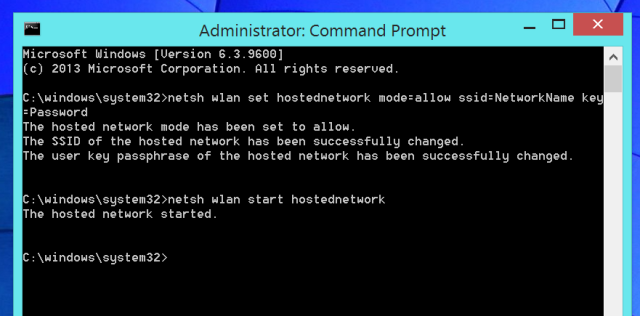
First, you'll need to create the Wi-Fi hotspot on your computer. Press Windows Key + X to open the power user menu, and then click Command Prompt (Admin) or PowerShell (Admin).
Type the following command in the Command Prompt or PowerShell window, replacing the NetworkName and Password text with your own name and password for the Wi-Fi hotspot:
netsh wlan set hostednetwork mode=allow ssid=NetworkName key=Password
Now you'll just need to run the following command to enable your Wi-FI hotspot:
netsh wlan start hostednetwork
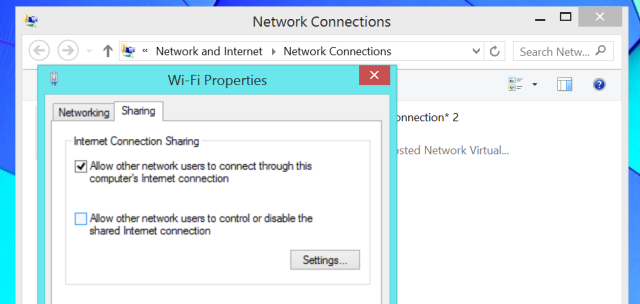
Next, we'll need to enable Internet Connection Sharing. This allows computers that connect to your computer's Wi-Fi hotspot to connect to the Internet through your computer. To do this, open the Control Panel, click View network status and tasks, and click Change adapter settings in the sidebar. Right-click the adapter that represents your Internet connection, select Properties, click the Share tab, and enable the Allow other network users to continue through this computer's Internet connection checkbox.
You can now connect to your new Wi-Fi hotspot from any of your other devices and they'll be able to access your Windows 8 PC's Internet connection.
Use the following command if you want to turn off your hotspot in the future:
netsh wlan stop hostednetwork
For more detailed information, read our guide to turning your Windows PC into a wireless hotspot.
Have you encountered any other Wi-Fi problems on Windows 8? Share any solutions that worked for you!
Image Credit: Kiwi Flickr on Flickr

