One of the ways to increase your productivity is to be conscious of how you spend your time. If most of your work involves a computer, an OS X application called Timing ($48.99) can help you track exactly where the hours go.
Whether you work a salaried or hourly job, keeping track of time can help you see which tasks are holding you up, or where you may need to work on your productivity. If you're a freelancer, keeping track of your time is essential for billing your clients and getting paid the right amount for the effort you have put in.
Setting Up Timing
Timing starts working almost immediately after you launch and enable it. Under Mavericks, Timing will need to access the Accessibility API in System Preferences in order to track specific documents you're working on, in addition to applications. When Timing first launches, and the Accessibility API window pops up, click on Open System Preferences, and then enable the "TimingHelper.app" entry under Accessibility controls.

You should also manually add Timing to your startup items when you log into your Mac, which can be done under the User Groups option in System Preferences, by clicking the Login Items tab. Click the plus "+" and find Timing in your installed Applications and you won't have to start the application every time you return to work.
Timeline Tracking
Once enabled Timing tracks all of your activities when you're working directly in an application. If you're playing a video while working in a writing application, only the latter activity will be tracked. When the video application or web page is in the forefront, Timing will track the time.

In the sidebar, Timing groups various activities into categories. For example, under Image Editing, Timing monitors all the time you spend in applications like do-it-all wonder app Photoshop, the cheaper alternative Pixelmator, and iPhoto. You can right-click on a category to see which applications it is recording, and you can add other applications, like document and image viewer Preview, that you want Timing to monitor in that area.

Timing also supports tracking individual documents in a wide variety of applications. As I worked on this article, Timing specifically tracked and reported which image files I opened and worked on in Photoshop, and in Safari it recorded the website domains and title webpages I visited, plus how long those pages were in the forefront. This kind of reporting, for example, enabled me to see just how much time I spent editing and proofreading this article in WordPress.

Project Tracking
Timing can also be set up to track specific projects. Tracking projects is similar to categories in the sidebar. Click on the new project plus "+" button in the bottom left corner and give the project a name. Next, drag and drop files and applications onto the project in the sidebar.

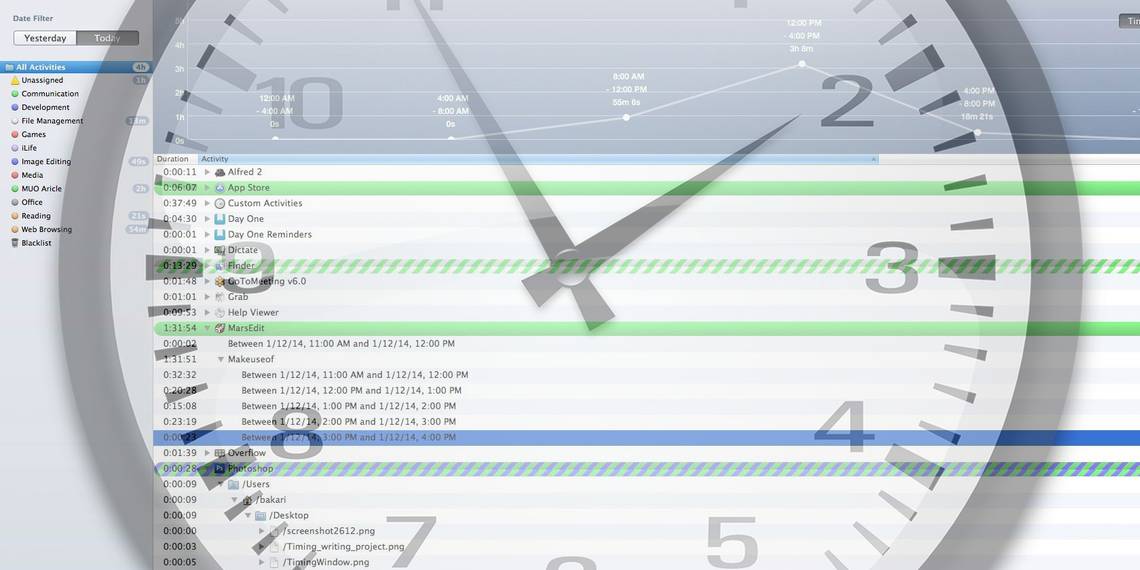
For writing MakeUseOf articles, my Timing project consists of blog writing app MarsEdit, Photoshop, Safari, and the screen capture tool Snagit. Timing will monitor these applications by default, but when they are grouped together in a project, Timing provides the total amount of time spent using the applications for each project. In the case of MarsEdit, however, while Timing records the amount of time I spend writing in the application, it unfortunately doesn't record the specific document being worked on.
Note: By default, Timing puts the Finder under the File Management category in the sidebar. If you want to add Finder to a specific project, it is located in /Systems/Library/CoreServices.
As far as I can tell, Timing doesn't record break times from your computer, but if that data is important, you can manually add it and other non-recorded data by clicking on the Timing icon in the menu bar and selecting Add Custom Activity. You can also enable a feature that will ask you to input custom activities after you return to your computer.

You can also enable private mode, which pauses the recording of activities. Timing can be kept running in the background, and it doesn't have to be opened in the dock in order to record activities. By default, Timing will stop tracking time if your computer is idle for at least 150 seconds. You can adjust the inactivity time in the settings area, and entire activities can also be deleted.
Timing Reports
As you work, Timing shows the total amount of time spent in each individual application, and which hours you spent on individual activities.

When you select All Activities in the sidebar, and filter by project, Timing provides a handy color-coded graph of your activity data. Colors for categories and projects can be customized.

Worth Downloading
The only other activity and application tracking program I've used is time tracking app RescueTime, which provides more specific tracking of documents and webpages, and better assessment of your most and least productive activities. I find Timing a little more straightforward and simpler to use, but don't miss our other article about useful desktop time tracking software.
Timing is not a billing application, though you can export data in CSV format. It also does not share data with your other Macs or devices, and when you have an application in two different projects, Timing doesn't make a distinction between the two.
Despite these limitations, Timing works pretty well for what it does. Downloading the free lite version provides a good overview of how it runs, and if you want to monitor time over several days or use the app's more advanced project features then you might find the full version worth the price.
Download Timing ($48.99)
Do you use an app to track your computer usage? Let us know what works for you in the comments, below.