Google Chromebooks are becoming increasingly popular. The market intelligence firm ABI Research have predicted an annual growth rate of 28 percent through to 2019, meaning an expected 11 million units per year will be shipped by the turn of the decade.
If you are one of the latest converts to Chromebooks and are looking for some of the best tips and tricks to get you started, then read on for some great hints…
Create Folders In Your App Launcher
The app launcher has come a long way from its initial inception. Today it represents Google's version of the much-debated Windows Start Button, located in the bottom-left corner of the screen rather than on the far right of the taskbar where it was originally placed.
A relatively new feature of the launcher is the ability to group icons and apps into folders, an addition that in many ways aligns it even more closely with the aforementioned old start button. It is a welcome feature, as prior to its introduction the app launcher could easily run into being seven or eight pages long for a power user.
Grouping apps together is easy - just click and drag one app over the top of another and the folder will be created. Once you've put all the apps you want into a group you can rename the folder by opening it and overwriting 'Unnamed Folder' with the description of your choosing.
Make A Recovery Drive
The Chromebook's stateless operating system means it is very rare for something to go wrong, and even when it does a reboot will often cure the problem.
Nonetheless, like any computer, there are times when you might have no choice but to restore the system to a clean, factory state. The Chromebook makes it easy to know when this is the case - you'll see the message "Chrome OS is missing or damaged" when you boot the machine.
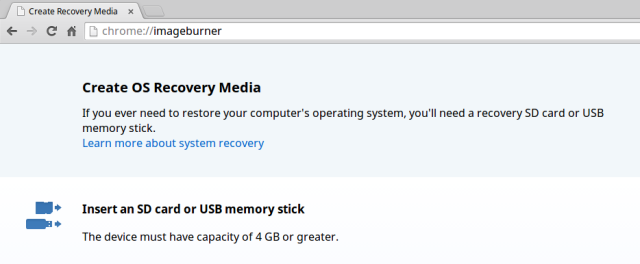
To reinstall the Chrome OS you'll need to make a recovery drive using either a USB flash drive or an SD card with at least 4GB of storage. To start the process, type 'chrome://imageburner' in the browser's omnibox and follow the instructions.
Be aware, if you recover your machine you will lose all your locally saved data (though cloud-based data will automatically re-sync itself). Make backups!
Open Apps In Their Own Window
Although the Chrome OS is built around online functionality, it is a myth to presume that Chromebook's don't work offline. The myth is at least partly perpetuated by the fact that unless set up otherwise, all Chrome apps open in a tab within the Chrome browser.
If you want a more traditional windows feel to your Chromebook experience, then you should know that it's easy to make apps open outside of the constraints of the Chrome browser. This is also useful if you have a Chromebook with a large screen, or you are using a second monitor.
To make apps permanently open outside the Chrome browser you need to right click on the icon in the launcher and choose 'Open as window'. To make apps open in a window for a single session just hold down the Shift button on your keyboard whilst you click on the app.
Add Website Shortcuts To The Launcher
If you are not comfortable with enabling experimental features this is not a trick for you. If you are, however, this tweak is a great timesaver for loading your most visited sites.
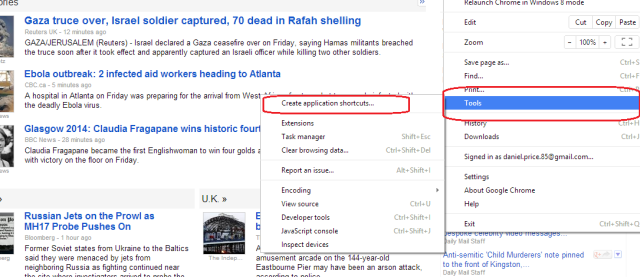
The launcher is ordinarily locked down and it's not possible to add or remove links to it without installing them from the Chrome Web Store. To work around this, simply type 'chrome://flags/#enable-streamlined-hosted-apps' in the omnibox and click 'Enable'. Restart your machine and head to any site for which you would like to add a shortcut. Once you're there, click on the browser's menu in the top right and navigate to More tools -> Add shortcut to this website. You will be prompted to give the shortcut a name, click 'Add', and you'll now have the shortcut available in the launcher.
It won't take you long to realise several of these shortcuts can then be grouped together using the grouping method described above, essentially making your launcher an alternative bookmarking tool.
Use Skype To Make Calls
One of potential Chromebook users' biggest concerns and criticisms of the Chrome OS has been the lack of a native Skype app. Sadly, the new Skype browser plugin still doesn't work on Chromebooks because it requires data to be directly installed on your machine - something that the Chrome OS will not allow.
Luckily, this can be worked around by installing another Linux distro on your machine. The process is not the simplest, but we have tried to streamline it as much as possible in our detailed guide about how to install Linux on a Chromebook, published earlier this year.
Change Your Release Channel
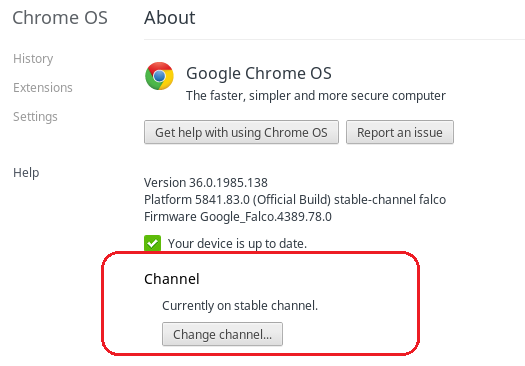
The Chrome OS offers users four distinct release channels - each with its own advantages and disadvantages (though only three are accessible through the normal method of switching). Simply put, the Beta and Developer release channels are a test bed for features which will (normally) eventually appear on the stable channel.
To change the channel that your Chromebook is running, enter 'chrome://help' into the browser's omnibox, click More info -> Change channel, and select the release version you want to run.
If you want more information check out our in-depth article which details the pros and cons and helps you decide which release channel is right for you.
Enable Voice Search
In November 2013, Google released an extension for Chrome which allows users to add voice search to their Google search home screens. Android users will be familiar with the concept; the Chrome voice search is launched by saying 'Ok Google' and can offer personalised results from both the web and your own Google products in exactly the same way as Google Now functions.
The extension is still in beta but it works well. Download Google Voice Search Hotword [No Longer Available] directly from the Web Store.
Access Your Windows Or Mac From Anywhere
Despite all of their benefits, there are some occasions when you need the extended functionality of a more traditional operating system. The Chrome OS cannot run specialist software or locally installed games - so what can you do if you still want to take advantage of a Chromebook's excellent portability?
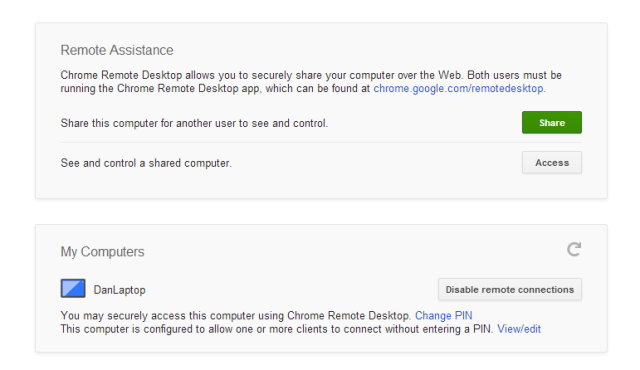
The solution is the Chrome Remote Desktop. It is available for download from the Chrome Web Store and is remarkably easy to set up. Once you've authorised access to your Windows or Mac you can access it from anywhere as long as it's turned on. The app also allows the machine to be password protected, which is very useful if friends or colleagues are likely to use your Chromebook.
Reverse The Touchpad's Scrolling Direction
If you are migrating from a Mac, the Chromebook's default scrolling direction can be confusing and frustrating at first.
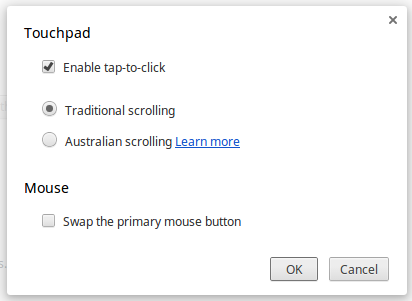
Users who struggle to accommodate this new default can easily reverse the direction of scrolling - head to settings then Device -> Touchpad and mouse settings and check the box next to Australian scrolling. Left-handed users can also reverse the primary mouse button through this menu.
Need Help?
Aside from the numerous excellent independent blogs and sites about the Chrome OS, users have the official guide to turn to when they need some guidance.
The in-built 'Get Help' app was totally redesigned in Spring and now offers a comprehensive guide on just about everything to do with your machine. The app can no longer be deleted, suggesting this is a feature that Google hope will eventually become the go-to guide for all things Chromebook.
Bonus - Barrel Roll
You know, because being able to make your laptop's screen do a barrel roll is a vital feature in modern computing. Just press Ctrl + Alt + Shift + Refresh. It's great. Honest.
Your Tips?
What tips and tricks can you offer to new Chromebook users? Let us know in the comments below.
Image Credits: John Karakatsanis Via Flickr

