So, you’ve bought yourself an Arduino starter kit, and possibly some other random cool components - now what? How do you actually get started with programming this Arduino thing? How do you set it up and upload some code? Read on and I'll explain all.
I’m going to assume you have an Arduino Uno board, because that’s the one that comes with most Arduino starter kits.
Installing Drivers
Mac OSX:
You have it easy on a Mac. Just download the latest Arduino package, mount it, then run the included FTDIUSBSerial Driver. When thats done, drag the application to your applications folder. You’ll need to restart though to get the new drivers to kick in.

When you first plug in the Arduino, OSX will tell you it’s detected a new interface. Just click Network Preferences and hit Apply - there is no configuration to do there.
Windows 7
Nothing is ever easy in Windows, especially when it involves drivers. Start by downloading the latest package and unzipping it, preserving the folder structure. It’s quite a large download - 85MB when I checked, fully expanding to 230MB, so it may take a while to download.
Plug in the Arduino with the included USB cable. It may try to search for drivers, but fail. Just close down the wizard and open up the device manager. The quickest way to do this instead of trying to navigate Windows’ confusing set of Control Panel multilevel menus, is just to click start, and type in devmgmt.msc . Hit enter and you’ll open the device manager directly.

Under Other Devices you should see an Arduino Uno listed, with one of those yellow "problem" marks. Double click, select Update Drivers, and choose Browse My Computer for Driver Software.

Choose the options of Let Me Choose a Driver, click All Devices, Have Disk, and navigate to the download folder. In the drivers folder, you should see an Arduino Uno file. Choose that. The driver install process will recognise it as a “Communications Port”, and will cause an “unsigned driver error” to appear when you install. Ignore that, and install anyway.

If you’re using XP, the process is a bit more involved and involves two sets of drivers. Read the full instruction set on the Arduino page.
Set Up The Board & Port
Launch the Arduino application from either the download folder or the applications folder. The first thing we need to do is to set up the port and board. On either system, you should have a tools menu. Click that and make sure that:
- A matching board is chosen. The Uno is the default and was already selected on my installation, but it’s always good to check.
- The serial port is chosen correctly. On Windows, I found I only had one option (see the screenshot) and it was unselected, so the choice wasn’t difficult.

- On a Mac, the port names are a little more convoluted, but basically it’ll be in one of the two USB ports listed. cu-USB was the correct choice on my machine, but it may be different for you.

Test It
Let’s take a quick look at the toolbar.

From left to right:
- Play symbol: This compiles your code to check it without actually uploading it to the Arduino, but clicking the upload button will perform this too.
- Stop symbol: This will stop the COMPILE of your program, not stop any running application already uploaded to the Arduino.
- New file: Starts a new code project
- Up arrow: Open - loads an existing project. There’s hundreds of example programs included, but leave this for now.
- Down arrow: Save
- Right arrow: Upload the current code to the Arduino.
- Serial Monitor: This allows you to check communications coming from the Arduino when it’s connected to the computer, but don’t worry about it for now.
OK, time to run your first application. Click Open, and from the dialog choose the example app from 1. Basics -> Blink. You should see the following code:

To check your Arduino board is working and connected correctly, go ahead and click the Upload button. After a short moment compiling the app, some orange lights labelled TX / RX on the Arduino should start flashing. This means it’s transmitting or receiving something - in this case the code you are uploading. When the process is done, the code will be run immediately.
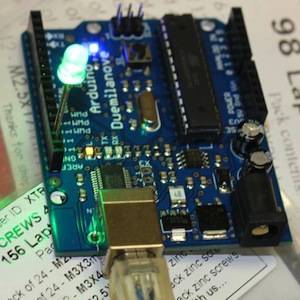
This app is incredibly simple - it will just "blink" the on-board LED labelled L (while the board is plugged in, there will a green LED that stays on, this just indicates power and will not blink). You can use your own LED too if you like - just stick the longer of the two legs into the hole number 13, and the shorter leg (the LED should have a flat bit on the head on this side) into the neighbouring GND hole. The LEDs will both flash together now.
That’s as far as we’ll go this time. You’ve now set up the Arduino and figured out how to upload apps to it, confirming that it works. That’s a good start, and at this point you might like to look over the Blink app code, and try to figure out what, or how it is doing it. Don’t worry if you don’t understand it yet, as I’ll explain the code in detail next time, as well as explaining the various bits on the Arduino board.
Thanks for reading, and as ever we welcome comments. If you having problems getting the board set up, feel free to ask away in the comments, but if your question relates to an outdated version of Windows or some obscure Linux distro then it's unlikely I'll be able to help.