Most Raspberry Pi models now ship with on-board connectivity options. The Raspberry Pi 3, 3B+, Raspberry Pi Zero W, and Raspberry Pi 4 all feature built-in Bluetooth and Wi-Fi.
This inclusion extends the possibilities for your projects, saving you from relying on USB dongles and hubs. But just how do you set up Wi-Fi on a Raspberry Pi 3 or later? How does Bluetooth connect?
Here's what you need to know about setting up wireless networking via Wi-Fi and Bluetooth on Raspberry Pi.
Wi-Fi and Bluetooth on the Raspberry Pi 3 and 4
The Raspberry Pi 3 is the first version of the computer to have on-board wireless and Bluetooth. Subsequent version with these features include the Raspberry Pi Zero W, the Raspberry Pi 3 B+, and the Raspberry Pi 4.
With Wi-Fi built-in, the Raspberry Pi can be easily connected to wireless networks. This enhances connectivity considerably. Meanwhile, including a Bluetooth radio on the Raspberry Pi (the Pi 3 has Bluetooth 4.1 BLE, the Pi 3 B+ 4.2 BLE, and the Pi 4 Bluetooth 5.0) means you can add any device, such as a smartphone, a TV, or an Xbox One controller
Set Up Wi-Fi on the Raspberry Pi via Desktop PC
The easiest way to connect your Raspberry Pi to a wireless network is to use the desktop tool. However, this means that you will need to set it up with a keyboard, mouse, and display. The alternative is to first hook up an Ethernet cable, then connect via VNC or RDP. Just remember to disconnect Ethernet when the Pi is connected wirelessly!
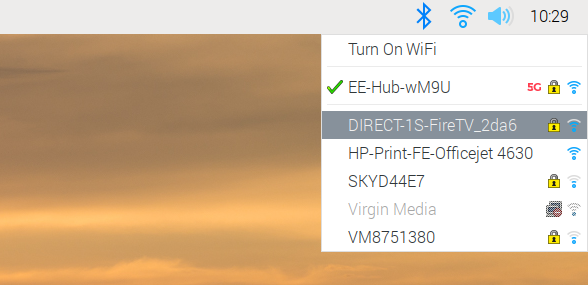
To connect to your router, right-click the grayed-out wireless networking icon in the right corner of the panel. Select the option to Turn on Wi-Fi, then select the desired network from the menu.
Input the Pre Shared Key when prompted, then wait for the connection to be established.
You should now be online.
Configure Wireless Networking to Connect the Raspberry Pi to Wi-Fi
Alternatively, you can set up wireless networking in the command line. This is a good option if you're accessing your Raspberry Pi using SSH (initially over Ethernet).
        sudo apt update

sudo apt upgrade
You have two options for setting up a wireless connection. It might seem easier to boot into the GUI, but it's more straightforward to do it in the command line. You should already have your SSID name, but if not, use
sudo iwlist wlan0 scan
This will reveal the SSID in the line "ESSID". Next, open wpa_supplicant.conf:
sudo nano /etc/wpa_supplicant/wpa_supplicant.conf
You'll need to add or edit the following:
        ctrl_interface=DIR=/var/run/wpa_supplicant GROUP=netdev

update_config=1

country=US

network={

ssid="SSID"

psk="PASSWORD"

key_mgmt=WPA-PSK

}
Take the time to change the value for country as appropriate and add the SSID and password for your network.
Use Ctrl + X to exit and save, pressing Y and Enter to confirm. Wireless connectivity should start immediately. If not, use this command to restart wireless:
        sudo ifdown wlan0

sudo ifup wlan0
You could also simply enter
sudo reboot
.
Set Up Wi-Fi on Raspberry Pi 3 Before Booting
Another option for Wi-Fi on the Raspberry Pi 3 and later is to configure it before the first boot. This is possible by inserting the microSD card in your PC's card reader and browsing to the /boot/ directory. Here, create a text file called wpa_supplicant.conf then open it and add the details as you did above.
Save this, close the file, then safely eject the microSD card. Note that the success of this method will depend on your Raspberry Pi operating system. It works with pre-Raspbian Buster OSs, as well as various other operating systems. Raspbian Buster has a Wi-Fi driver that prevents the use of a wpa_supplicant.conf file in this way.
Configure Bluetooth on the Raspberry Pi 3 and 4
As with Wi-Fi, the software to configure and connect Bluetooth is built into Raspbian Buster. For older versions, run update and upgrade, then
sudo apt install bluetooth-pi
You can now activate Bluetooth from the command line with:
bluetoothctl
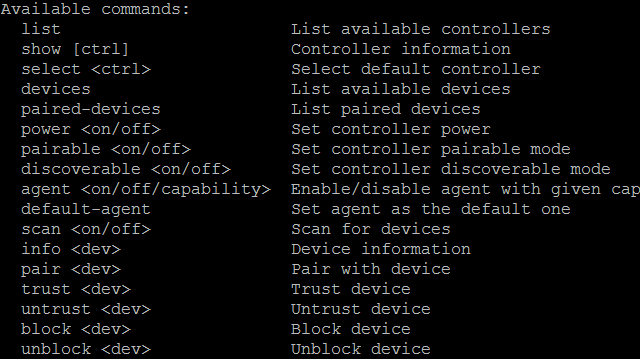
A host of options are available with this. Type "help" to see them.
For Bluetooth to work, it needs to be enabled, discoverable and capable of discovering devices.
We use three commands to do this:
-
power on -
agent on -
scan on
In this screen, you can see the Raspberry Pi has detected my Ubuntu phone. A connection can be made by entering connect, followed by the MAC address. If a passcode is required on the remote device, enter this when prompted.
Moments later, your Bluetooth connection will be established.
Connect to Bluetooth on the Raspberry Pi Desktop
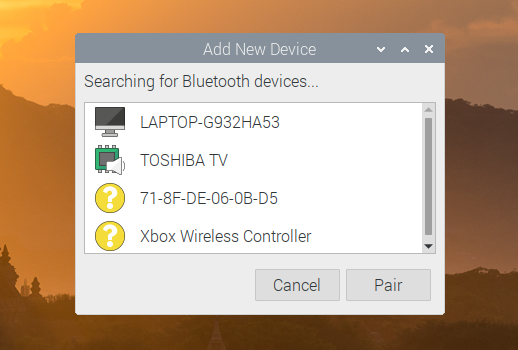
If you prefer to setup your Raspberry Pi Bluetooth connections on the desktop, click the Bluetooth icon in the panel. In the menu, select Add Device to find discoverable devices, select the one you want, then Pair to begin the pairing/trust process.
Bluetooth is up and running!
Connect an Older Raspberry Pi to Wi-Fi and Bluetooth
If you own a Raspberry Pi 2 or earlier, or a standard Raspberry Pi Zero, Wi-Fi is not an option. Indeed, in the case of the Raspberry Pi Zero, Ethernet is not an option either. The solution is USB dongles that add Wi-Fi and Bluetooth capability to the Pi.
Top USB Wi-Fi Dongle for Raspberry Pi
Need to connect your older Raspberry Pi to a wireless network? You'll need a USB Wi-Fi dongle, but with limited USB ports on the original models, this can be frustrating. Ethernet might be preferable.
Get a USB Bluetooth Dongle for Raspberry Pi
USB Bluetooth dongles are also available for the Raspberry Pi. However, you may find that you won't enjoy the functionality from a dongle that can be enjoyed with integrated Bluetooth
For Raspberry Pi Zero-based projects requiring Wi-Fi and Bluetooth, you have two options. The first is to switch to a Raspberry Pi Zero W, which is incredible value for a computer.
Otherwise, you'll need to connect standard USB dongles to your Pi Zero using a USB hub with a micro-USB cable. The dongles above will work on the Pi Zero with this USB hub.
Wi-Fi on the Raspberry Pi 3 and 4 Is Enabled!
You should now be up and running with wireless and Bluetooth on the Raspberry Pi 3 and 4. As with any computer, it is straightforward to set up; with some operating systems, you can configure it before booting.
Meanwhile, Bluetooth is just as simple, and allows remote controls to be connected, as well as audio devices. The hardware is reliable and the software uncomplicated. And if you're using an older Raspberry Pi, these features are also available via USB dongles.
If you haven't already, here's why you should try the new Raspberry Pi 4.


