Most people are pretty good at keeping backups of their valuable data on external hard drives. But what happens if the drive becomes corrupted?
It's a lesson in why you should always make an offsite backup with a cloud provider as well as a local copy—but it's too late for that now.
Thankfully, if you use a few little workarounds, you can reformat an external hard drive without losing everything on it.
Yes, It Is Possible!
A quick browse on the web's many tech forums reveals that too many people think "data recovery" and "format drive" are mutually exclusive terms. They aren't.
It's perfectly possible to wipe your hard drive without losing all your data. The process requires you to format your drive, then use data recovery tools to salvage your data.
The methodology for the formatting part of the process differs depending on whether you're using a Windows computer or macOS. We're going to cover both platforms; keep reading to learn more.
How to Reformat a Drive on Windows
The process to reformat an external hard drive on Windows is straightforward.
Firstly, connect your external hard drive to your computer using a USB port. Wait for Windows to recognize the connected drive.
Next, open File Explorer, navigate to This PC in the left-hand column and click on the shortcut.
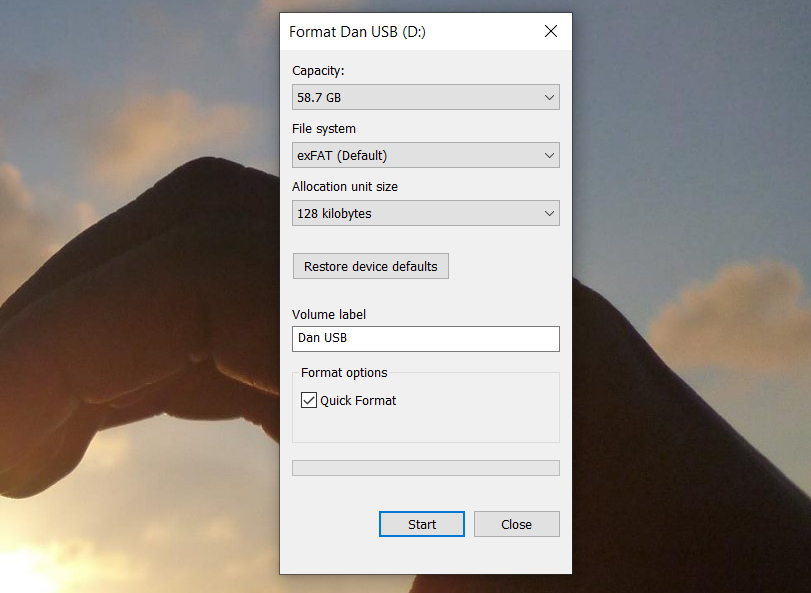
In the Devices and Drives section of the main window, you should see your external hard drive. Right-click on the drive's icon to bring up the context menu, then select Format from the list.
Make sure the Quick Format box is ticked and leave all the other settings the same.
Finally, click on the Format button and wait for the process to complete.
To reiterate—it is extremely important to ensure the Quick Format checkbox has a tick in it. If you do a full format of your drive, you will lose all your data.
How to Reformat a Drive on Mac
macOS doesn't have a Quick Format box, but you can still achieve the same result by tweaking a particular setting.
To begin, open the Finder app and select Applications from the left-hand panel.
Scroll down the list of applications until you come to the Utilities folder. Open the folder and locate Disk Utility.
Within the Disk Utility app, you should see your external hard drive listed under External on the left-hand side of the screen. Click on your drive's name.
Now turn your attention to the top of the window and click on the Erase button. The operating system will prompt you to wipe the drive.
Do not proceed—you need to click on the Security Options link. It's vital to ensure the slider is moved all the way to the left side of the scale. If the slider is not in the correct position, you will lose some (or all) of your files. The data recovery process will be impossible.
Why Is Quick Format Important?
If you want to use data recovery software, you need to perform a Quick Format (or the Mac equivalent)—but why?
Think of your files as books on a bookshelf. The filesystem is like the catalog that tells you where the books are kept. Performing a Quick Format is akin to throwing away the catalog but keeping the books themselves. You wouldn't be able to find the books as easily, but they are still there.
In more technical terms, a Quick Format only deletes the file system journaling. It doesn't overwrite the entire drive with binary zeroes. The files stay, but File Explorer/Finder can no longer see them because they don't have any information about where to look. The files remain there until they are overwritten with new data from the user.
Don't Add More Files
At this stage, it's imperative that you don't write any new data to your hard drive.
As we just explained, any new data will directly overwrite the old (now hidden) files. And the overwriting won't take place on a file-for-file basis. By sending a new file to your external hard drive, you could corrupt hundreds of the files that you need to retrieve.
Just move straight on using the data recovery software.
Using Data Recovery Software
Now it's time to turn to a data recovery app. This is specialized software that can find files on a hard drive without a catalog that tells it where to look.
Quite a few data recovery apps have a free tier. Sometimes, the free tier is restricted to a certain number of files or amount of storage. If you're trying to recover lots of data, you might need to get your wallet out.
Here are three data recovery apps you can try:
1. Prosoft
Available on: Windows, Mac
Prosoft is a data recovery app that's available on both Windows and Mac. It can recover more than 100 different file types, recognize duplicate files among those you want to restore, and offers a recovery preview before you begin the process.
The free trial lets you see a preview so you can be sure it's going to work before you buy.
Download: Prosoft (Free trial, $29/month for a full license)
2. EaseUS Data Recovery Pro
Available on: Windows, Mac
EaseUS Data Recovery Pro is probably the most well-known data recovery app.
Unlike Prosoft, it lets you recover 2GB of data for free. All mainstream file types are supported.
If you need to recover more than 2GB of data, you will need to pay for the Pro version. It costs $70 for a lifetime license.
Download: EaseUS Data Recovery Pro (Free, $70 for Pro)
3. Recuva
Available on: Windows
The Windows-only Recuva app falls under the CCleaner umbrella. It is free to download and use, and does not have any data limits.
The $20 Pro version adds support for virtual hard drives and automatic updates.
Download: Recuva (Free, $20 for Pro)
Avoid Problems, Make Multiple Backups
As we mentioned at the start, all these problems can easily be avoided if you make multiple backups of your data.
At the very least, you should keep an onsite and offsite backup. In a dream world, have a backup on a NAS drive, with a cloud storage provider, on an external hard drive, and with a dedicated backup app provider.


