The growth of smartphone photography has given rise to an unexpected consequence. We now use our cameras not just for preserving life's most treasured moments, but also for snapping anything and everything we might need to refer to later.
Gas receipts, maps, sale items in shops -- you name it, we shoot it. Of course, being able to record these images is useful. But it's also not entirely practical. If you need to send an official document to your bank or employer, you can't snap an out-of-focus JPEG and hope they accept it. You need a full-feature scanner app on your phone.
The best scanner app is also one of the most established names: CamScanner. In this article, I'm going to explain how to use the app and introduce you to a couple of its lesser-known features.T
There are also plenty of options available for scanning documents into your Mac using an iPhone or scanning your old photographs.
Availability and Cost
Throughout this article, I'm going to refer to the Android version of the app. However, it's also available on iOS and Windows Phone, and the user interface is almost identical.
The pricing of CamScanner can be confusing to new users. There's a free version of the app, a licensed version of the app, and a premium version of the app.
The licensed version costs a one-off fee of $2. It introduces high-quality scans and the ability to create PDF files without watermarks. It also eliminates the time limits on OneDrive and Evernote uploads and removes in-app ads.
The premium version of the app costs $4.99 per month or $49.99 per year. If you have to scan a lot of documents while you're on-the-go, it's a worthwhile investment.
Premium features include:
- Editable OCR files
- 10 GB of cloud storage space
- Password protection on your scans
- Automatic uploads to your cloud storage provider
- Batch downloads of PDF files
Use the download links below to grab a copy before you read on.
Download: CamScanner Android (Free)
Download: CamScanner iOS (Free)
Download: CamScanner Windows Phone (Free)
Scanning an Image
Performing a simple scan of a document is fast and straightforward.
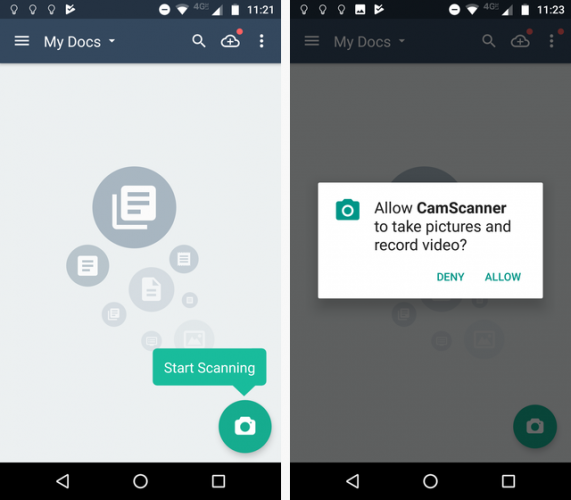
When you fire up the app, you'll automatically be taken to the My Docs screen. Click the Camera icon in the bottom right-hand corner to start scanning. If you haven't used the app before, you'll need to give it permission to take pictures and record video.
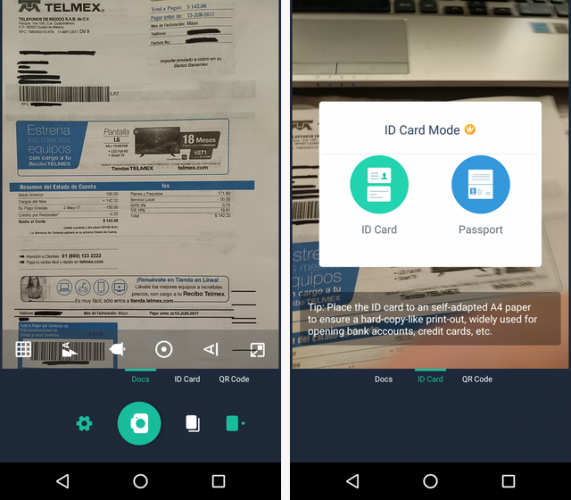
On the scanning screen, there are three types of scan you can perform: Docs, ID Card, and QR Code. The ID Card option is ideal for producing a copy of a passport for printing. Just make sure you put it against a plain background before continuing.
If you're scanning documents, there are two modes available. The first, Single Mode, should be used when you only want to scan a single page. The second, Batch Mode, should be used if you want to add several pages to a single document. You can change the batch-wide cropping and editing options in the app's Settings menu.
Lastly, clicking the Gear icon will let you change settings such as flash, text orientation, and resolution.
To scan your document, line it up in the viewfinder and tap the Camera icon.
Editing Your Scan
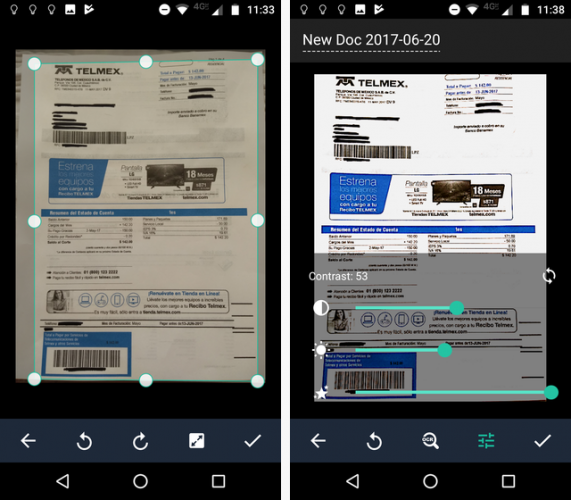
Once you've scanned your document, the app will automatically take you to the cropping screen. Adjust the perimeter of the area to be cropped to remove any unnecessary background, or to focus on the particular part of the document you want to retain.
As you can see in my example below, I accidentally scanned a bit of my tablecloth as well as my internet bill, so I've adjusted the cropping tool to remove it.
At the bottom of the screen, you'll find options to rotate your image as well as a one-click button in case you want to retain the entire document. When you're ready to move on, tap the Tick icon.
Now you can add Instagram-esque filters to your scan. Rather than being designed to make you look cool in front of your peers, these filters aim to make your document easier to read. There are seven to choose from: Auto, Original, Lighten, Magic Color, Gray Mode, Black and White, and Black and White 2.
If the filters aren't sufficient, you can edit the Brightness, Contrast, and Level of Detail manually by tapping on the equalizer button.
Again, when you're ready, tap the Tick icon. The scan will be saved into the My Docs file.
Extracting Text
CamScanner comes with an OCR feature. OCR stands for "optical character recognition" and is a way to extract text from a scanned image.
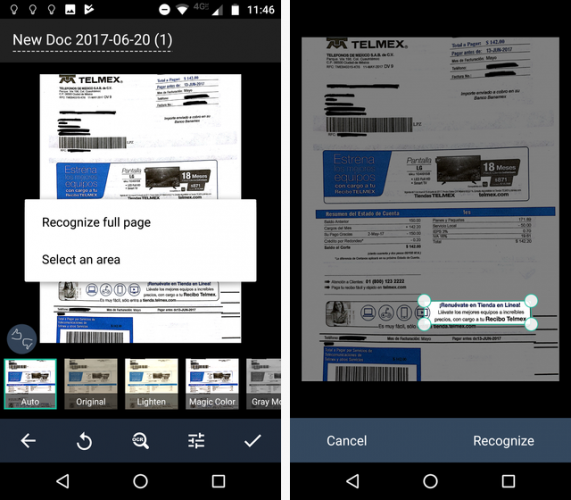
To use the OCR feature, follow all the above steps through to the part where you can add you own filters. This time, instead of clicking the Tick to complete the process, tap the OCR Magnifying Glass.
The app will ask you whether you want to scan the full document for text or just a specific area. Because of the nature of my document, I chose just to scan a small area. Tap Recognize to start the process.
The results of your scan will be shown on the screen. If you have the Premium version of the app, you can tap Edit to fix any errors.
(Warning: No OCR feature is 100 percent reliable. You should always proofread any OCR document before using it in a public setting.)
Post-Processing
Once a scan is saved in the My Docs file, you can perform some post-processing editing on it.
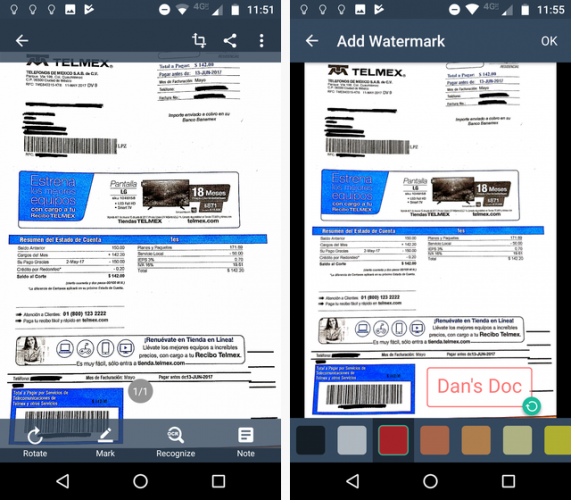
In the top right-hand corner, there are options to Crop, Share, and Rename the file. Along the bottom of the screen, you'll find an option to rotate your document, extract OCR text, and a way to add annotations and watermarks. To add notes, you'll need to install another one of the developer's apps called InNote.
Tap the Add a Watermark button, and you'll be able to add your own text in any color you want. Hold and drag the watermark to position it on the page. Hit OK when you've finished.
Lastly, you can attach notes to your file by tapping the Note icon in the bottom right-hand corner.
Alternatives
CamScanner is no longer the only player in town. There are lots of comparable apps, all of which function in a broadly similar way.
If you want to try something different, here are three apps you should try:
- Google Drive: You don't need a specialist scanner app anymore; Google has built the functionality directly into Google Drive. Just tap the + icon in the bottom right-hand corner and select Scan.
- Microsoft Office Lens: Office Lens is Microsoft's attempt to break into the world of scanner apps. Unlike CamScanner, you don't need to pay for the OCR feature. The app will save OCR text directly in OneNote or Word.
- Tiny Scanner: Tiny Scanner has almost identical functionality as CamScanner, but in testing, the image quality wasn't quite as good.
Which App Do You Use?
I've shown you how to use CamScanner to scan documents, as well as offering you some alternatives.
Now it's your turn to provide some input. Which app do you rely on when you need to snap a PDF of an image?
You can leave all your suggestions and recommendations in the comments below.


