Let’s RIOT! No, not that way. That way gets people injured – never good. I’m referring to the “radical” image optimization tool that is one of the best, if not the best tool for… well… optimizing images of course. You might be wondering, but I don’t “optimize” images and you could be very correct… right now.
But you will, especially after reading about Radical Image Optimization Tool, otherwise known as RIOT. What I mean is that we often don’t do something or notice a need simply because we never knew there was a solution for it and perhaps optimizing images might be one of those things you didn’t know there was an excellent, free program for.
First thing you need to know in order to understand the tasks that RIOT can accomplish for you is what falls under the category of “optimizing images.” The term “optimizing” makes the task sound quite technical, when in reality it’s things that not only all of us have the capability of doing, but also often want or need to do. These are tasks like resizing, compressing, rotating, flipping, zooming, and making adjustments on brightness, contrast, gamma and invert. There are other tasks that fall under this category as well, but those are some of the basics and are certainly in RIOT.
Now what what would you want in a program that does these things? Some nice benefits are features like batch support to handle several images at one time, the ability to save in several and the most popular formats, and dual view, allowing you to see the before and after of the image, before the changes are made permanently. These basic, but crucial features are all included in RIOT.
Starting The RIOT
You have a couple of ways you can use RIOT: as a standalone application or as a plugin in GIMP, IrfanView, XnView and several other supporting applications. The benefits of using the plugin over a standalone app is you get RIOT’s features integrated directly into the program that you already use all the time. No matter which direction you decide to go, either will satisfy you and both can be accessed via the same download page.
Also, if you’re interested in the newest and latest version of the program, you can try the “sneak preview” of version 0.5. Understand that this isn’t considered the “stable” version of RIOT, but is most likely safe to use. Nonetheless, if you prefer the safest version, download from the regular download link which has version 0.4.6, which is considered stable.

Aha! That’s where that came from! Ever wondered how that stupid toolbar got in your browser? The majority of the time it’s through programs which have sponsored applications within the installation process. In fact, not long ago I wondered how I got an AOL bar in my computer and as I did another install of RIOT (to check for things like this) I found the culprit. Somehow I overlooked this the first time, and I’m very keen on these sort of things. So I wanted to bring it to your attention that although RIOT is a great free program, do watch out for the AOL toolbar. Simply uncheck the top box and the bottom two will uncheck themselves, then click “Install.”
Do note that this doesn’t make RIOT a bad program, it simply allows it to remain free. Nonetheless, you don’t want stuff you don’t need on your computer and this is definitely something you don’t need. In addition, for more information and tips on keeping your computer clean check out the MakeUseOf article “A Simple Checklist To Safely Installing Free Software Without All The Junk.”
Jumping Into The RIOT
As I’ve previously mentioned already in the introduction of the article, RIOT has all the features you need in an image optimization application. That said, saying that doesn’t really help you find and use them all, so let’s briefly take a look at what makes RIOT so awesome.
A Simple, Clean Interface
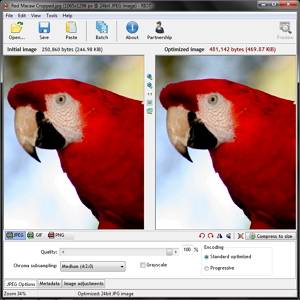
This isn’t necessarily a “feature,” but it certainly shouldn’t be ignored. All too often there are full-featured and otherwise excellent programs, but with hard-to-use interfaces, thus preventing the majority of users to really get the most out of the program or even use it. RIOT is different in that way. The creator has put a great amount of work into it to make it as simple and intuitive as possible. As you can see in the screenshot below, the options visible are very straightforward. But what you can’t see is what is under each menu, where each feature and option is aptly categorized. This, again, seems basic, but you’d be surprised how many programs get this wrong.

A Plethora Of Features
Referring to the image above, the five menu options are File, Edit, View, Tools and Help. The large icons under the menu options are Open, Save, Paste, Batch, About and Partnership. To the far right, there is a Preview button. The buttons are also nicely separated into specific categories by solid vertical lines. It might seem trivial, but it’s little things like this that improve an interface and make it just that much more user friendly. Then you have the two image panes. The one on the left is the initial image which you opened (or drag and dropped, or used the command line) and the right is the optimized image. In other words, it’s the image showing the changes you are making.
You will also notice buttons between the two image panes. These are easy to overlook – I did at first. The first two are zoom in and out buttons. The button below those two with “1:1” as the icon shows the image at the original size. The next button is used to fit the image back to the window so the whole image can be viewed again. The last button in the row is an in-place compare, which allows you to look at the image, click and hold it down to see the changes without needing to bounce back and forth between the two panes comparing the changes made.

On the bottom half you have many more options. Starting on the left of the bar directly under the image panes, there are options for image file types JPEG, GIF and PNG.


On the right side there are buttons to rotate either 90 degrees to the right and left, to flip horizontally and vertically, to resize and to compress to a specific size in kilobytes.
Finally there are three tabs in the bottom left corner. The first one is the Image type options label with either JPEG, GIF or PNG displayed. This is simply another visual feature to aid you in realizing the options are specific toward the different file types. The next tab is Metadata which enables you to remove certain information related to the image. What is available to be removed depends on the file type.

The last tab is Image adjustments which includes basic adjustments like Brightness, Contrast, Gamma and Invert (negative). You can also revert back to defaults by clicking the “Set defaults” button or apply the changes through the “Apply to initial image” button on the right.

Image File Types
Along with outputting to JPEG, GIF and PNG, RIOT supports many more input file types including bitmap, PSD (Adobe Photoshop), HDR, RAW, and a few rare and scientific types.
Highlights Of Version 0.5
You can read more about each of the highlights of version 0.5 on the website, but below is a short list of some of the major changes and additions.
- Automatic Optimization Mode
- superior PNG compression
- Enhanced transparency handling
- Progress monitoring
Again this is just a list of the new features. It’s quite impressive really. Also remember that this version is still under active development.
Some More Things To Make Note Of
Many of the features can be used through keyboard shortcuts, which you can learn by hovering over the icons with your cursor. By doing this you can also learn a bit more about what the different options can do.
Speaking of learning, the Help topics link, located under the Help menu, contains some incredible information about both the program, images and how to optimize them. I learned quite a bit about the program through the various help links and it’s a great resource.

The majority of the features accessed through buttons in the interface can also be accessed through the dropdown menus.
RIOT is portable. The standalone version can be run off a flash drive, portable hard drive, or any other portable device. I recommend using a program like PortableApps to quickly access it and any other portable programs you run.
Conclusion
Well what do you know, we made it through the RIOT alive! Wasn’t that hard right? I highly recommend trying it out. It’s excellent for optimizing images for the web or just for personal use. Try it and let us know what you think!
What do you use as an image optimization tool? Have you found success using RIOT? We’d love to hear your thoughts in the comments!