Would you write your password on a piece of paper and stick it to your forehead? Probably not. Yet connecting to a public Wi-Fi network is almost as foolish.
You might not have any choice, however, if you're on the road and want to stay connected. A VPN can keep you safe, but each device has to connect separately, unless you're using a travel router as a go-between.
Don't have one handy? Don't worry, you can build one with a Raspberry Pi. It's the perfect choice for a DIY VPN travel router, so let's walk you through how to build one.
What You'll Need
To get started building a Raspberry Pi VPN travel router, you'll need:
- Raspberry Pi (Pi 3 or Raspberry Pi Zero W preferred) with case
- A single USB Wi-Fi adapter (two, if you're using an older Raspberry Pi)
- A microSD card with at least 8GB storage
- An SD card reader
- A high-quality power supply
- PC with an SSH client installed
- A VPN subscription with OpenVPN support
It's possible to use Pi models without built in Wi-Fi , but you'll need two USB Wi-Fi adapters, or one capable of running in both managed/access point mode and client mode.
Instead of a standard Linux distribution, you'll need to install OpenWRT onto your SD card to turn it into a fully fledged router. You can use another Linux distro if you prefer, but OpenWRT provides a handy web interface for configuration when you're away from home.
If you're using Windows, you'll also need to install PuTTY or another SSH client for Windows before you get started.
Step 1: Install OpenWRT
First, download the OpenWRT firmware for your model of Raspberry Pi. You can find the most up-to-date images from the OpenWRT wiki.
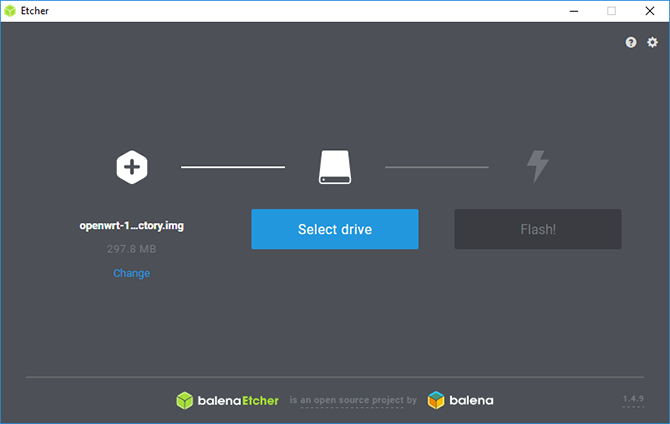
Unzip the downloaded file using 7zip or another suitable file archive manager, then flash the IMG file to your card with Etcher.
This tool should detect your SD card automatically; you just need to select your image file, select the correct drive by letter, and then click Flash.
Once it's done, place your microSD card back into your Raspberry Pi and let it boot.
Step 2: Initial Configuration
By default, OpenWRT defaults to a static IP address of 192.168.1.1, which is the default gateway IP for many routers. You'll need to change this to prevent conflicts. Connect your Pi to your PC using an Ethernet cable; you may need to set a static IP on your PC first.
Rather than handle the configuration using LuCI, OpenWRT's web interface, you're going to do it manually to ensure that the configuration is set correctly. Load up PuTTY or your SSH client and connect to 192.168.1.1 first, with the username root.
You'll get an initial security warning on your first connection; just click Yes and proceed. It's a good idea at this stage to set a password; do that by typing in
passwd
at the terminal window.
Configure the Network and Firewall Settings
You need to edit two files---
/etc/config/network
and
/etc/config/firewall
---before you can proceed any further. Start by typing the following to edit the file:
vim /etc/config/network
Next, tap I to edit the text and include the following:
        config interface 'loopback'
option ifname 'lo'
option proto 'static'
option ipaddr '127.0.0.1'
option netmask '255.0.0.0'

config interface 'lan'
option type 'bridge'
option ifname 'eth0'
option force_link '1'
option proto 'static'
option ipaddr '192.168.38.1'
option netmask '255.255.255.0'
option ip6assign '60'

config interface 'wwan'
option proto 'dhcp'
option peerdns '0'
option dns '8.8.8.8 8.8.4.4' ## Google DNS servers

config interface 'vpnclient'
option ifname 'tun0'
option proto 'none'
Once you're done, hit the Esc key and type
:wq
to save and quit. Then switch attention to the firewall config file:
vim /etc/config/firewall
Tap I to edit, then find (or add) a zone for the WAN section, which should look like this:
        config zone
option name wan
option network 'wan wan6 wwan'
option input ACCEPT
option output ACCEPT
option forward REJECT
option masq 1
option mtu_fix 1
Type reboot and wait as the Raspberry Pi reboots with a new IP address: 192.168.38.1.
Step 3: Update and Install Packages
Next, you'll need to update OpenWRT. To do that, you're going to borrow the Pi's internal Wi-Fi and set it initially to connect to your existing Wi-Fi network. You may need to change your static IP address to 192.168.38.2 or a similar address in that range to allow you to connect.
Once connected, type the IP address of your Raspberry Pi into your browser to access the OpenWRT admin dashboard. Use your username and password to gain access, then go to Network > Wireless. You should only see one Wi-Fi device at present, so click Scan to find your Wi-Fi network, then Join Network when you find it.
You'll need to enter your Wi-Fi password under WPA Passphrase, before hitting Submit.
You should now see the connection settings for your Wi-Fi connection. Go to Advanced Settings and set your Country Code to match your location; your Wi-Fi might not work otherwise.
Reconnect to your Pi using new IP address over SSH (accepting the RSA security key warning). You'll need to update your device first by typing:
opkg update
Keep an eye on this, tapping Y when prompted.
Installing the USB Wi-Fi Drivers
Once you've installed all the updates install any drivers you need for your USB Wi-Fi adapter. This is required to connect to Wi-Fi hotspots when you're on the go. You'll also be installing the tools you'll need for VPN connections using OpenVPN, as well as nano, an easier-to-use terminal file editor.
This is where your method may vary; I had a RT2870 chipset Wi-Fi adapter, so the following commands should work if you do, too:
        opkg install kmod-rt2800-lib kmod-rt2800-usb kmod-rt2x00-lib kmod-rt2x00-usb kmod-usb-core kmod-usb-uhci kmod-usb-ohci kmod-usb2 usbutils openvpn-openssl luci-app-openvpn nano
ifconfig wlan1 up
reboot
If you don't have an RT2870 chipset Wi-Fi adapter, or you're unsure, plug in your Wi-Fi adapter and type the following into the SSH terminal:
        opkg install kmod-usb-core kmod-usb-uhci kmod-usb-ohci kmod-usb2 usbutils
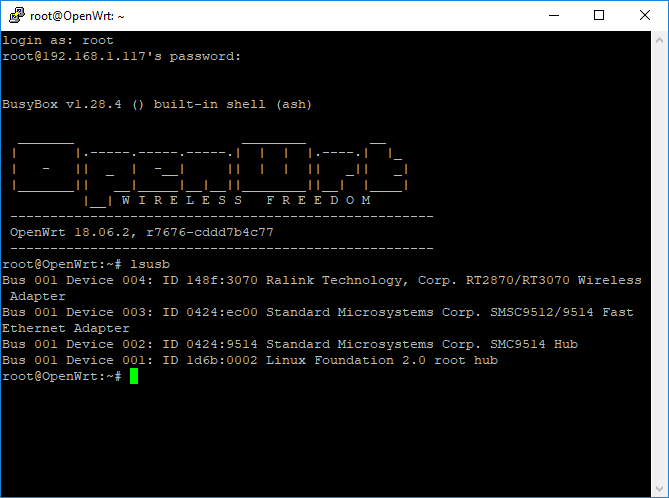
lsusb
Once the files have installed, you'll see a list of connected devices. Find any that refer to a wireless adapter, and search for the relevant installation instructions for your device.
Step 4: Set Up Wi-Fi Access Point
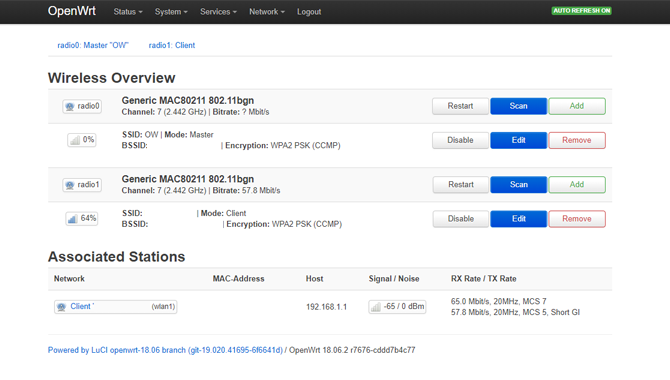
If your USB Wi-Fi adapter is connected, you can now set up both Wi-Fi connections. Return to the LuCI dashboard, under Wireless, and remove both network connections. The device radio0 is your in-built Wi-Fi, while radio1 is your USB Wi-Fi adapter.
Set up your in-built Wi-Fi by clicking Add. Ensure the following:
- Mode is set to Access Point
- ESSID is set to a network name of your choosing; default is OpenWRT
- Network is set to lan
- Under Wireless Security, Encryption is set to WPA2-PSK
- Key is set to a suitable password
Once you're done, hit Save then return to the Wireless menu. Follow the instructions from earlier for the initial connection to set the radio1 device (your USB Wi-Fi adapter) to your existing network. This is also where you'll need to scan and change networks when you're in a new location.
You should now have two Wi-Fi connections running, one as an access point for your Wi-Fi devices, and one acting as the internet connection for your device to your existing Wi-Fi network. Try out the connection to your Pi at this stage with your smartphone or laptop to confirm it works.
If it works, disconnect your Pi from the Ethernet connection with your PC.
Step 5: Connect to VPN and Final Changes
You will need an OpenVPN configuration file (OVPN) to connect your Pi to your chosen VPN provider and server. If you have one, upload it to your Pi using an SCP client like WinSCP where you can connect with your admin username and password.
Rename the file to vpnclient.ovpn and upload it into the
/etc/openvpn
folder. Complete the instructions found on the OpenWRT website to set your Pi up for VPN connections. The only slight change will be under section 4 for the VPN client profile setup, where you won't need to use the initial
cat
tool to insert your vpnclient.ovpn file, as it's already in place.
As soon as you complete this, your VPN connection should activate automatically. Check your outgoing IP address has changed; if it hasn't, reboot your Pi and check your connection is active.
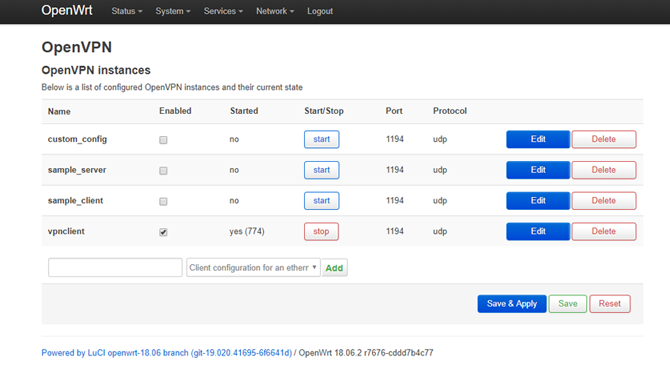
Find this by going to the OpenVPN section of LuCI, listed under Services at the top of the dashboard. If it's connected, vpnclient will be listed as yes under the Started column.
Step 6: Register Your Device on Public Wi-Fi
Your Pi is nearly ready at this stage, but if you've ever connected to a public Wi-Fi network, you'll know that you'll typically need to authenticate using a captive portal, either to pay or register your device. Because your Pi is now set up to automatically connect via VPN (and should prevent connection otherwise), these portals will usually get blocked.
To get around this, set your USB Wi-Fi adapter to match the MAC address with a device that you can use to connect and authenticate with a public Wi-Fi network first, such as your smartphone. Once you have this, type:
nano /etc/init.d/wan-changer
In the editing window, add the following (replacing the placeholder XX for your MAC) and hit Ctrl + X, followed by Y to save.
        #!/bin/sh /etc/rc.common

START=10

start() {
 uci set wireless.@wifi-iface[1].macaddr='XX:XX:XX:XX:XX:XX'
 uci commit network
}
Finally, run the following commands to set the script to run automatically when your Pi starts:
        chmod +x /etc/init.d/wan-changer
/etc/init.d/wan-changer enable
Reboot to check everything works okay. You should also check for any DNS leaks to make sure your VPN connection is working correctly. Most VPN providers offer a tool that will help with this.
Secure Wi-Fi Wherever You Go, Guaranteed
Your Raspberry Pi should now be set up and ready to go as a VPN travel router, meaning you're safe to surf in any hotel or cafe you visit. Thanks to the LuCI dashboard, you can connect to any new Wi-Fi network with ease through your web browser.
See our list of the best VPN services to find a VPN service that suits your needs. If this was too advanced for you, you might also consider other ways to set up a VPN at home.


