Queries are the basis of power in a database. They give you the ability to ask questions, record the questions for later, and to take actions on the answers.
As a follow-up to my introductory summary post on the product, and a more recent post on tables, this Microsoft Access tutorial is the ideal next step in your journey with Access. Get ready to ask questions.
Preparation
We created two tables in the previous post. You'll need to either do that for yourself again, open the one you saved last time, or follow along with a similar example of your own.
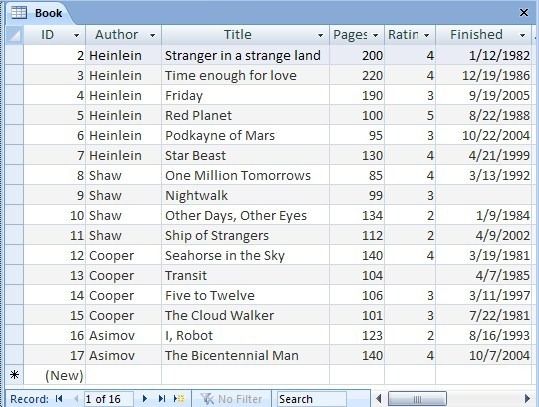
In any case, you need a table that looks a little like this"¦
Close the table, and we can start with the queries.
A Microsoft Access Tutorial - Query Basics
Queries are the second structure in Access. Tables hold the information, queries contain stored questions. Let's create one. It's much easier that way.
Click the Create tab, and then the Query Design button at the right hand end.
If you ever need help in building a query, you can also use the Query Wizard. But for now, we'll take the direct route.
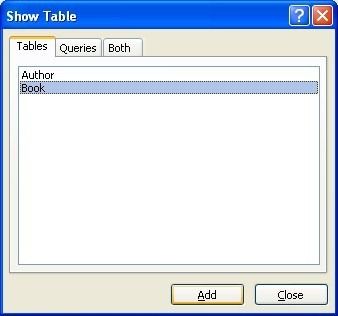
Access asks you which tables you want to ask questions about. First off, let's just take a look at the Book table. We can add the Author table later.
The real power in Access is the ability to easily deal with multiple tables at once, but one step at a time.
Click on Book, and click the Add button. The window stays open, so click the Close button.
Access presents you with the query design page.
You can make some adjustments to the way the layout looks by dragging the central divider up or down, and there are shortcuts at the bottom right, in the status bar, that let you change the type of view you are using. More about those later.
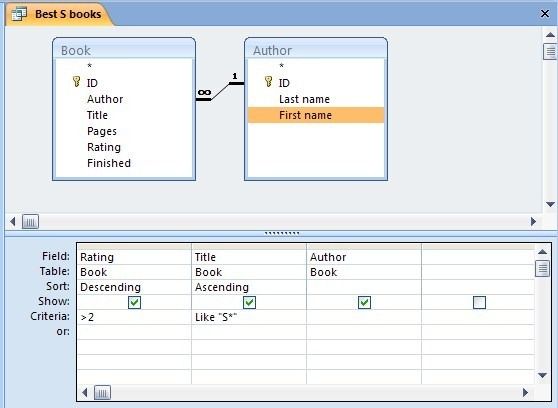
The upper portion of the screen contains all of the included tables, with a list of the fields. The lower portion is where the questions are asked.
First, you need to choose which of the fields in the table you want to either ask questions about, or wish to include in the answer. To choose, double-click the field, or drag it to the grid below.
For our example we want to choose Author, Title & Rating.
Once you have the fields in the grid, there are a lot of choices to make. They work line by line.
We have already chosen the fields, and the tables are added automatically. The next thing is the sort. To sort the books by rating for instance, click in the sort box for that column, and change the setting to Ascending or Descending.
You can sort by multiple columns. The priority is from left to right, so if you wanted to sort by Rating and then Title, you would need to rearrange the columns. You can just select by the grey bar at the top and drag them around.
The Criteria row is a little more complex, but it's very easy to use once you get used to it. Criteria are specifications for which records (rows) from the table to show. And for the technical types reading, these are generally what is known as AND criteria. That is, all of the criteria need to be met. If instead you wish to use OR critera (that means that any of the criteria can bet met) then put the criteria on different rows. You can use as many rows as you wish from the one labelled Criteria downwards.
In our case, we want to only see books where the Title starts with "˜S', and the rating is better than 2. The "˜S' criteria also includes what is known as a wild card. That is, the title needs to start the letter S, but anything at all is permitted after that.
Numeric criteria are allowed to be defined as limits, rather than specific values, so in the case we can use the "˜>' operator.
We could spend the whole day talking about criteria and wildcards, but let's move on.
Now that the we have defined the question we wish to ask, we can pose it to Access, and view the answer. Click the View button in the ribbon or the datasheet view button in the status bar. You can flick back and forth between design and datasheet to make further changes to the query.
It's important to note that as a general rule, the datasheet view from a query is live. That is, if you make changes to the query results then you make changes to the table data.
Finally, you can save the query for later. There is some confusion with this at times. Saving the query saves the question, not the answer. So that means that next time you run the query, if the data in the table has changed, then the answer might also change. There some other options to grab a snapshot of the data later on if necessary.
Click the Save button in the quick toolbar at the top left of the Access window. Remember that queries are saved along with the tables inside the one Access file on your hard drive.
You often need to connect tables together in queries. For instance in this case, we could add the Author table so that we can make use of the information in it for sorting or further criteria.
As it happens, the lookup that we set up for the Author table means that we already have access to the Author's last name, but let's just pretend we wanted to sort the output by the author's first name instead. After all, these guys (or at least the few who are still alive) are friendly enough. Let's call them Isaac and Robert, right? Oh, hold on. Those two are dead.
To make this work, add the Author table to the query.
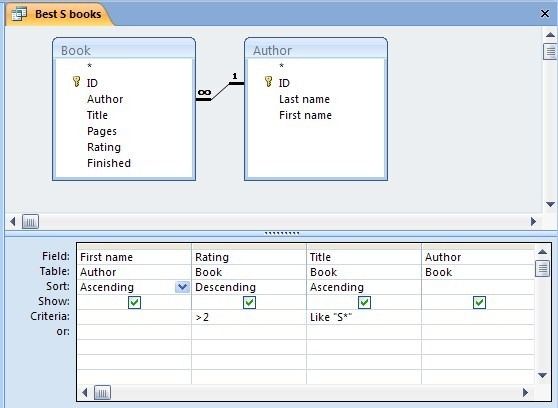
While in Design View, click the Show Table button and add the Author table to the grid.
Because of the lookup that was set up, Access already knows how the tables are related, so you don't need to worry about that. Drag the First Name field down into the criteria block, then drag it off to the left so you can sort it as a priority.
Click the Datasheet View button to see the difference.
A Microsoft Access Tutorial on Query types
The query we just built, the default type in Access, is called a Select query. It's essentially a view of the answer to a question. The other types do a number of specific things that might be useful later. I won't go into too much detail here, but some pointers might help.
Most of these other queries are what is known as Action queries. That is because they actually change data in tables. No changes are made until you click the Run button (the Datasheet view only previews the results) and you will be warned that changes are about to be made.
Update
An update query is used to make changes to the table data in one hit, rather than dealing with the records one by one. For instance, perhaps an author might change his name, or admit to having written a stack of books under a nom-de-plume. An update query would let you select the appropriate records and then change them all at once.
Make Table
A Make Table query works the same way as an Update, but puts the results in a new table. This might be useful where for some reason you need to maintain both sets of data separately.
Append
An Append query lets you select records from one table and add them to the end of another. The most common use for this is for archiving records from a main table to a secondary one.
Delete
A Delete query is extremely useful, but care needs to be taken with using it. This query lets you select some records from a table, and then delete them.
Other
The other types of query (Union, Cross-tab, Pass-through and Data Definition) are for advanced use, and I won't cover these here.
That's it for now, until I'm back with a post on Access Forms.
Let me know how it goes with queries, and whether there are any difficulties I can help with in the comments.


