Last time, you might have been fortunate enough to stumble over my introductory post for Microsoft Access 2007, and then get frustrated because it doesn't actually show you how to do anything.
This is the place to get the cure. I'm going to provide a Microsoft Access tutorial on how to create and use tables. I'll be following that up with posts on queries, forms, reports and automation.
We need to make some assumptions in order for this to be short enough to fit in a single post. First off, you already know how to use a spreadsheet. probably Excel, but it really doesn't matter. Secondly, you can relax a little even if you have a different version of Access. You might need to hunt around for a few things, but mostly it's all the same.
Just to get the ball rolling, take a look at this spreadsheet.
That's a pretty typical list of items in Excel. Imagine for a moment that this list had a few thousand rows instead of just the ones you can view here, and you might see that this isn't necessarily the most practical way to deal with this sort of data.
Hopefully you'll have some data of your own that you can experiment with. A practical example is always easier.
In Access, this same information would be stored in tables, but before we can do that, we need to make sure that things are thoroughly consistent. That's one of the things about databases. It's much harder to deal with inconsistencies than it is in a spreadsheet.
There are a couple of examples of things in here that you would need to fix. For starters, you really ought to read some of these books, but that won't help. Every column in Access needs to be consistent. You can't start putting dates, like we have here in the Finished column, and then put the word "˜Never' in one of the cells. Same problem with the "˜x' in the Rating column. Fix it first. Note that in most cases having the cells blank is just fine.
Okay, let's start Access, and start making decisions. Two specific things before you can get started with tables.
First, choose to create a blank database rather than using any of the pre-built templates. Come back and check those out later for more examples.
Secondly, you need to choose a name for your Access project at the beginning. You can't go ahead and do things like you can with the other Office products.
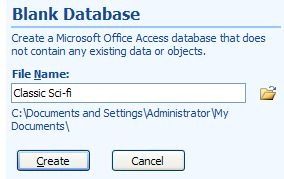
So click on Blank Database, give the file a name, and click on Create.
Access tries to help out as much as possible by creating a default table, and setting it up ready to use. In our case though, we don't want to do that. We want to design the table properly.
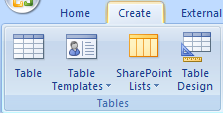
The best way to get there is to click on the X at the top right to close the table, click the Create tab in the ribbon, and then click on Table Design. If you get lost, close Access down without saving anything, and then try again.
Here's the thing to remember. You need to know what you want to do first, design the table to do that, and then add the data. It's cumbersome to change your mind afterwards.
Our main job here is to decide on the fields we want to store in the table, and what sorts of information we want to store in each one. If you're using my example, fill things out so they look like this.
Before we can move on from here, there's one thing that can be a little complex, but you need to understand. Access is a relational database. The relational part means that you can deal with multiple tables at once, and the relationships between them.
One of the aims of relational databases is to minimise both repetition and wasted space. I'm not going to go into the theory, but this is called normalisation. There are many other places to research the topic. I'm just going to be practical and show you an example.
Notice that each of the classic sci-fi authors is mentioned a number of times in the spreadsheet. To achieve the same thing in Access, we create another table especially for the authors, and then relate the new table. That way each author only exists once, and the opportunity for errors is greatly reduced.
For the moment, accept my request that you create the author field as a Number.
Save the table. The quickest way is to click on the Save button in the toolbar. That might not be the easiest thing to find.
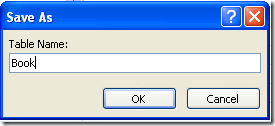
You'll be asked for a name for the table. Book might be a simple option. Another note. The table names are not file names. They are just components in the database called Classic Sci-fi. Think of multiple sheets in an Excel workbook.
But"¦ before Access will let you save the table, there's another thing you need to do. Just take my word for this one. In almost every case, a table in Access needs to have a field somewhere in it that is guaranteed to have a different value on every row. I mean every row, so you couldn't make use of the Pages field for instance, because eventually you'd be bound to end up with two books with the same number of pages. The easiest way to do this is to add another field just for the job. That's normally referred to as the ID field.
So, click Yes on the crazy dialog box which is too wide to show effectively in the post"¦
"¦.and a new field is added to the table. The field type is Autonumber, which means that a new value is automatically added for each row that you add to the table. Don't worry about it. It just happens.
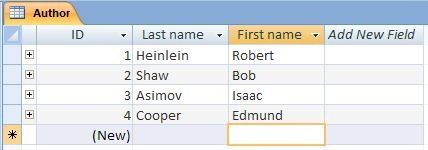
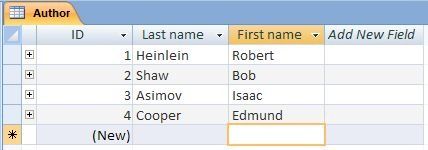
Now go ahead and save the table again, and close it. When you've done that, run through the process again to create an Author table that looks like this. Same deal with the ID field. Just let it be created.
Before we can start using the tables, we need to relate them to each other.
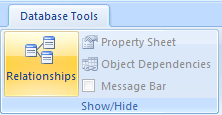
Click on the Database Tools tab, and then click the Relationships button.
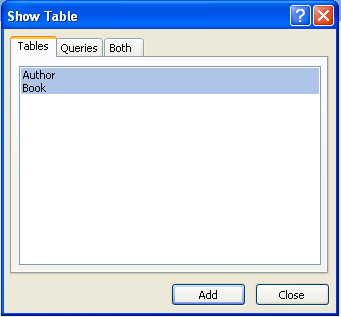
Add both of the tables using the Show Tables dialog.
Close the dialog when you've finished, and take a break for a moment. Let me explain.
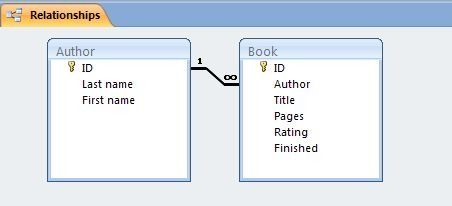
Tables in Access generally relate in special ways. The most common of these is what is called a many to one relationship.
In our case, for each author there can be many books. To create this relationship, click on ID in the Author table, and drag it to the Author field in the Book table.
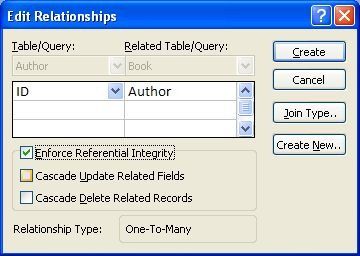
Access asks you for some details for the relationship. The only change you need to make is to tick the Enforce Referential Integrity box. Then click on Create.
Close the relationships window, and save the changes.
Another thing that helps make it easier to use the Book table. What actually gets saved in the Author field is the ID of the author from the Author table, but that's a bit difficult to make use of, because you'd have to go and look up the other table to check on the correct value. So we're going to set things up so that it looks up the author name all by itself.
Sensibly enough, this is called a lookup.
First, open the Author table and add some information.
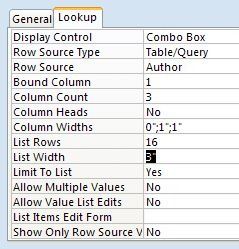
Open the Book table again by double-clicking on its name. Click the Design button. Click on the Author field, and then on the Lookup tab down below the field list.
Fill out the fields as noted. You're going to need a more in-depth tutorial to explore the reasons for the settings, but this will suffice for now.
Close the table, save it, and reopen it in the Datasheet view again.
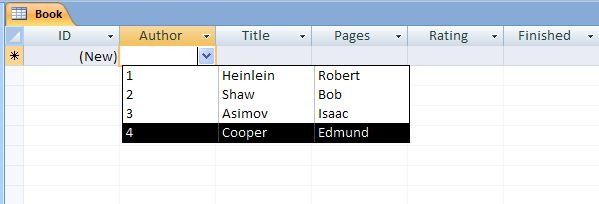
Move to the Author field, and you'll see a combo box appear. Click the arrow, and you'll see a list of authors. Click the correct one, and move on. Go ahead and fill out the rest of the records.
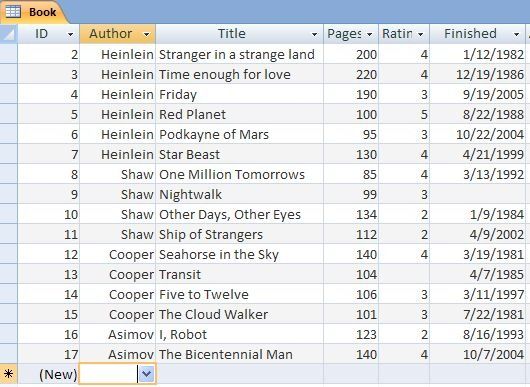
And that's it. You've successfully replicated the spreadsheet you had at the start, and now you can use it to build queries, forms and reports which are much more comprehensive than anything Excel can manage.
More on that in the next few posts.
So, how did it go? Let me know how much fun you had with this Microsoft Access tutorial. Oh, and have you read any of the books? Let me know in the comments.

