Excel is a fantastically useful spreadsheet program, but there's nothing worse than creating a perfect spreadsheet and printing it only to see it come out on nine sheets of paper, including a single row on the last one. What good is a beautifully crafted spreadsheet if it looks terrible on paper?
Fortunately, you can tweak your spreadsheet and the program settings to get everything on one page, and to make that page look as good as possible. If your spreadsheet is just too big for a single page, you can use these settings to distribute it over a number of pages more agreeably.
Preview Before You Print
This is an important step—you can head off a lot of problems before you print if you just know about them. If you print and then check to see how well it worked, you might end up wasting a lot of paper trying to get that last row or column onto the paper.
Depending on your version of Excel, you might have to click File > Print Preview, File > Print > Print Preview, or just File > Print to see what your spreadsheet will look like when it comes out of the printer. If it looks good, go ahead and print. If not, try some of the strategies listed below.
Use the Page Layout View
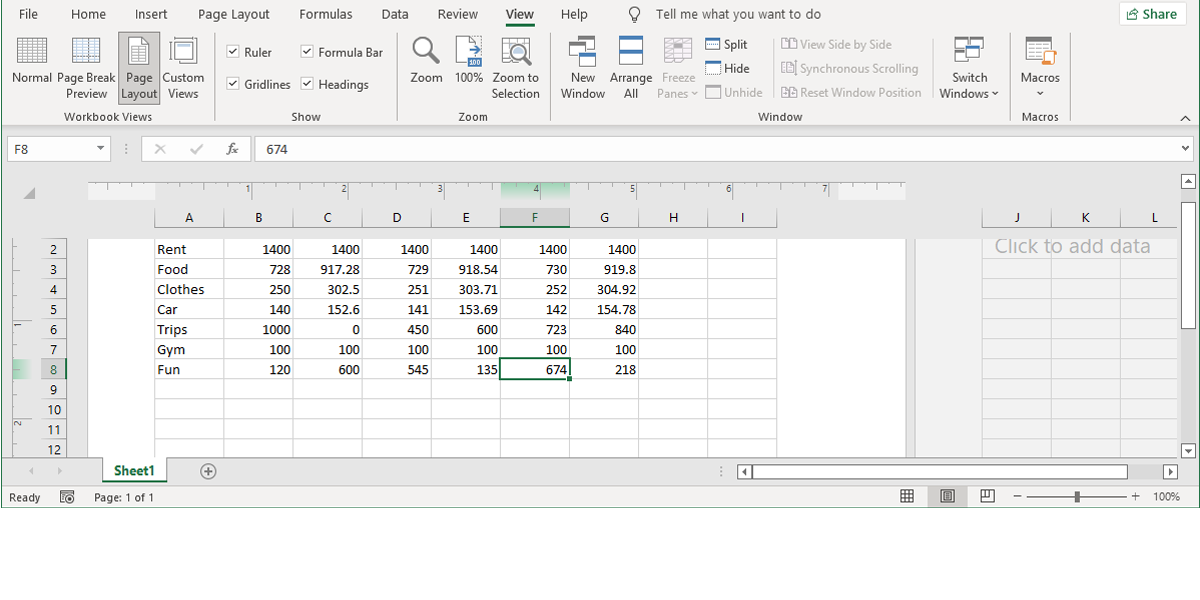
The page layout view will show you how your document will print while you're working on it. It's not a great view for working on your spreadsheet, but it can help you make adjustments to ensure that your columns and rows make the most of the space that you have. To activate the view, go to View > Page Layout.
Now you'll see your spreadsheet as it would be printed. Making adjustments using the tools listed below while in this view will give you a better idea of whether or not they've worked well. (This same functionality is available in Word, and can help you create professional-looking documents there, too.)
Change the Page Orientation
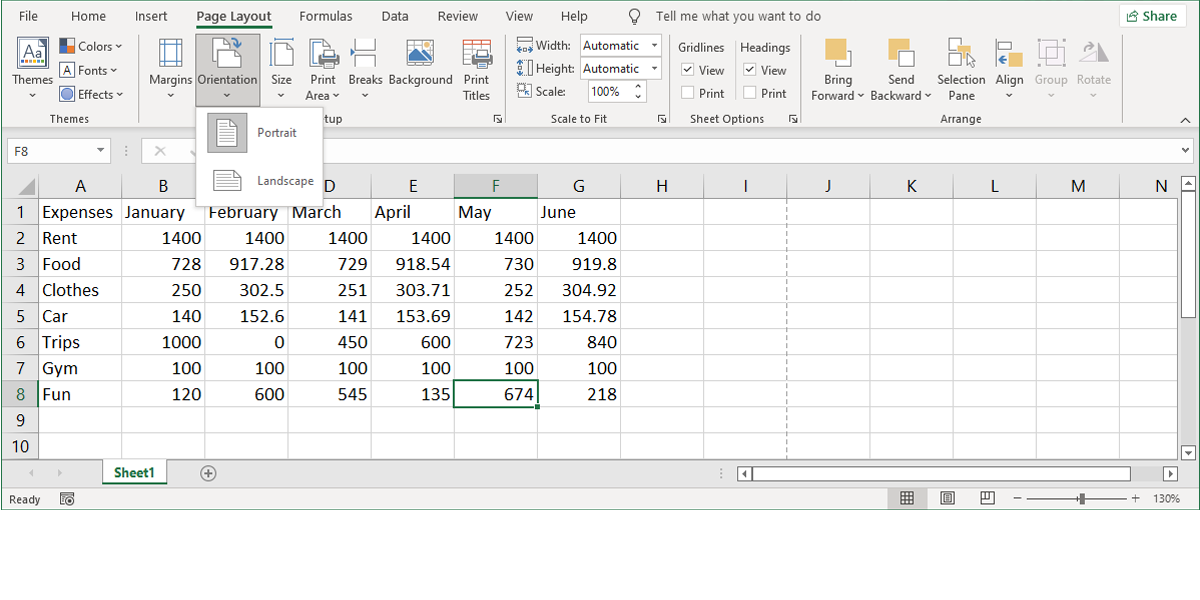
If your spreadsheet is wider than it is tall, a horizontal orientation will help you fit more of it on a page. A taller spreadsheet will likely benefit from a vertical orientation. To choose which orientation your spreadsheet uses, open the Page Layout tab, click Orientation, and select Portrait or Landscape.
On Mac, open the Page Setup menu and choose Portrait or Landscape under the Page tab.
Delete or Hide Rows or Columns
In large spreadsheets, there are often rows or columns that are redundant, contain old information, or just don't need to be printed in a particular situation. These rows and columns take up valuable real estate on the page and can make it much more difficult to get your spreadsheet to fit nicely.
If you can delete some of that data, just use the familiar highlight > Edit > Delete sequence to get rid of them.
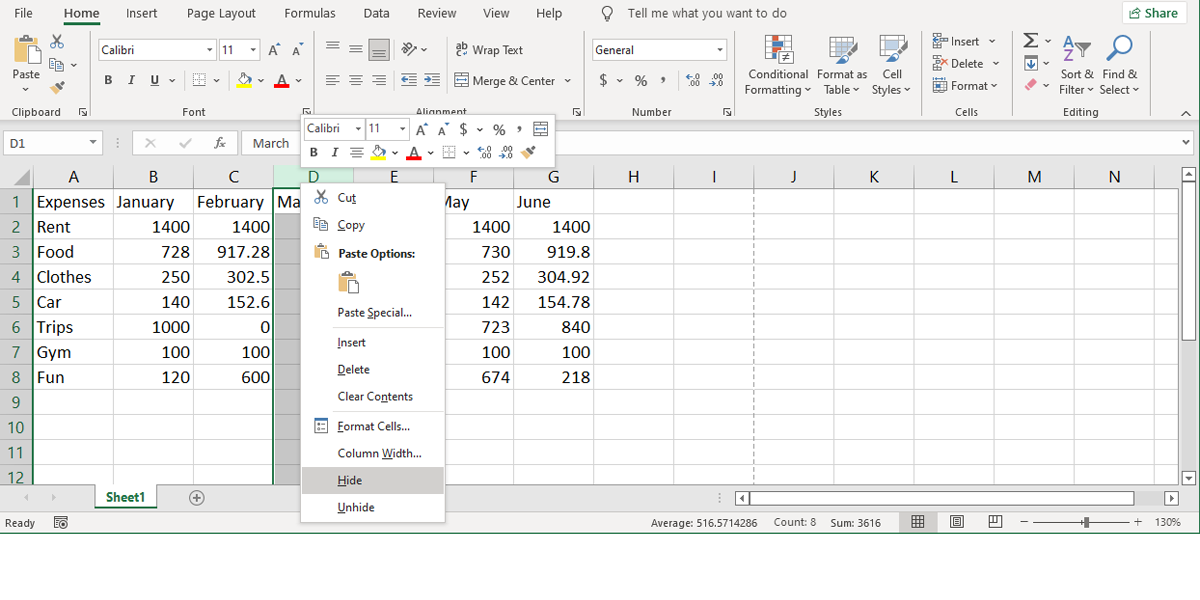
If they contain information that you think you might need again sometime later, you can hide them by right-clicking on the row or column header and selecting Hide. To see the data again, highlight the rows or columns on either side of the hidden data, right-click on the label, and select Unhide.
Use Page Breaks
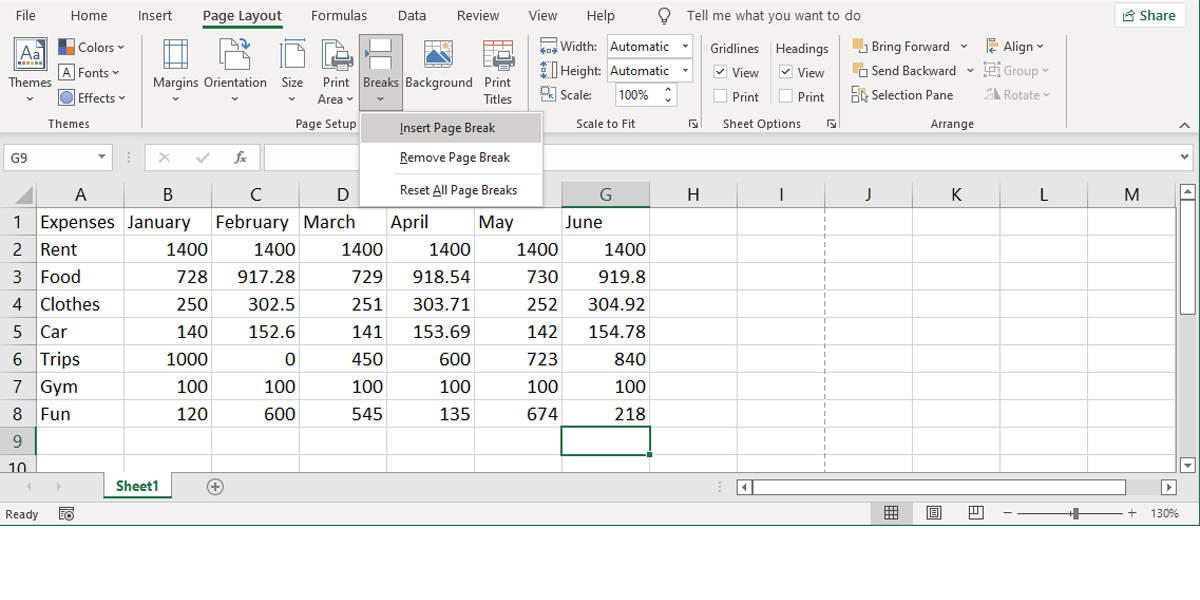
Just like in your favorite word processing program, you can insert page breaks to make sure that your spreadsheet is split between multiple pages where you want it to be, instead of where Excel decides it's convenient.
Select the Page Layout tab. Go to Breaks > Insert page break to tell Excel where to split your document. On a Mac computer, use Insert > Page Break
Change the Print Area
If your spreadsheet has a huge amount of data, and you only need to print some of it, you can print just the part of the spreadsheet that you select.
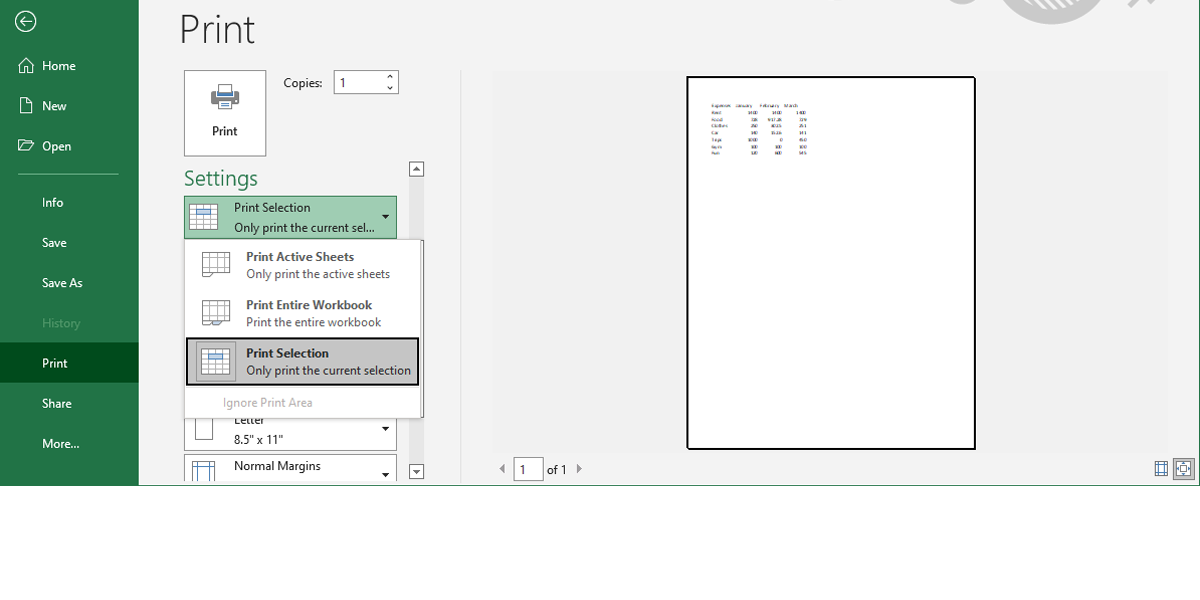
Select the cells that you want to print and click File > Print. Below Settings, click Print Active Sheets and change it to Print Selection. Additionally, if you want to print only the cells containing data, select Print Active Sheets.
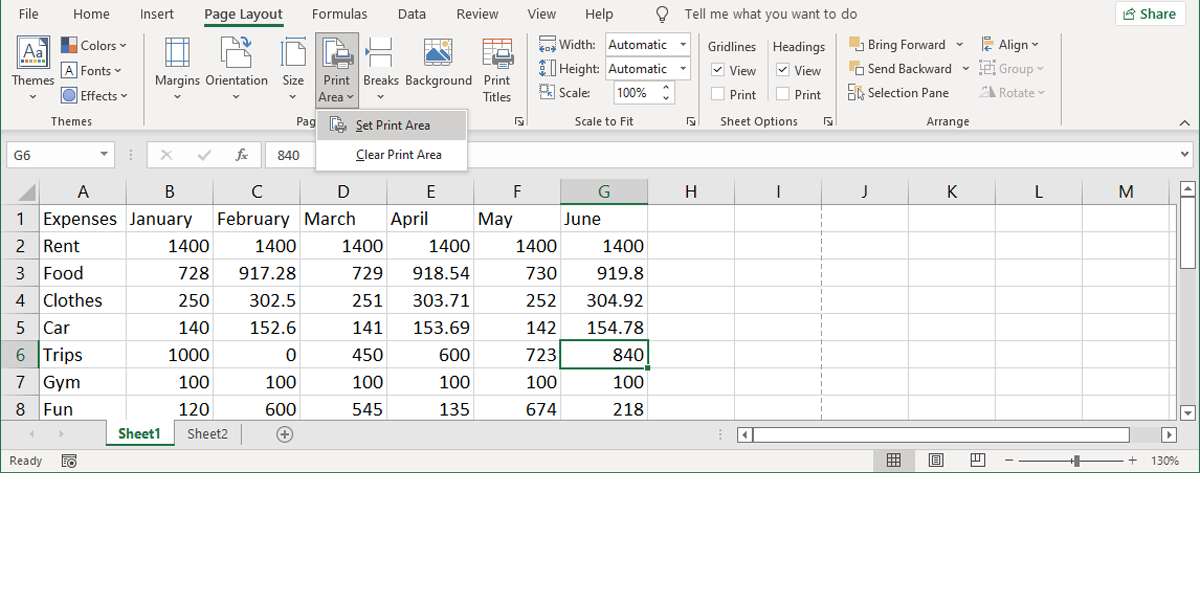
If you tend to print the same selection on a regular basis, you can set a permanent print area that encompasses just that section, so you don't have to select it each time. To do this, select the area you print frequently, then go to Page layout and click Print Area > Set Print Area. To remove the set area, open the Print Area menu and click Clear Print Area.
On Mac, the process is quite similar. To print only a part of the spreadsheet, select the cells that you want to print and click Print. Change the Print What: option to Selection, and the preview will update to contain only the data that you've selected.
To use the Print Area option, go to File > Print Area > Set Print Area. Now this selection will become the standard print area for your spreadsheet. To get rid of that setting, use File > Print Area > Clear Print Area.
Change Page Margins
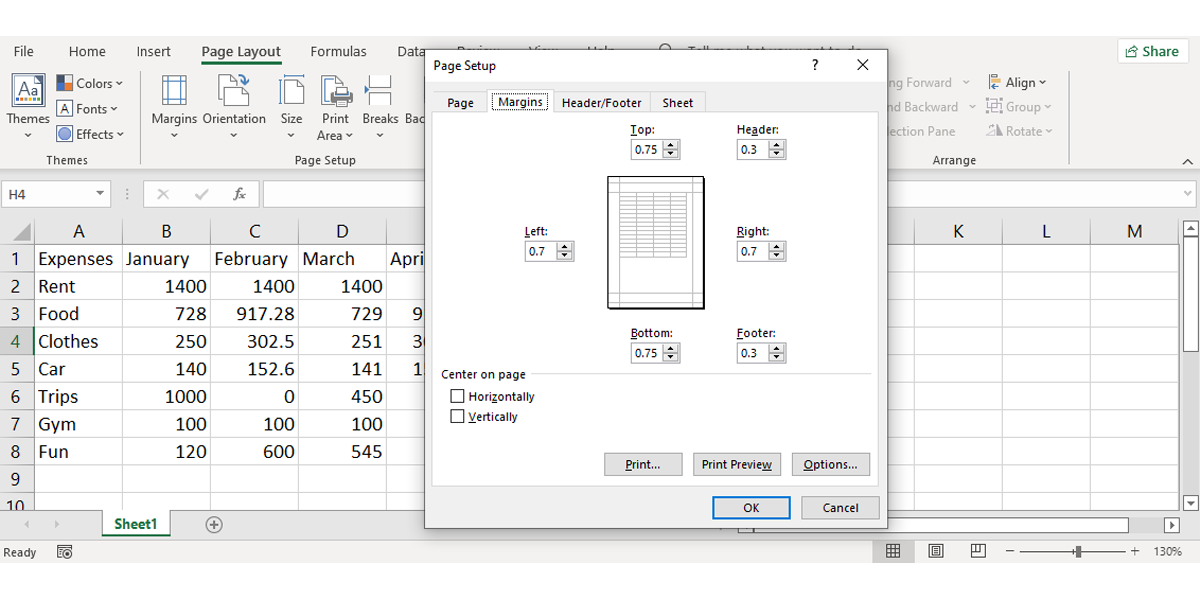
If you need just a little more room to fit your spreadsheet on a page, adding some extra space to the margins of the page can solve your problem. Select the Page Layout tab and go to Margins > Custom Margins and edit the margins values.
On Mac, you can access the Page Setup dialog either from File > Page Setup or with the Page Setup button in the Print dialog. Add a fraction of an inch to each margin and check the print preview again.
It's easy to go overboard with adding room in the margins to fit as much as possible on a page. However, remember that text running all the way to edge of a piece of paper is not only aesthetically unpleasing, but can also be hard to read. Be judicious with this one!
Wrap Text and Resize Columns
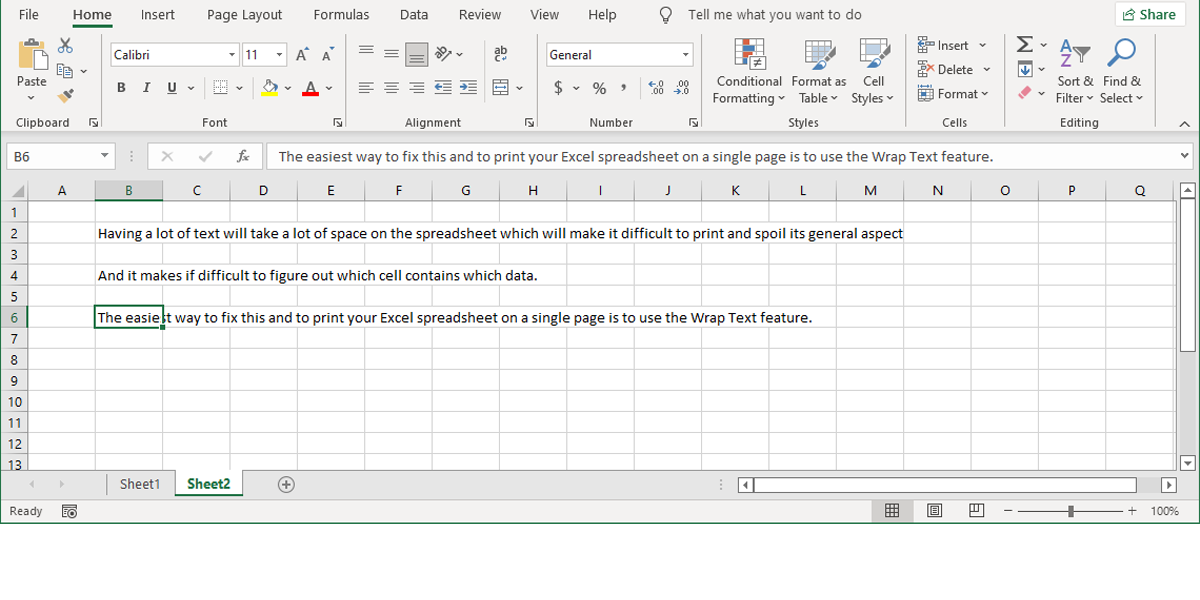
Excel is usually used for numerical data, but it can be really useful for text as well. If you have a lot of text in your cells, they can really stretch out your spreadsheet and make it difficult to fit it on one page, or even on multiple pages; you might end up with a weird printing scheme that makes your document look like this:
Some of the text is cut off, and the cells that aren't cut off run way too far to the right. To limit the width of your spreadsheet to the width of a single page, you can limit the width of your columns and use text wrapping to make sure that you don't lose any of the data that you want printed.
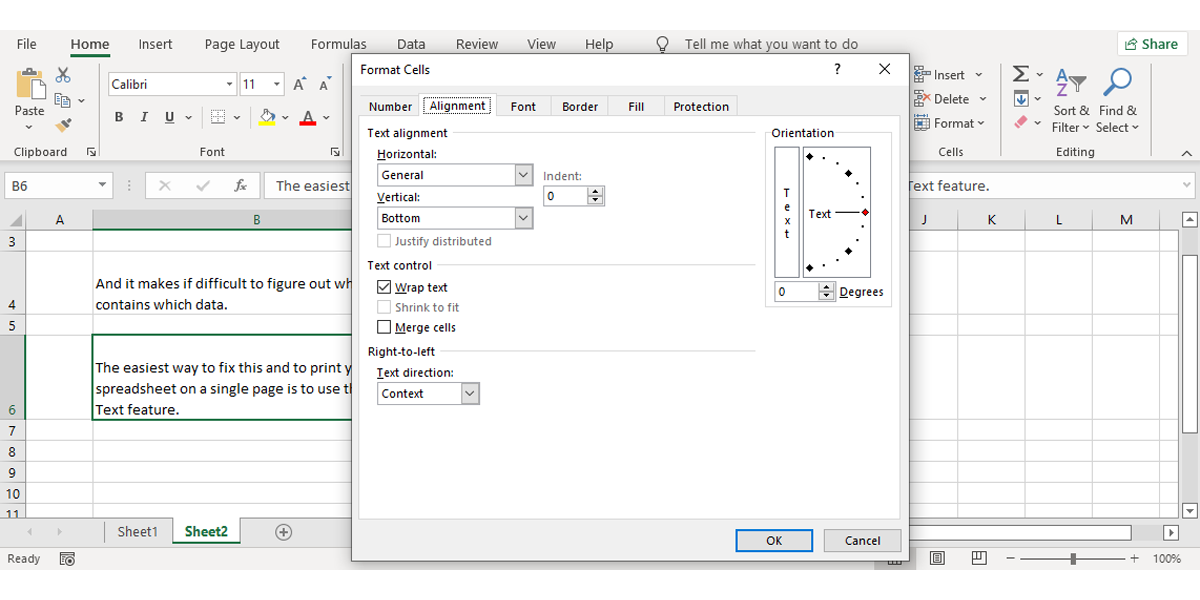
In the Home tab, go to Format > Format Cells > Alignment and select the Wrap text option.
On Mac, head to Format > Cells > Alignment and enable Wrap text.
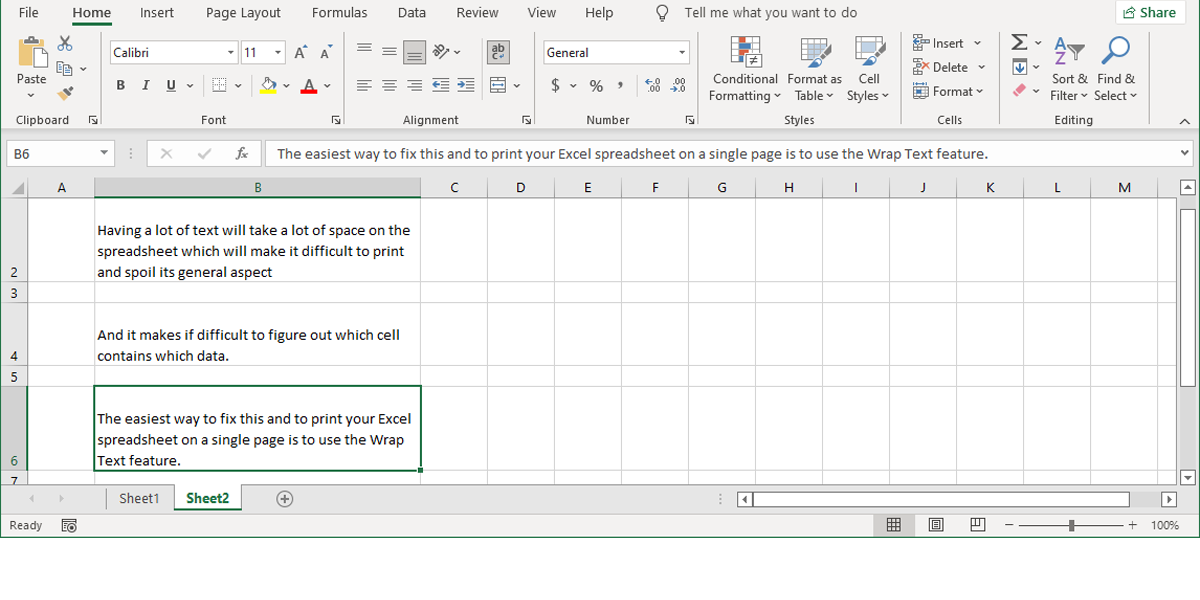
Now, when the text in a cell is wider than the column width, the text will wrap down to the next line. From here, you can adjust the widths of your columns by dragging the edge of a row or column header to resize it.
You can also double-click on the row or column labels to automatically make them as wide as necessary, as shown in the video below. To make sure that your columns fit on a page like you want them to, use the page layout view mentioned above.
Scale Your Spreadsheet
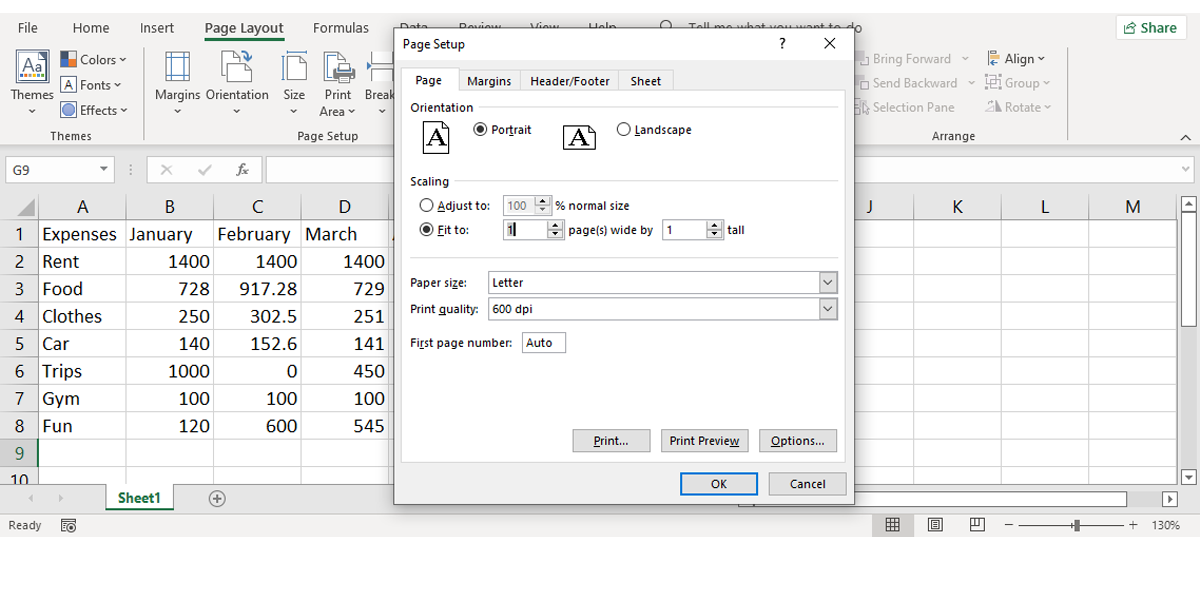
If nothing else has done the job, you can scale your spreadsheet so that it fits onto a single page (or a certain number of pages).
In Page Setup, click the radio button next to Fit to: and choose the number of pages that you'd like your spreadsheet to print on.
Selecting a smaller number of “wide” pages will scale the document horizontally, and selecting a smaller number of "tall" pages will scale it vertically. You can also select a percentage scale.
Using the scaling option can help limit the size of your document when it's put on paper, but it can also make your text very small and difficult to read. Do check the preview and make sure that you're not scaling so far that it's impossible to read any of your data. Scaling is really useful when you're trying to print Excel charts, too.
Making Your Printout Easier to Read
Once you've managed to get your spreadsheet on an acceptable number of pages, go a step further and make it as easy to read as possible. By tweaking a few other print settings, you can optimize the look of your printout. Here are a couple you should know about.
Printing Gridlines and Row or Column Headings
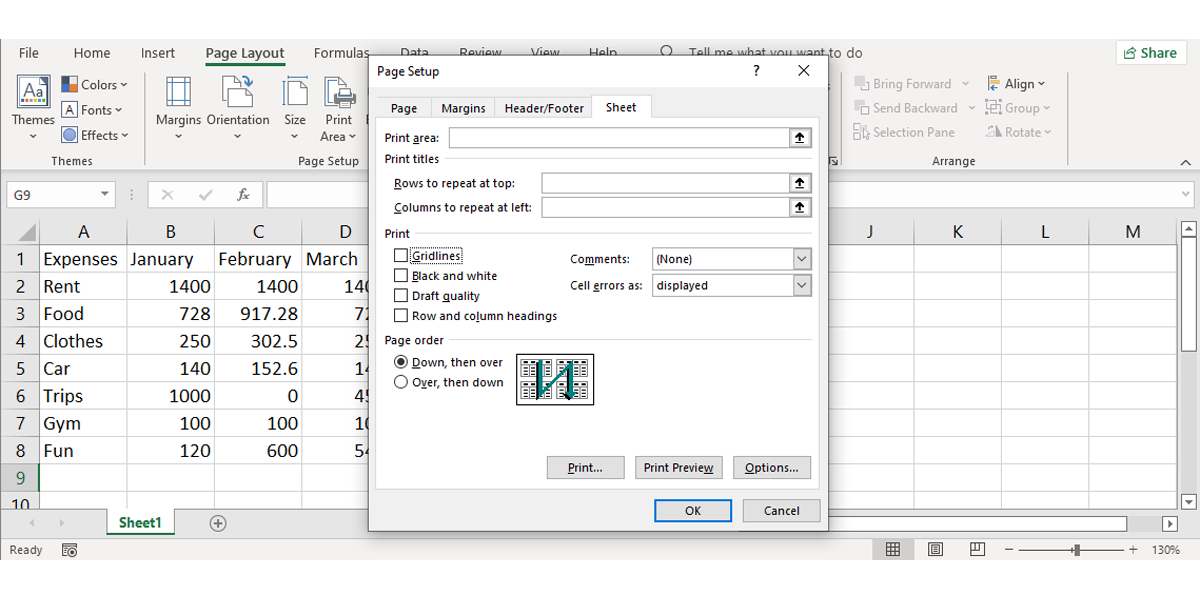
In the Page Setup menu, click on the Sheet tab and select Gridlines under the Print section. You can also select Row and column headings to add these labels to your printout.
Adding Header and Footer Information
Excel can automatically add useful information to the header and footer of your document to make it easier to read. In the Page Setup menu, click on the Header/Footer tab and use the dropdown menus to add information like page number, file name, and author name to the header or footer. If your spreadsheet is really long, this information can help keep the pages organized more easily.
You can also add custom text by using the Custom Header and Custom footer buttons.
Don't Settle for Poorly Printed Spreadsheets
It can be frustrating trying to get your spreadsheet to look good when you print it—especially if you have to get it on a single page.
But with a few tweaks to settings and format of your document, you can produce a nice printout! Don't forget to learn other tips for Excel success in the office while you're at it, too.

