You should always set a print area on Microsoft Excel sheets before feeding them to the printer. It helps to present your data with a focus on the important bits only. Plus, why include unnecessary rows and columns and make the printout more unwieldy than it already is?
Excel can be a bit scary for most people, but don't worry. You will pick up this basic spreadsheet printing skill in one minute flat.
How to Set a Print Area in Microsoft Excel
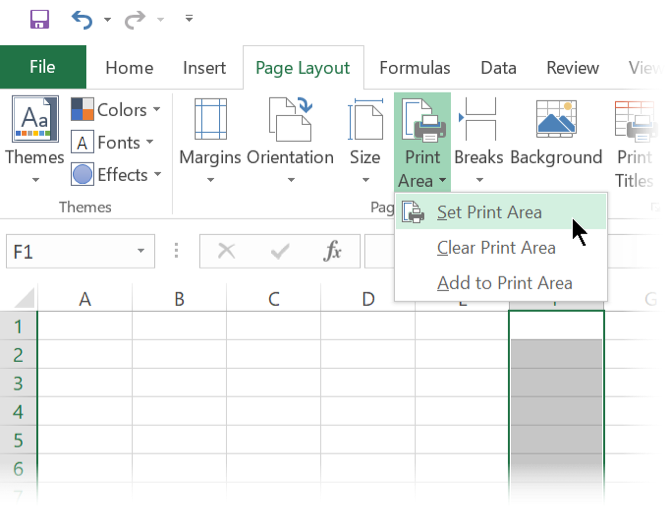
- Drag and select the cells that you want to define as the print area.
- Go to the Page Layout tab on the Ribbon. On the Page Setup group > click Print Area > Set Print Area.
When you want to print multiple areas: Hold down the Ctrl key and click to select the areas you want to print. Each print area prints on its own page.
You don't need to immediately print the sheet as every print area is retained in the document when you save the workbook.
How to Clear the Print Area in Microsoft Excel
When you get it wrong, it is easy to clear the selection and start over.
- Click anywhere on the spreadsheet for which you want to clear the print area.
- Go to the Page Layout tab. In the Page Setup group, click Clear Print Area.
This step will also remove all the print areas on your worksheet in one go.
How to Expand a Print Area in Microsoft Excel
Missed selecting a few cells? You can always add them to the area with a single command, but this will only work for only adjacent cells. If the new cells aren't next to the print area, Excel will create a new print area for those cells and they will be printed on a separate page.
- On the sheet, select the cells that you want to add to the existing print area.
- Go to the Page Layout tab > Page Setup > Print Area > Add to Print Area.
Remember to always print what you need to show. The Print Area feature isn't just a toner-saving feature but also makes the matrix of numbers or graphs easier to understand.


