

Welcome to post 3. If you've stumbled across this series out of order, you might like to check out the Installation post, and the View post which follows it. My good friend and Mac-Meister, Kate has taken a wander through the draft, and tells me there aren't any differences of note, so dig in, Mac folks.
Now where were we? Editing.
Before we start making changes to your images, you need to understand something about the way Picasa works. The important point is this. As a general rule, Picasa doesn't change your original image. It just keeps a record of the changes.
That's good, but it means that if you look at the pictures outside Picasa then you won't be able to see the changes. That is, unless you specifically Save or Export the files. More on that later on, but keep it in mind.
So, at the end of the previous post, we double-clicked an image, and that put us into Edit View.

Picasa isn't an image editor as such. It doesn't let you adjust individual pixels in your photographs. What it does is allow you to alter the images to correct or enhance them. Those enhancements are categorised in three distinct groups.
Basic Fixes
These are the things you're most likely to want to use first. The idea is to quickly fix mistakes you might have made when you took the photo.
Crop
Let's pick on an easy one. Cropping is the removal of unnecessary parts of the image to improve the composition. Select an image you'd like to crop. Click the Crop button.


You can manually choose the shape of the cropped image, or select from the list of shapes. Click on the combo box to choose.
You can also take a look at Picasa's suggested crops. It's interesting how often one of the three preview boxes is pretty close.
Once you've made your selection, drag the mouse over the image and adjust it until it's the size and shape you want.

If you're happy with the result, click Apply. If you're not sure, click Preview to take a look at what the result will look like without the distraction of the rest of the image.
If you have used one of the preset sizes, you can switch between portrait and landscape orientation using the Rotate button.
If you change your mind before you finish, click Reset so that you can make a different selection, or Cancel to get out of the Crop module.
Now that you see how that works, let's quickly step through the rest. First, the other Basic Fixes.
Straighten

You can use this to tip your image to the left or right so that lines are horizontal and vertical. Or not, as you please.
Redeye

I don't have a good example for this, because"¦ well, you can see why. But it's easy. Click the Redeye button, and drag the mouse of the eye you want to fix. Release the mouse and then repeat on the other eye. Click Apply.
If you're feeling lucky, click on Auto, instead of all the dragging routine.
Auto Contrast, Auto Colour, I'm Feeling Lucky

These all work the same way. Click the button, and watch the improvement. For those of you with a lucky streak, I'm feeling lucky just does both of the others at the same time.
Retouch

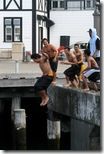
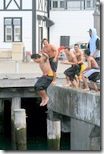
This tool is wonderful. It lets you select a part of an image that has blemishes (like the bolts in the wall here, perhaps) and then select another part of the image to replace them with, and does a nice job of it.
Click Retouch, adjust the size of the brush if necessary, click the blemish, click the replacement. Click Apply, or cancel if it all goes wrong.
Text

You can add text to your images using this tool, and there are an impressive array of options, including font, size, border and transparency settings. Have a play with it.
Apply when you have a result you like, or Cancel to back out when you've made a mess.
Fill Light
This option lets you correct situations where the darker portions of the image are a little too dark. Just use the slider to adjust the result. Don't overdo it, or you'll lose some detail in the lighter areas.
| Before | After |
|
|
That's it. The basics are fixed. Next, click the Tuning tab.
Tuning

These settings are all about making careful adjustments to your image so that it is presented at its best.
The first slider, Fill Light is exactly the same as the one we just used in the Basic Fixes area.
The next two, Highlights and Shadows, adjust other parts of the image, recovering burned out details, deepening shadows etc. Mess with the three of them to get the result you want.
Take care with adjusting things too drastically. Your image might show evidence of the manipulation as a result.

The last option in the tab allows you to adjust what's known as the temperature of the image. That is, to make it appear warmer or cooler than it is. It's all to do with the colour of the light you took the photograph in, and the colour the camera thinks the light is. But don't worry about that so much. Just use the slider.
There are also two buttons on the right hand side that let Picasa take a guess as to what you might want. They sure didn't help with this image, but sometimes they do a great job.
Great place to take a break. You're all tuned and ready to go. When we come back, I'll tell you all about the third tab. The one that's so much fun. Effects.
Get some practice in, and then let me know how it's going in the comments.