
Need to forward some emails to another address, or perhaps you're looking to forward all emails from Outlook or Gmail to a new inbox? Both Outlook and Gmail have easy set-it-and-forget-it methods to automate the forwarding process.
We'll show you how to forward Outlook email to Gmail and vice-versa, whether you use Outlook on the web or desktop.
How to Automatically Forward Emails in Outlook Desktop
First, we'll cover how to auto-forward emails to Gmail in Outlook's desktop version. To do this, you need to create a rule using these steps:
-
Open Outlook. If you're using the slim Simplified Ribbon, click the three-dot button on the far right of the Ribbon and choose Rules > Manage Rules & Alerts. If you're using the larger Classic Ribbon, find the Move section and choose Rules > Manage Rules & Alerts.

- On the resulting window, click New Rule.
-
Under Start from a blank rule, select Apply rule on messages I receive. Click Next.
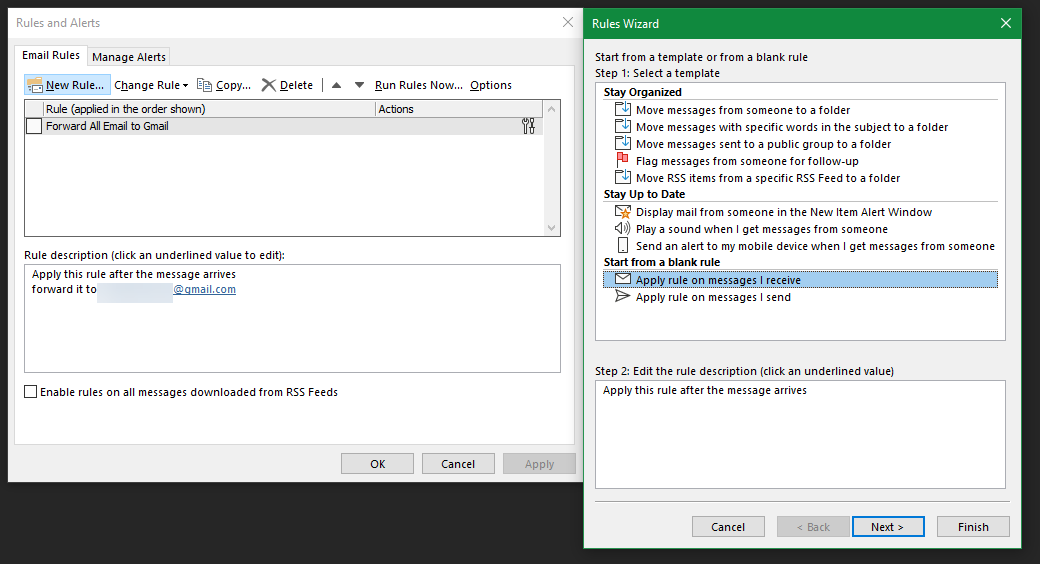
- Select the criteria for the kinds of messages you want to forward. If you want to forward all emails, leave every box on this page blank. Click Next and confirm the prompt if you see a dialog box warning that this rule will apply to all messages.
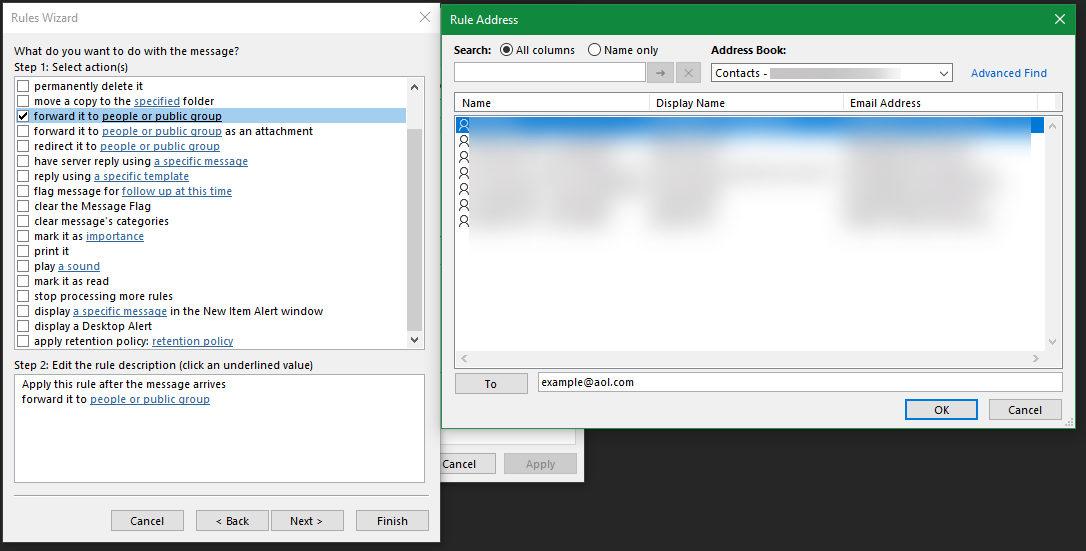
- In Step 1 of the next window, select Forward it to people or public group. (If you prefer, Forward it to people or public group as an attachment works too.) Then in Step 2, click the link text people or public group.
-
In the Rule Address box that appears, enter an email address in the To box at the bottom to forward all emails to that address. You can select from your contacts in the above box instead of entering addresses manually, and can enter as many addresses as you like. Click OK when done, then Next on the Rules Wizard window.
- Next, you have the choice of certain criteria for emails you want to exclude from this rule. You don't need to choose anything, but if you like, you can filter emails from certain senders or messages that contain specific words, for example. Click Next when you're satisfied.
- Finally, enter a name for your rule so it's easy to locate in the future. Then make sure Turn on this rule is checked and click Finish. If you also want to forward all matching emails in your inbox now, check the Run this rule now on messages already in "Inbox" box too.


You're all done forwarding your Outlook messages to Gmail (or any other email address). Every email you receive (or only those that fit the criteria you set, if you specified any) will be forwarded to the address you specified.
To stop forwarding Outlook emails, just go back to the Home tab, click Rules > Manage Rules & Alerts, and uncheck the box next to the rule you want to disable. You can toggle this checkbox any time you want to enable or disable forwarding
How to Automatically Forward Emails in Gmail
Looking to automatically forward emails in Gmail? This is a similar process to forwarding in Outlook, but has one main difference. When forwarding emails in Outlook, you don't have to do anything on the forwarding address's account. However, with Gmail, the receiving email address must grant you permission to forward emails.
This is one of the small differences that can help you decide between choosing Outlook and Gmail.
How to Add a Forwarding Address in Gmail
The first step in automatically forwarding Gmail emails is to add forwarding addresses. To do this:
- Go to your Gmail options by opening Gmail, clicking the gear at the top-right corner, and choosing See all settings.
- Open the Forwarding and POP/IMAP tab.
- At the top of the page under the Forwarding subheading, click Add a forwarding address.
- In the window that pops up, enter the email address you want to forward emails to. Note that you can only enter one email address at a time. Click Next when done.
- You'll see a new dialog box; click Proceed inside this.
- The chosen email address will receive an email. The owner must click the link inside to grant your Gmail address permission to forward emails. Alternatively, you can copy and paste the code from the email to the box on the Gmail page.
Once you have approval, you can easily auto-forward all emails to the new address on the same Gmail settings page. Enable the Forward a copy of incoming mail to button, then choose your forwarding address from the dropdown list.

Using the second box, you can choose from four options for what happens to the original message in your inbox:
- Keep my copy in the Inbox, which leaves the email untouched in your Gmail inbox.
- Mark my copy as read, which means it won't be lit up as new in your Gmail account.
- Archive my copy, so it's out of your main inbox.
- Delete my copy, if you don't want it at all.
Filtering Forwarded Emails in Gmail
If you don't want to forward all emails in Gmail, use the below steps to create a smart Gmail filter that only forwards certain messages. Note that Gmail filters will only forward new emails, so this won't apply to old messages:
- Go to Gmail, click the gear > See all settings, then jump to the Filters and Blocked Addresses tab.
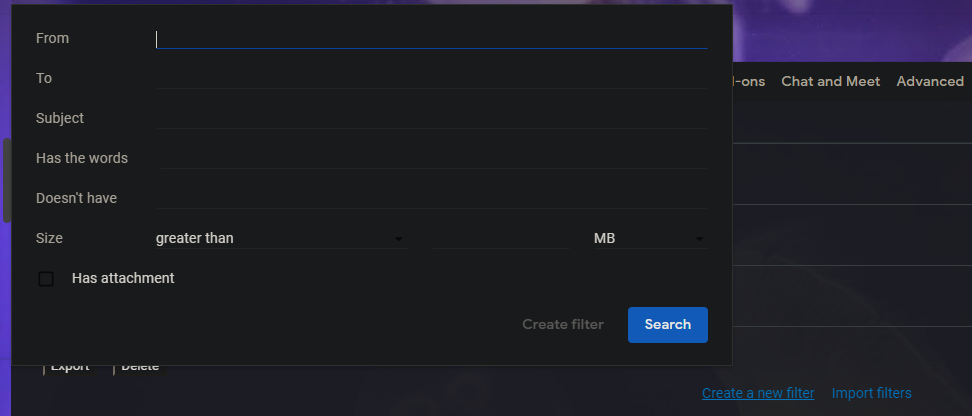
- At the bottom of your filter list, click Create a new filter.
-
Enter the criteria for the emails you want to forward. If you want to forward all emails, just enter your email address in the To field. When done, click Create filter.
- On the next screen, check the Forward it to box. From the dropdown menu, select the forwarding address you want to forward the applicable emails to. In case you don't see the right address, click Add forwarding address and follow the steps listed above to add an approved address.
- Enable any other options if you'd like, then click Create filter.


To stop forwarding emails, go back to Settings > Filters and Blocked Addresses and click delete next to the rule you want to erase.
How to Automatically Forward Emails in Outlook.com
Finally, let's look at how to forward messages from the web version of Outlook.
To start, sign into Outlook.com mail and click the Settings gear in the upper-right corner. Scroll down to the bottom of the sidebar that appears and select View all Outlook settings.

On the resulting screen, make sure you have the Mail tab selected at the far left, then select the Forwarding section in the next tab. At this point, you may need to verify your identity before moving on.
Afterward, on the Forwarding page, tick the Enable forwarding option and enter the email address you want to forward to. If you check Keep a copy of forwarded messages, they'll stay in your Outlook inbox as well.

Click Save at the bottom to complete the process. That's all it takes to forward emails from Outlook's web app to Gmail or another service. To disable forwarding, simply come back to this page, uncheck the Enable forwarding box, and hit Save again.
How to Forward Only Some Messages From Outlook Web
If you don't want to forward all mail, Outlook's web version also lets you filter messages with any criteria you select. To set this up, go back to Settings > Mail as described above, then open the Rules section.
Here, enter a name for your new rule at the top, then select an item in the Add a condition dropdown box. Use the Add another condition link if you want to specify multiple.
Next, under Add an action, choose Forward to or Forward as attachment. Enter the email address you want to forward these messages to in the box next to this. Click Add an exception if you don't want this rule to forward certain messages.

If you want the rest of your Outlook rules to apply to the messages that are forwarded, make sure Stop processing more rules is unchecked. Choose Save when you're done.
How to Import Outlook Mail and Contacts Into Gmail
Above, we looked at how to forward all new Outlook mail to your Gmail account. If you'd like, you can also bring over messages currently in your inbox, plus your contacts, in an easy step using Gmail's import tool. Note that this works for nearly any email address, not just Outlook.
Open your Gmail account and click the Gear icon in the upper-right, then choose See all settings. Choose Accounts and Import along the top, and on that page, click Import mail and contacts.
This will open a new window. Enter the Outlook email address (or any other email address) you want to import from. After confirming its credentials, you'll see a list of permissions you must grant.

Click Yes to accept them. Finally, you'll see an Import Options window. Choose the boxes to Import mail and Import contacts, if you want to. You can also check Import new mail for 30 days, though this is unnecessary if you've done the forwarding above.
Depending on how much mail you have in Outlook, this could take some time. Your mail will appear in Gmail as it progresses.
How to Important Outlook Contacts to Google Contacts
If the above tool didn't work for some reason, you can transfer your Outlook contacts to Gmail using the Google Contacts import tool. While logged into your Gmail account, open Google Contacts. On the left side of the screen, choose Import.

Gmail will ask you for a CSV file containing your contacts. To obtain this, take a look at our guide to importing and exporting email contacts.
How to Move Your Outlook Calendar to Gmail
We've looked at how to import your mail and contacts; the last important element to bring over is your calendar. For this, take a look at the best tools to sync your Outlook and Google Calendar accounts.
Forwarding Outlook and Gmail Email Is Complete
Now you know how to forward Outlook to Gmail and vice-versa. Whether you're just moving a few important messages or want to completely switch providers, it's not hard to accomplish.
After you've moved to Gmail, make sure you know the best features of the service so you can fully enjoy it.