
The ever increasing power of computer processors has brought its users to a level where they don't even think much about how many applications are running and how many windows are opened. Multitasking - which once was a luxury - is now part of the nature.
This new 'open-everything spree' lifestyle adapted by most modern people under any OS - me included - results in a very cluttered Mac desktop. One hit on the Exposé's "Show All Windows" button reveal just how many of them are cluttering my desktop.

More clutter means less focus, and I realized that, to improve myself, I need to organize. Fortunately, Mac OS X 10.5 Leopard comes with the solution: Spaces - a tool to organize your Mac desktop and optimize those cluttered workspaces.
So, how to organize Mac desktop with Spaces
Open Spaces
To get the maximum result from utilizing Spaces, we need to customize it first to fit our need. Go to System Preferences,

choose Exposé & Spaces

and click on the Spaces tab.

The first thing to do is to make sure that there's a checkmark in the "Enable Spaces" option. Then you may also give a checkmark to the other box that says "Show Spaces in the Menubar" if you like to have access to Spaces from the menubar.

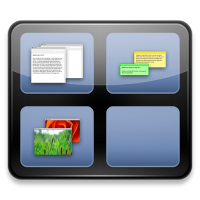
By default, there are four virtual desktops. But users can add/remove more rows and columns up to sixteen desktops (four rows times four columns) by clicking the plus (+) or minus (-) signs.

Everybody has different preferences on how many virtual desktops they would want. So before deciding your number, the first thing to do is to make a list on what 'workspaces' you need.
For example, I need four virtual Mac desktops: the first one is dedicated to work and internet-related activity (work 1), the second one is to music, movie and games (entertainment), the third one is to graphic design (work 2), and the fourth one is for any background activities like downloads or backups.
The next step is to assign applications to their respective virtual desktops. Click on the plus (+) sign under the "Application Assignment" window and choose which one of the opened applications you want to assign. If the application that you want is not on the list (it means the app is not running at that time), choose "Other..."

Then you should assign one of the spaces to the app by clicking on the arrows next to the space number and choose one from the pop-up list. If you want to, you can assign an (important) app - like Mail or Safari or any other app that you need all the time - to be available in every spaces.

The last step is to customize the shortcut keys. Choose one of the available options from the drop down list. There are three kinds of shortcut keys: To activate Spaces (by default assigned to F8), To switch between spaces (by default assigned to Control + any of the Arrow Keys), and To switch directly to a space (by default assigned to Control + Number Keys related to the space numbers).

Using Spaces
After assigning the apps to their spaces, you can do your everyday activities like normal. If you switch between apps with Alt + Tab, you will be taken to the app's virtual space automatically.
You can use the menubar icon or shortcut keys combination to access Spaces. To use the shortcuts, you can - for example - press Control + Right Arrow to go to the next space, press Control + 4 to go directly to space number 4, or press F8 and you can choose which space to choose.

By categorizing apps into different spaces, I teach myself to focus on a specific task at one time. Hopefully, this will lead to better work results.
How do you organize your Mac desktop? Do you have Spaces related tips to share? Use the comments below to spill your thoughts.