We’ve talked a lot in the past about running local web servers for development purposes or to try out software such as Wordpress without having to pay for hosting, but how do you take it live once you’re ready to launch? After a recent question on our tech support community, I was prompted to write about this process in detail, so here goes - a guide to taking your locally developed Wordpress site to a live server. The principles remain the same for any CMS or web software though, but obviously your database structure will be different.
Requirements
I’m going to assume that you already have a local server running, and are able to both access the files as well as the database through PHPMyAdmin. You’ll also need to already have a hosting account set up and domain name associated with it - we won’t be covering that today.
Today I’ll be outlining the case of moving to a shared host without command line access, which I believe will be the most common use case. Bear in mind that if your database is huge, you can’t use this method as you won’t be able to upload large files. Basically, your database export needs to be under 2MB, or things start to get very complicated. Beyond that, you’ll need to do partial exports, or use the command line. However, this 2MB doesn't include your actual files - it's just the textual content of the database. So unless you have a few thousand posts in your Wordpress, you should be just fine.
1. Prepare
Make sure you know your database user, database name, and password for both your offline and online server accounts beforehand. Also note down the URL and file paths you’ll need to adjust later - for instance, your files may be linked using an absolute path such as c:/sites/wordpress/wp-content/uploads/2011/05/test.jpg or http://localhost/wp-content/uploads~ . Note down everything up to the wp-content section, as this is what you’ll need to adjust later. The URL you use to access the site locally may also be different to the file paths of pictures you’ve uploaded, so make sure you note that down too - we’ll be adjusting them both later on.
2. Export The Database
Open your local PHPMyAdmin panel and navigate to the correct database if you have a few.
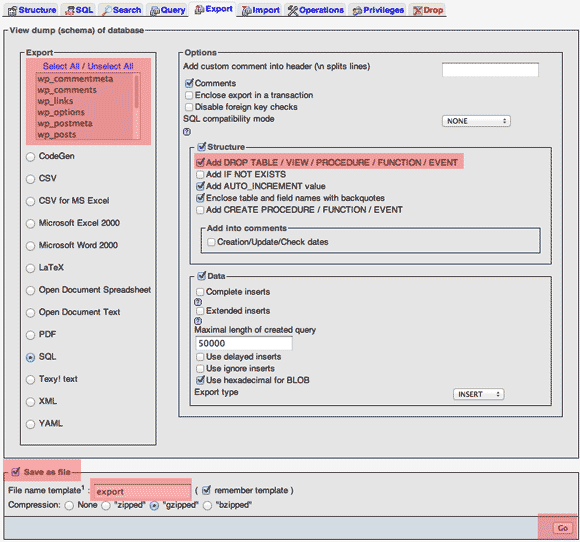
- Select the export tab
- Click Select All to ensure all tables are selected.
- Check Add DROP TABLE / VIEW / PROCEDURE / FUNCTION / EVENT is selected (it isn’t by default)
- Check Save as file
- Enter the filename template as something memorable (I chose "export")
- Click Go to save the file somewhere.
3. Adjust Paths
This is the difficult bit, and you may need to come back and do it again if you miss something. Make a copy of the SQL file first in case you mess it up.
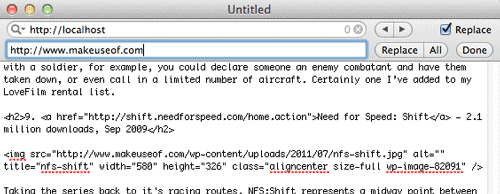
Open up the SQL file you just saved in a good text editor. By opening the entire file like this, we can just search and replace paths/URLs all at once, without needing to adjust settings through the Wordpress admin panel or having to use complicated SQL commands.
Do a simple search first to make sure you have, and look for the previous offline domain you were running the site on. Just check you have the search variable entered correctly first. Taking note of trailing slashes, perform a full search/replace on every occurrence of that item in the file. So for example, if you previously set everything as localhost, then replace all instances of localhost with yourdomain.com. If you were using Windows, you may find your image paths are using the c:/~ notation, so replace that with your domain address too. A good rule of thumb is to check before you actually replace - just FIND the paths before you start adjusting them.
4. Upload Files
Open up an FTP connection to your live server and upload the contents of your offline Wordpress folder into the httpdocs or public_html folder there. Assuming you will be installing to the root of your live server, you should be able to see the wp_contents folder inside the public_html web server root now.
<str=ong>Warning: If you’re coming from Windows, there may be some serious security issues with permissions. After you’re up and running, install the Wordpress Security Checker to do an automated scan on folder permissions.
Note: On GoDaddy hosting, it may be easier to install Wordpress using the control panel instead of uploading all your offline files - GoDaddy often makes the database connection settings difficult. In this case, you only really need to upload the contents of the wp-content directory, then continue to re-import the database.
5. Re-Import The Database
Firstly, zip up the SQL file you made earlier, and make sure it’s less than 2MB. Then open up the PHPMyAdmin on your live server. You should see a heading for import. Click there, choose your modified and zipped up SQL file and upload.
6. Edit wp-config.php
(Not necessary if you used the Fantastico / application control panel installer).
In the root of your directory is the Wordpress config file. Open it up and edit the appropriate lines for "database name", "database user", and "database password".
That’s it! All done. Everything should be working at this point, but you may discover now that the paths you entered during the SQL editing stage were actually wrong - don’t panic though, it’s easy to just re-edit the original backup and upload again until you have it right, and soon you’ll have mastered the process.
Any problems? Of course, I’ll try my best to help in the comments, but I can only point you in the right direction rather than give specific answers. You might also want to ask in our fantastic and lively tech support community part of the site, which is where this article was set in motion in the first place.


