A few days back one of my computers decided to act up. Sometimes Windows would boot and function well for some time after which applications would fail to start or crash. Other times Windows would not boot without resetting multiple times.
Obviously, almost instinctively I attributed the trouble to Windows. Ran a couple of scans and diagnostics and they all came out clean. Fed up of the problems and not being able to resolve them I decided to go ahead and install Linux alongside. Half an hour later I was ready to bid a much wanted goodbye to all the troubles. However, about 10-15 minutes into the session, applications started quitting unexpectedly or failed to start altogether.
It was not a Windows problem after all. Now I was almost certain that it was a hardware issue. Having already scanned the hard disk, I didn't know what to check next. Then on a random reboot I noticed the memtest86 entry on the GRUB menu. It has always been there whenever you install Ubuntu, yet I had completely forgotten about it. So I decided to give it a whirl and viola, one of the RAM sticks was found to be the miscreant!
Memtest as it turns out is an excellent solution for conducting a computer memory test, only its a little too advanced for the average user. Let's attempt to demystify some of the options that you can make use of if time demands so.
First off you need to download Memtest and I would suggest burning the bootable ISO image onto a CD. That is perhaps the easiest way to use Memtest. Owing to its popularity and usefulness, Memtest is also included on a number of Live CDs including the likes of Ubuntu and System Rescue CD.
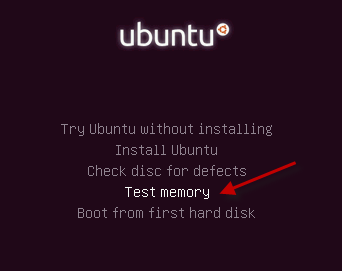
Once you have the CD ready, pop it in and let the computer boot from it. Depending on whether you are using the Memtest ISO or one of the other Live CDs you will be taken to Memtest directly or you would have to invoke it via one of the options. Here is how to invoke it on the Ubuntu Live CD:
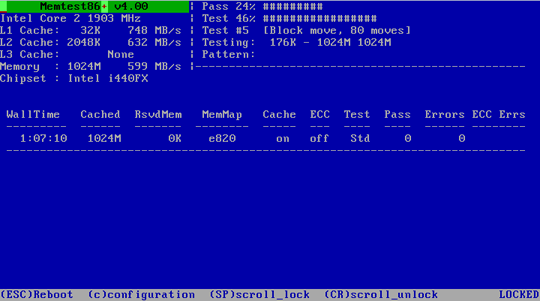
In either case, once Memtest has been invoked, it starts running computer memory tests straight away without asking questions of any sort. It displays a basic memory information in the upper left hand corner, information on the currently running tests in the upper right hand corner and overall test results just below them (only errors are displayed). Towards the bottom you can find the means to interact with Memtest.
You can reboot any time using the ESC key and Lock/Unlock scrolling to view the errors if there are too many of them. Enabling the scroll lock also pauses the tests till you disable it. Hitting 'c' would take you to the configuration menu and allows you to customize a variety of settings and parameters. You can choose from amongst various tests. The detailed description of the tests and what kinds of issues they detect is available here.
Via the settings menu, you can also customize the memory address range that should be tested. Its best you leave it to the full memory scan especially on the first scan, then you can use custom values, depending on the errors you get to test only the bad addresses. In addition you can change error display options and redraw the screen. Frankly these are the bits that you should be concerned about. If you need to go into the advanced options, you probably already know a lot about Memtest!
Memtest is an excellent tool to keep in your virtual troubleshooting toolbox. Although such memory errors like I encountered are rare, they do leave you clueless as to what's giving way. A quick memory scan can either rule that out or point you towards the problem straightaway.
Let us know what you think of the Memtest computer memory test or if you have a preferred alternative.


