Every email is a potential distraction. You can manage your emails using rules, priority flags, and color categories. This automated workflow will help you keep your Outlook inbox clear and your mind free from clutter.
Consider automated conditional inbox formatting to take your productivity to the next level. Each message can be classified and filtered the instant it enters your inbox. This article is aimed at all Outlook users, though could be particularly useful for those using IMAP email accounts. IMAP accounts don’t allow for the extensive use of color categories users of POP3 can enjoy.
What Is Conditional Inbox Formatting?
Conditional Inbox Formatting is an automated method of colorizing messages as they enter the inbox. We can assign a different range of colors, fonts, and styles to each message, specified on a range of conditions. If the conditions are met, the message will receive the respective formatting conditions, making it stand-out, and easing your workflow.
Now I’ll show you some quick examples to get your inbox moving.
Setting Up Conditional Inbox Formatting
Setting up several conditional inbox formatting rules is really quite easy, and can make a big difference to your workflow.
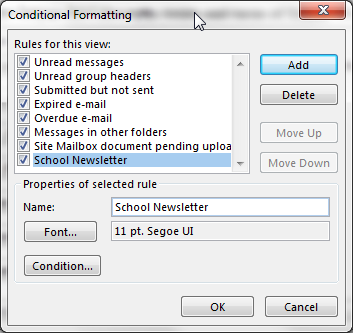
Head to the View tab. Under Current View, select View Settings. This will open the Advanced View Settings panel. Select Conditional Formatting. This will show you a list of default conditional formatting options, some of which will already be in use.
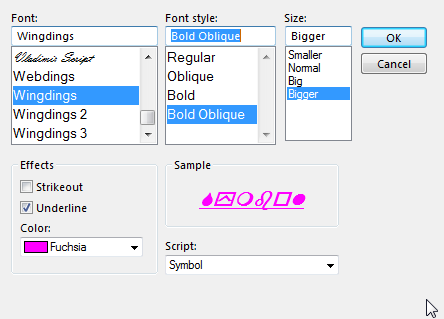
Press Add. Enter a name for your first rule. I'll make sure I never miss a school newsletter, so the rule is accordingly named "School Newsletter." Now, choose a Font. You have the full range of Windows fonts available, meaning Comic Sans, Chiller, and Wingdings are at your disposal. However, as we are attempting to maintain our inbox workflow, I would suggest sticking to something sensible, that doesn’t distract you!
Once you’ve selected a font, choose a color, and increase the font size to big (for some reason this system does away with regular font points, presumably so we don’t select an absurdly large size, which would break the Outlook inbox pane). When you’re ready, press OK.
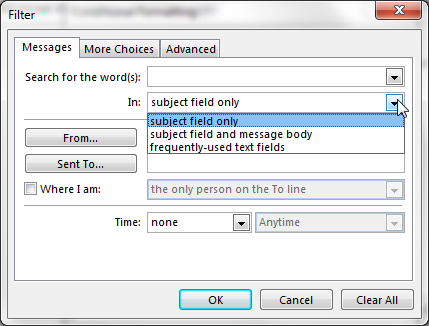
Now, select Condition. I’m only adding a single address to this rule, in the From box. If you know the single address, enter it where applicable. If you're adding a long list, or even just multiple addresses, pressing From will open your Outlook address book. Once you have added the requisite addresses, press OK, and head back to your inbox. The rule will apply from the next email you receive.
Adding Color Categories
Now we know how to create a conditional format for incoming mail, we can begin to specialize our rules. The Conditions panel has three tabs: Messages, More Choices, and Advanced. We can put each tab to use to streamline our inbox.
Messages
Use the Messages tab to create a specific word-search for each email as it arrives. Isolate a keyword, words, or phrases that repeatedly enter your inbox and, if they’re important, apply a filter.
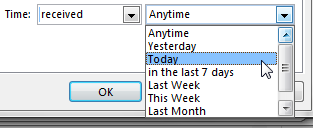
We can also apply formatting to our emails, based upon a variety of time filters, including time Received, Sent, Created, Modified, and when the email landed in your inbox, such as Anytime, Yesterday, In the last 7 days, or Last week.
More Choices
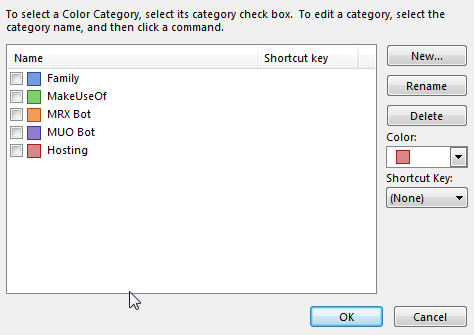
The More Choices tab is where you’ll find color categories, as well as options for matching items that are unread or read, have multiple attachments, have varying importance levels, or have been independently flagged by the user.
The color category formatting filters are the same as any you’ve already established, but it makes it easier to build on any color-rules you’re already using. This way, you can automate your colors!
Advanced
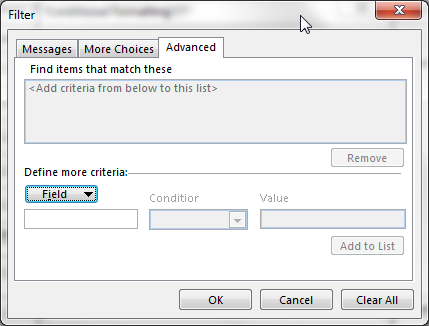
The Advanced tab allows us to create specialized conditional formatting criteria to filter and apply to your inbox. Clicking the Field button will grant you access to a somewhat overwhelming list of potential filter criteria, of which you can select multiple choices to build a "filter tree."
There’s a significant number of options here, but don’t let that put you off creating your own lists. Take your time and scan through each list. A large number of the options simply will not apply to your inbox, so it should theoretically narrow your search range.
You’re Now Conditionally Formatting
You should now be able to set up a range of conditional formatting rules for your inbox, whether you filter everything into specific folders or not. Even the emails heading into those specific folders can take the formatting with them, allowing you some variations on how you apply specific colors. For instance, instead of highlighting specific names, try coloring and filtering a specific theme, or a keyword.
Conditional formatting is incredibly easy to set up, and once you’re up and running, it will keep your inbox – and hopefully your mind – somewhat clear of digital clutter.
Do you use conditional inbox formatting? Do you have any tricks or tips for our readers? Let us know below!

