In part one of this series, I showed you how to transfer your camcorder footage from the camera to your desktop using Windows Movie Maker. Today, I am going to show you what you can do next - editing your footage and adding some special effects such as music and credits. Then, exporting your finished movie.
There's a lot more you can do with Movie Maker so I am just going to focus on the ones that enable you to bang out a good quality video. I'll let you experiment with the other stuff yourself. If you want to see some live examples of what I am about to show you, you can check out my video blog which has most of these features in them.
So last time, we ended the article with the footage having been dragged over from the top of the screen to the storyboard below.
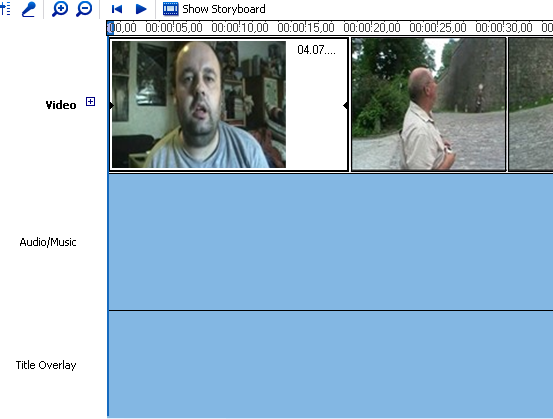
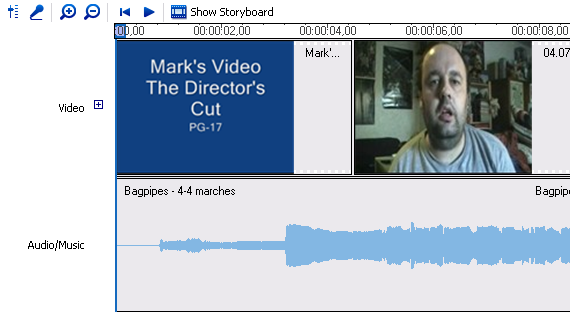
If you press "show timeline", you'll see another view of the clips. This is the view you will need to look at if you want to add anything extra such as music, credits and extra footage in the right places:
At the top of the screenshot, you will see two little magnifying glasses (one with a plus and one with a minus). The plus one zooms in and gives you the timeline in a more detailed time frame. At the moment you can see the time being split up into 5 second intervals. Zooming in, you can have the timeline split up into one second intervals. Again, that's good for inserting extra features at exactly the right moment of the movie. The minus magnifying glass zooms back out into bigger time chunks.
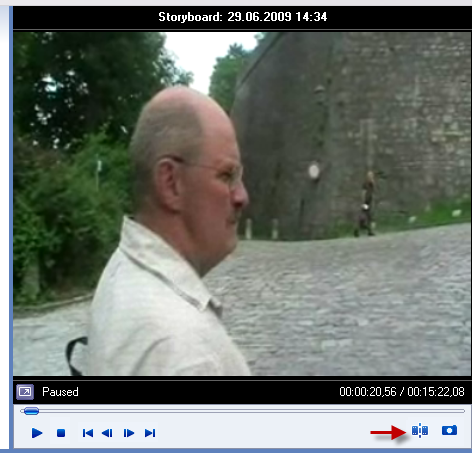
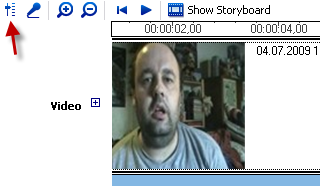
To edit, take one clip at a time. Click on the "show storyboard" view and then click on the clip. It will immediately show up in the media player at the top:
When you press "play" and the footage starts rolling, a small button will then activate (shown by the red arrow in the screenshot above). This button is your editing button.
When you get to the point where you want to remove a piece of footage, press the editing button. The footage will then be split in two and a new clip will be created. Keep that clip rolling till you get to the end of the part you want to remove. Click the button again and again it will be split. This results in a clip in the middle which is the piece you don't want. Now, right-click and select "delete" to remove it from your storyboard. Repeat with other parts of the footage until you have removed all the embarrassing scenes and drunken rants from your movie masterpiece. ;-)
It's a bit difficult to explain this. It's one of those things that will become apparent once you start doing it. It would be an excellent idea to backup your footage before starting the editing. That way, you can start over if you make a mistake.
The next thing might be to improve the quality of the picture or the sound. You may have filmed a scene in poor lighting or the audio might be a little faint. Movie Maker provides some options for improving things like that.
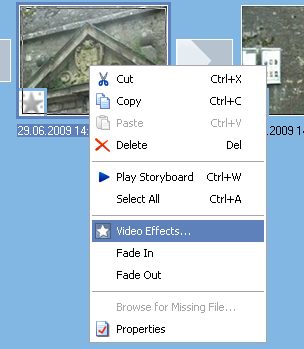
Click on the clip you want to alter and then right-click. A little menu will pop up. Choose "Video Effects".
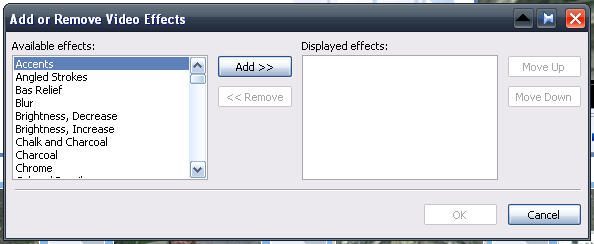
You'll then see options for changing the clip. Some of them are very Photoshop-like such as "chalk and charcoal" but the main ones you should focus on are the brightness options, fade in and out, and slow down & speed up.
Just make your options and save. Now, replay the clip and you should see your changes.
If you want to change the audio volume, click on the clip you want to alter and then press the audio button on the far left. Increase or decrease as desired. Remember to keep saving all your changes.
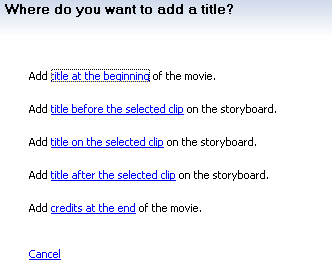
Now the credits. You can enter credits anywhere in the video but normally you would see them at the beginning and the end. So let's do the start credits first. Go to storyboard view and click on the first clip. At the top menus, choose Tools-->Titles and credits. You will then see this.
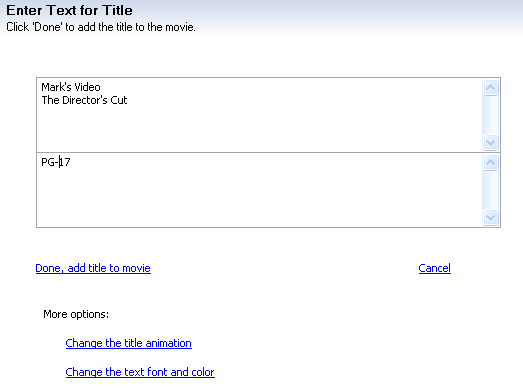
Choose the first one and you will then get boxes to type your credits in :
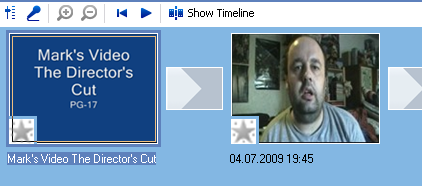
The options are self-explanatory and as you do each one, the changes are immediately shown on the media player so you can see if they look the way you want them to. You have a variety of animations to choose from and you can change the font style and background colours. When it is finished, the credits will automatically be inserted into your story board. If it is in the wrong place, just click and drag the clip with your mouse to wherever you want it to go.
To do the end credits, just go to Tools-->Titles and credits again and choose the end credits option. Then repeat as before. The one limitation of the end credits is that you are not able to put too much text in it. So no long thank you's can be inserted!
There are three other main options to import material into your movie. Music (more on that in a moment), photos and other movie material. By inserting photos, you can perhaps put some music to it and have a musical montage! If you want to insert a clip from another movie file, just import it from your computer and drag it into the appropriate position in your storyboard.
The last option I am going to tackle here is the music. You first have to edit your MP3 or WMA file in something like Audacity. You can get lots of copyright-free public domain music over at the Internet Archive and you then need to edit the file down to the correct length. Movie Maker allows you to fade in and fade out or you can put the fading in via Audacity. It's up to you.
To insert the music, go to "timeline view" and you'll see an area below the pictures for music (audio/music). Next, import the music file into Movie Maker and wait till the file appears at the top of the screen.
At this point, it's a good idea to zoom in with the positive magnifying glass until you have one second intervals. Now drag the music file down into the "audio/ music" section until you have it at exactly the correct start and end positions.
When the music is in the right place, save it and play it back in the media player to make sure that it is all correct.
Finally, it's time to export the video file. Go to File--->Save movie file in the top menu and you will have to make some selections as to the file name and where you want to put it in your computer. When you are finished and clicked "start", it will begin transferring the saved movie file to your computer in WMV format. It is normally quite fast (5 minutes or less for me).
And that's really it. As I said, there are other options and features (such as subtitles and narration) but I'll let you discover them on your own. I just wanted to cover the basics to make a decent video but I'm sure you will find all the other stuff you can do. Or you can check Microsoft's webpage on how to do stuff in Movie Maker.
How do you find Movie Maker? Is it one of the best in your opinion or does another program do it better? Having problems working out any of the features? If so, let us know in the comments.
**UPDATE** It has been brought to my attention that the Portable Movie Maker which was initially featured in this and the last article has a file which is being flagged by AVG as a virus. It is not a virus in my version of the program (which is how I didn't find out about it before the publication of part one) but a subsequent check of a new download of the app does indeed reveal the file is being flagged by AVG.
To be on the safe side, all links and mentions of the portable app have been removed from this article. If you have already downloaded it, I suggest you delete it to be safe and use the full installed PC version of Movie Maker instead. Or at the very least scan your copy with a virus checker.
Normally we thoroughly virus check everything before publication. However, since I downloaded the portable app several weeks ago and AVG initially passed it as safe, this one got past me. I apologise.


