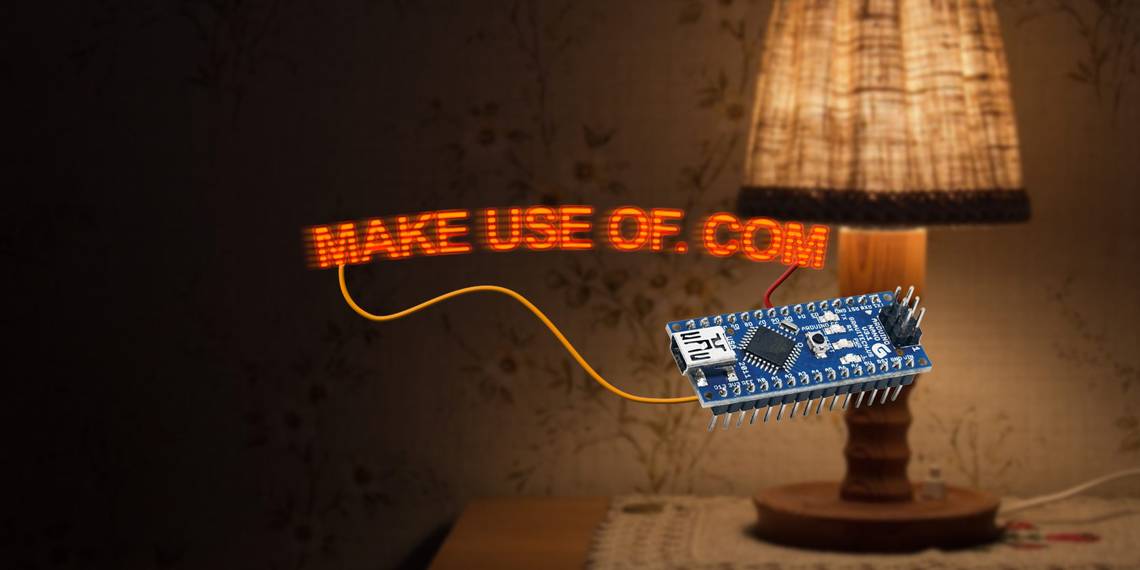
You can do all sorts of things with flashing LEDs, and in this simple project, we'll make a small device that lights up messages in the air when you wave it back and forth. It's easier than you think, and the total cost of parts is under $5.
This project utilises an optical illusion called persistence of vision to make text appear in the air. You've probably come across this phenomenon when someone moves a lit sparkler quickly at night. We will be using an Arduino and some LEDs to mimic this effect. This project is simple to build, with few components and little soldering (though if you want some tips on getting started with your soldering iron check out this guide).
You Will Need
- Arduino (I used a $2 Nano because it's compact and cheap, but any model should be fine).
- 5x Red LEDs.
- 5x 220 Ohm resistors.
- 1x 9v battery holder.
- 1x Rocker switch.
- 1x piece of protoboard.
- A housing for the finished product (I used a small cardboard box painted black).
You'll also need a soldering iron and some solder to put it all together.
While optional, some solder wick can come in very handy in case you make any soldering errors. A breadboard and some hookup wires are also useful to test your circuit.

Wiring
The wiring couldn't be simpler. First, hook up your Arduino, LEDs and resistors as shown in this diagram.

Pins D2 through D6 go to each resistor respectively, which are attached to the positive anode (long leg) of each LED. The cathode is connected to ground, which connects back to the Arduino. When it's done it should look something like this:

That's it: our circuit is done! We will be adding a battery housing and a switch to it later, but this is all we need to test whether it works.
Code
Now hook up your Arduino to the computer and open the Arduino IDE. If you are new to using the Arduino and want a good guide on getting going, this link will be useful.
Open a new sketch and copy this code in. The code was modified from this project and you can download it in full at this Gist.
// how long each led stays on for
int delayTime = 1;
//how long between each
int charBreak = 3;
//how long to wait after the message is finished before it repeats
int resetTime = 20;

int LED1 = 2;
int LED2 = 3;
int LED3 = 4;
int LED4 = 5;
int LED5 = 6;

void setup(){
pinMode(LED1, OUTPUT);
pinMode(LED2, OUTPUT);
pinMode(LED3, OUTPUT);
pinMode(LED4, OUTPUT);
pinMode(LED5, OUTPUT);
}

int a[] = {1, 6, 26, 6, 1};
int b[] = {31, 21, 21, 10, 0};
int c2[] = {14, 17, 17, 10, 0};
int d[] = {31, 17, 17, 14, 0};
int e[] = {31, 21, 21, 17, 0};
int f[] = {31, 20, 20, 16, 0};
int g[] = {14, 17, 19, 10, 0};
int h[] = {31, 4, 4, 4, 31};
int i[] = {0, 17, 31, 17, 0};
int j[] = {0, 17, 30, 16, 0};
int k[] = {31, 4, 10, 17, 0};
int l[] = {31, 1, 1, 1, 0};
int m[] = {31, 12, 3, 12, 31};
int n[] = {31, 12, 3, 31, 0};
int o[] = {14, 17, 17, 14, 0};
int p[] = {31, 20, 20, 8, 0};
int q[] = {14, 17, 19, 14, 2};
int r[] = {31, 20, 22, 9, 0};
int s[] = {8, 21, 21, 2, 0};
int t[] = {16, 16, 31, 16, 16};
int u[] = {30, 1, 1, 30, 0};
int v[] = {24, 6, 1, 6, 24};
int w[] = {28, 3, 12, 3, 28};
int x[] = {17, 10, 4, 10, 17};
int y[] = {17, 10, 4, 8, 16};
int z[] = {19, 21, 21, 25, 0};

int eos[] = {0, 1, 0, 0, 0};
int excl[] = {0, 29, 0, 0, 0};
int ques[] = {8, 19, 20, 8, 0};
int space[] = {0, 0, 0, 0, 0};

void displayLine(int line){
int myline;
myline = line;
if (myline>=16) {digitalWrite(LED1, HIGH); myline-=16;} else {digitalWrite(LED1, LOW);}
if (myline>=8)  {digitalWrite(LED2, HIGH); myline-=8;}  else {digitalWrite(LED2, LOW);}
if (myline>=4)  {digitalWrite(LED3, HIGH); myline-=4;}  else {digitalWrite(LED3, LOW);}
if (myline>=2)  {digitalWrite(LED4, HIGH); myline-=2;}  else {digitalWrite(LED4, LOW);}
if (myline>=1)  {digitalWrite(LED5, HIGH); myline-=1;}  else {digitalWrite(LED5, LOW);}
}

void displayChar(char c){
if (c == 'a'){for (int i = 0; i <5; i++){displayLine(a[i]);delay(delayTime);}displayLine(0);}
if (c == 'b'){for (int i = 0; i <5; i++){displayLine(b[i]);delay(delayTime);}displayLine(0);}
if (c == 'c2'){for (int i = 0; i <5; i++){displayLine(c2[i]);delay(delayTime);}displayLine(0);}
if (c == 'd'){for (int i = 0; i <5; i++){displayLine(d[i]);delay(delayTime);}displayLine(0);}
if (c == 'e'){for (int i = 0; i <5; i++){displayLine(e[i]);delay(delayTime);}displayLine(0);}
if (c == 'f'){for (int i = 0; i <5; i++){displayLine(f[i]);delay(delayTime);}displayLine(0);}
if (c == 'g'){for (int i = 0; i <5; i++){displayLine(g[i]);delay(delayTime);}displayLine(0);}
if (c == 'h'){for (int i = 0; i <5; i++){displayLine(h[i]);delay(delayTime);}displayLine(0);}
if (c == 'i'){for (int it = 0; it <5; it++){displayLine(i[it]);delay(delayTime);}displayLine(0);}
if (c == 'j'){for (int i = 0; i <5; i++){displayLine(j[i]);delay(delayTime);}displayLine(0);}
if (c == 'k'){for (int i = 0; i <5; i++){displayLine(k[i]);delay(delayTime);}displayLine(0);}
if (c == 'l'){for (int i = 0; i <5; i++){displayLine(l[i]);delay(delayTime);}displayLine(0);}
if (c == 'm'){for (int i = 0; i <5; i++){displayLine(m[i]);delay(delayTime);}displayLine(0);}
if (c == 'n'){for (int i = 0; i <5; i++){displayLine(n[i]);delay(delayTime);}displayLine(0);}
if (c == 'o'){for (int i = 0; i <5; i++){displayLine(o[i]);delay(delayTime);}displayLine(0);}
if (c == 'p'){for (int i = 0; i <5; i++){displayLine(p[i]);delay(delayTime);}displayLine(0);}
if (c == 'q'){for (int i = 0; i <5; i++){displayLine(q[i]);delay(delayTime);}displayLine(0);}
if (c == 'r'){for (int i = 0; i <5; i++){displayLine(r[i]);delay(delayTime);}displayLine(0);}
if (c == 's'){for (int i = 0; i <5; i++){displayLine(s[i]);delay(delayTime);}displayLine(0);}
if (c == 't'){for (int i = 0; i <5; i++){displayLine(t[i]);delay(delayTime);}displayLine(0);}
if (c == 'u'){for (int i = 0; i <5; i++){displayLine(u[i]);delay(delayTime);}displayLine(0);}
if (c == 'v'){for (int i = 0; i <5; i++){displayLine(v[i]);delay(delayTime);}displayLine(0);}
if (c == 'w'){for (int i = 0; i <5; i++){displayLine(w[i]);delay(delayTime);}displayLine(0);}
if (c == 'x'){for (int i = 0; i <5; i++){displayLine(x[i]);delay(delayTime);}displayLine(0);}
if (c == 'y'){for (int i = 0; i <5; i++){displayLine(y[i]);delay(delayTime);}displayLine(0);}
if (c == 'z'){for (int i = 0; i <5; i++){displayLine(z[i]);delay(delayTime);}displayLine(0);}
if (c == '!'){for (int i = 0; i <5; i++){displayLine(excl[i]);delay(delayTime);}displayLine(0);}
if (c == '?'){for (int i = 0; i <5; i++){displayLine(ques[i]);delay(delayTime);}displayLine(0);}
if (c == '.'){for (int i = 0; i <5; i++){displayLine(eos[i]);delay(delayTime);}displayLine(0);}
if (c == ' '){for (int i = 0; i <5; i++){displayLine(space[i]);delay(delayTime);}displayLine(0);}
delay(charBreak);
}

void displayString(char* s){
  for (int i = 0; i<=strlen(s); i++){
  displayChar(s[i]);
  }
}

void loop(){
  //Change the text inside here to change the text displayed.
  //Make sure to keep the brackets and the quotation marks.
displayString("..hello!..");
delay(40);
}
Save the sketch and upload it to your board. If you get any errors, make sure you have the correct board and com port selected. Your LEDs should start to flicker. If they don't, check all of your connections on your breadboard. The integers declared at the start of the code determine how fast the text is displayed. The higher the number, the faster you will need to wave the device. I found that the numbers used here worked well.
Now to do a quick test. Disconnect your Arduino from the USB cable, and attach your battery holder to the VIN and GND pins of your arduino

Now that you can move it around, carefully try swinging the LEDs in front of you. You should see some letters forming in the air provided it is dark enough around you. I found it helped to set my phone up to capture this.

It works! Now to make it a little more permanent.
Irons at the Ready!
Lay your Arduino board, resistors and LEDs on your protoboard like this:

You can of course make the layout as compact as you wish, as long as the circuit remains the same. Make sure you leave at least one line of protoboard contacts each side of your Arduino for the components and power supply. If you are a beginner in electronics, here are some great tips for you.
We will be soldering the LED cathodes together in a line to make a common ground, much like we did when we made our LED matrix.

Fold each cathode so that it overlaps the next, and solder them to create one unbroken line. Now we need to solder our anodes to the legs of the resistors next to them. I found the easiest way to do this was to solder each leg to their respective pad, and then place the iron between them to heat both joints, before finally adding more solder to bridge the gap between them.
Check each connection to see that it is solidly attached, and then use wire cutters to cut off the excess legs from the resistors and LEDs.

Now to repeat that same task, but this time connecting the other end of our resistors to the legs of the Arduino. This is the most fiddly part of the soldering. Each resistor much attach to its Arduino pin alone or the circuit will not work the way it is intended to. I made several mistakes here and had to use solder wick to remove unwanted solder multiple times.
Once you have made all of the correct connections, double check none of them overlap with their neighbours. If you have access to a multimeter here, you can use continuity mode to check each pin only has an unbroken line to it's resistor. If you've just got a multimeter, there is a great getting started guide in this article.

Once you have checked each connection, cut the excess length from the legs of the resistors
Adding Power
Now run a piece of wire from the GND pin of your Arduino to a hole next to where your line of soldered cathodes ends, and place the black wire of your battery holder next to it.

Now solder the wire to the GND pin, the same way we did with the resistors, and solder both wires to the end of the line of cathodes to create a common ground for the circuit.
Finally, attach a wire to the VIN pin of your arduino, and place your switch between that wire and the battery pack. Apologies for the hot glue covered switch in this photo, I had to dismantle the finished machine to photograph this stage!

Once it's all soldered together, put a battery in and flick the switch. Congratulations! The circuit is done. If you don't see anything lighting up, check each soldering joint carefully to see where there may be a break or a short circuit.
Enclosure
Now that we have it working, let's put it in a box. Here a painted cardboard box was used, though you could make something more permanant using a box bought in a hobby store, or even an old tupperware box. For extra geek cred, you could even 3D print your own on one of these cheap 3D printers.
Cut down your protoboard to size by scoring it and carefully snapping away parts you don't need.

Place your circuit inside your enclosure, and mark where the LEDs and switch need to poke through. You can optionally also mark where the USB connector on the Arduino board meets the edge so that you can plug it in to change the text without opening the box. Drill or cut the holes you need into the enclosure.

Now add a little hot glue to the edges of the LEDs and stick them in place. I glued a piece of sponge under the circuit so that it would sit snugly in the box. Attach your switch to the case. I used hot glue, though screws or bolts would make a much stronger connection. You could also glue the battery holder to the back of the circuit board to stop it moving around inside when the item is in use, but be sure that any metal contacts on the case don't touch any of your soldering joints!

Job's Done!
Close up your enclosure, and you are done! To change the text, attach your USB cable to the Arduino board, and change the text inside the brackets after displayString in the loop method. Find a dark place, and have fun!

Have you build a POV machine before and know ways to improve on the design? Are you planning on building one yourself? Tell us about your project in the comments below, we'd love to hear it!