Did you know that anybody can make a video game without programming? Though there are several beginner-friendly languages, you don't have to spend half a year learning Java or C++ to build a game. You could choose from many tools for various types of games, but one great option for kids (and adults) is MIT's free Scratch.
Scratch is a tool that lets you drag-and-drop assets to create games or animations. It's easy to understand, but teaches the building blocks of programming in the process. Let's see what you can create in Scratch, then walk through the steps to creating a simple Mario game.
Meet Scratch
To get started with Scratch, head to the homepage. You should create an account right away so you can save your creations. Click the Join Scratch button in the top-right of the window. Create a username and password, enter your date of birth and gender, then the system will ask for a parent's email address. Enter your own if you have one, then confirm your address so you can comment on other projects and share yours.
Now, you can jump right in. Click Create on the top toolbar to launch the Scratch editor. If you prefer, you can also download the offline editor to work without an internet connection.
On-Screen Elements
When you launch the editor, you'll see the below window. Let's break down its elements (see the full-size image if the small one below is unclear):

- Stage -- Shows a quick summary of your game. All active sprites and your chosen background will appear here. You can move sprites around if you like. Give your project a name in the field above this.
- Backdrop -- Here, you can select a background for your game. Choose from Scratch's library, paint your own, or import a file. You can also grab an image from your PC's camera, though most people probably won't need this option.
- Sprites -- The center for all the sprites in your project. Like backdrops, you can add default ones, create your own, or upload images. Click the little blue i icon on a sprite to rename it, change its angle, or hide it.
-
Work Area -- Where the bulk of your work in Scratch takes place. Use the tabs above (labeled Scripts, Costumes, and Sounds to change what you're working on.
- Scripts is for adding blocks of code, which we'll cover soon.
- Costumes lets you create additional poses for your sprites. This tab will change to Backdrops if you have one selected in area 2, and back to Costumes when you select a Sprite in area 6. A basic image editor lets you make changes to graphics in your game. You can rename assets here too.
- Sounds, unsurprisingly, is the center for adding and editing sounds.
- Blocks -- Depending on which of the three tabs you've selected, this area will switch between code blocks, sprite costumes/backdrops, and sound clips.
- Control Buttons -- The green flag starts your game, while the red stop sign shape ends it. You'll use these for testing.
Using Blocks
Now that you've gotten acquainted with Scratch's editor, let's talk about one of the most important bits of the tool -- the code blocks. Instead of typing out real code, these blocks let you define the behavior of your elements. They snap together like LEGOs, making it easy to see how they affect each other.

Click a sprite from the list on the left and make sure to select the Scripts tab to start dragging blocks for that element. Note that the blocks are color-coded and have edges like a jigsaw puzzle to show how they fit together. The ten categories and what they do are:
- Motion -- Make the given sprite move, whether by steps, toward another object, or via direct coordinates.
- Looks -- Lets the sprite hide or show itself, switch costumes, change size, or move between layers.
- Sound -- Play sounds, change volume, or adjust the tempo.
- Pen -- Draw with a marker and change its color and shape.
- Data -- Lets you create your own variables. This comes in extremely handy for elements that Scratch doesn't have built-in.
- Events -- Criteria for kicking off other actions, like when you click the green flag or press the space bar. You need these blocks to all your other blocks actually do something!
- Control -- Loops to repeat an action, perform an if-else statement, or stop something.
- Sensing -- Place these blocks into others to perform actions when a sprite is touching another element or the user is holding down a key.
- Operators -- Math elements that let you perform arithmetic or basic Boolean operations on variables.
- More Blocks -- Make your own blocks if these aren't enough!
A Simple Example
Let's take a simple example to illustrate how these blocks fit together, step by step. We'll make the Scratch cat kick a soccer ball into the goal, and play a sound when it goes in.
First, you need a cool soccer backdrop. Head into the Backdrop section in the bottom-left and click the picture icon to choose one of Scratch's backdrops. There's one called Goal1 that will work perfectly. Next, click the sprite icon to add a new pre-made sprite. You should see the Ball-Soccer in the list -- double-click it to add it to your sprites.
Now that the graphics are ready, you need to start with some blocks. Select the cat, since he's the one doing the action. Remember that the Events tab holds many of the starting blocks? Take a look, and you'll see one that fires when you click the green flag. That's a perfect starting point -- drag it over into the Scripts work area.
Once you start, you want the cat to run over and kick the ball, right? That sounds like something that would fall under the Motion tab. You have several options to make the cat move, such as the Move X steps block. But we can't guarantee how many steps it will take the cat to reach the ball. There's a better block for this -- try the Glide X secs to block. One second is a fine time, and you'll need to click on the blue i icon of the soccer ball to see its coordinates. Enter those into the block, and your first action is complete!
Kicking the Ball
Once the cat touches the soccer ball, it should fly into the goal. So, select the soccer ball so you can add some actions to it. Remember that every action must start with an Event -- the green flag is fine for this instance. Now, you don't want the soccer ball to move until the cat touches it. Have a look at the Control category for a block that lets us limit its behavior. The Wait until block sounds about right!
Notice how the Wait until block has an elongated hexagon shape inside it. Many of the Sensing blocks fit this shape, so take a look at those to find the right one. See the touching block at the top of the list? You can drag that right inside the hole inside Wait until. Change the drop-down box to Cat or whatever you named the cat sprite.

Now you just need to make the soccer ball fly into the goal. The Glide X secs to block in the Motion category that we used earlier for the cat will work fine. Snap that block under wait until, and place your mouse pointer over the goal net. You'll see X and Y coordinates underneath the stage -- plug those into the Glide block. The ball should move pretty quickly when kicked, so let's try 0.5 seconds for the timing.
And the Crowd Goes Wild
The last step is adding sound! Select the Sounds tab above the work area to add a new one. Click the speaker icon under New sound to grab one from Scratch's library. There's one called Cheer under the Human category, which is perfect. Double-click it to add, then head back to the workspace for the soccer ball.
You'll find a block labeled Play sound under the Sound category. Snap that under the glide block, and you're all done! Click on the green flag to play your animation. The cat will run over to the ball, and when he touches it, the ball flies into the goal and the crowd cheers.
[video width="480" height="360" mp4="https://www.makeuseof.com/wp-content/uploads/2017/04/Scratch-Soccer-Example-Video.mp4"][/video]
That wasn't too hard! Now that we've dug into how blocks relate and fit together, let's look at how you can build a Mario game using Scratch.
Creating a Basic Mario Game
The simple soccer example above shows how you can use blocks to control sprites, but it doesn't have any gameplay, animations, or music. Let's get more into it and create a simple Mario game. We could spend thousands of words on every aspect of making a game, so we'll stick to the basics.
Please note: Because I'm not an artist, for the purposes of this tutorial I'm copying Mario sprites from the web. Mario graphics are owned by Nintendo and you should not publish any game using copyrighted sprites. This is presented as an example only.
Import Graphics
The first step is getting your sprites and backgrounds imported into Scratch. Since we're using images from the web, I'll download them and then upload them into Scratch. Creating logic so that Mario can jump on enemies to defeat them but dies from touching their sides is too advanced for this tutorial, so we'll have him collect coins instead.
At the end of the tutorial, I'll provide a ZIP file with the final assets I used. If you use those you won't have to worry about the image manipulation instructions in the tutorial. If you want to download everything yourself, carry on. Here are the sprites that I downloaded:
- Mario running (two frames is sufficient for us)
- Mario jumping
- Animated coin
- Ground blocks
- Clouds
Scratch has a Blue Sky 3 background, which will work fine for our needs.
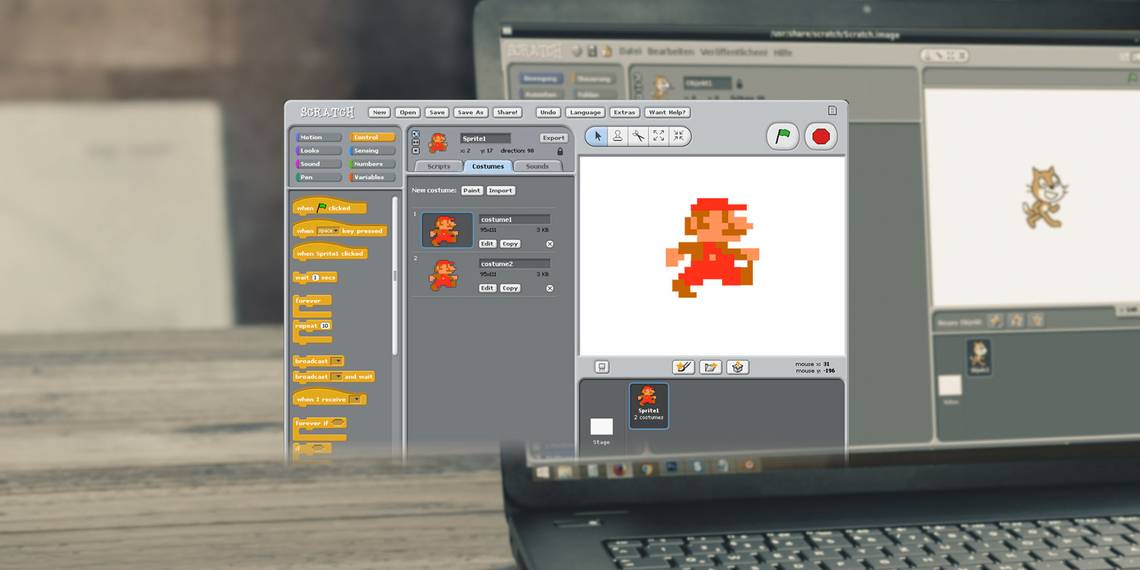
Edit Sprite Costumes
Because there are two sprites that make up Mario's run animation, you need to add them as separate costumes. Use an image editor like Paint.NET to save the two Mario frames as separate files -- you can ignore the third. Upload the first Mario sprite, then select it and use the Costumes tab to upload the other sprite as his second costume. Give them distinguishable names, like Mario-1 and Mario-2. Add the jumping sprite as another costume for Mario.

Use an image editor to extract the cloud from the image provided above, then upload it as a new sprite. It's not animated, so you don't need to add a separate costume.
For the ground, you'll need a lot of blocks since Mario runs along them. Use Paint.NET to grab the six blocks in the middle of the Ground Blocks image, then save them as a separate file. You'll need about 12 blocks to cover the entire bottom of the screen once you shrink them to a good size. Thus, you should place two copies of these six blocks side-by-side for your Ground sprite. Upload this and then make two ground sprite duplicates in Scratch.
The coin is an animated GIF, so it's a little different. Whenever you upload it, Scratch will create costumes for every frame of the animation. This image has 11 total frames, but unfortunately also has a white border around it, which looks off against the blue background. You'll have to open each costume for the coin inside the Scratch editor. Use the pipette tool to select the blue background color, then use the paint bucket tool to change the white edges of the coin to pale blue.

You'll need to resize sprites using the Grow and Shrink buttons along the top of the screen, right above the green flag button. Click either button, then click the sprite you want to change on the stage to the left. This will resize all costumes, too. Ballpark them for now; you can fine-tune later.
Import Sounds
Just like sprites, we'll grab a couple of sounds to flesh out our game. Go ahead and download these, then upload them using the Sounds tab. While you're at it, look into adding them as cool ringtones for your phone.
Animate the Coins
Now that all of the assets are ready, it's time to start making them come alive. We'll start with the coins, since those are easy. Select the coin sprite and the Scripts tab. Since our coins are animated GIFs, we can use a series of blocks to constantly scroll through their costumes so they appear to move.
An animation script looks something like this:

In short, this script sets the coin to its default state when you click the green flag. It then cycles through the frames endlessly, at a speed you set as the FPS variable in the Data tab. Play around with that number if you don't like the speed.
Uncheck the box next to Coin-FPS in the Data tab (this is a custom variable you create) so it doesn't show on-screen.
Making Mario Move
Now for the hard part. Many steps are involved in making Mario move, and it's actually a trick that scrolls the ground blocks to give the appearance of movement. Rather than try to explain every block loop, I'll provide screenshots of code blocks and explain their highlights.
First, you need to make four variables in the Data tab. All four of these are For all sprites except for Velocity, which is only for Mario:

- Gravity is a constant that pulls Mario back to the ground when he jumps.
- OnGround keeps track of whether Mario is touching the ground or not.
- ScrollX measures the horizontal movement of the screen.
- Velocity (Mario only) controls the speed at which Mario jumps.
Animating the Ground
You've already made two duplicates of your Ground sprite by right-clicking it and choosing Duplicate. Drag Ground-1 to the far left of the screen, so its leftmost block touches the far left of the screen. Then, drag the other ground sprite(s) to the right of the first one. Line the edges up, and it will look like the ground is one solid piece.
Here's the code block you'll need for each Ground sprite:

This places the ground at the bottom of the screen, then simply scrolls the blocks as Mario moves. ScrollX is the position of the blocks; 0 is the default position that launches when you click the green flag. You'll notice that you can't move left immediately after you start.
For the second (and further) ground blocks, increment the 0 digit in ScrollX + 480 * 0 by one for each new piece of ground. This will offset it so it scrolls smoothly.
Mario's Logic
That's all it takes for the blocks, but Mario has many more code blocks. Here's what each of them do, with a brief summary:
This block of code changes the ScrollX variable when Mario moves. Whenever you press left or right, Mario faces in the appropriate direction and takes a step, incrementing ScrollX by 3. If you find that Mario flips upside down when you move left, click on the blue i on his sprite and make sure the Rotation style is set to the second option. This will flip him left and right instead of in a circle.

Here we see the code that handles Mario's costume changes. When Mario is not on the ground, he has the jumping costume. Whenever you're moving left or right, Mario switches between frames every tenth of a second. Let go of the arrow keys, and Mario defaults to his standard frame.

A simple bit of code that figures out the OnGround variable. If he's touching one of the ground blocks, OnGround equals 1 (true). When he's jumping, OnGround is 0 (false).

These two blocks of code handle Mario's jump velocity. On the left is a block that ensures Mario doesn't have any momentum if he's on the ground. If he's in the air, then his velocity is gradually slowed by gravity, which is a constant value. The right block makes Mario jump whenever you press the space bar. His jump sound plays, and the velocity propels him into the air until gravity takes over.

Our last block of code for Mario is all setup. When you click the green flag to start, the music begins, all variables are set to their default values, and Mario spawns in the middle of the screen.
Collecting Coins
Let's jump back to the coins. We need to make sure that when Mario grabs one, it makes a sound and disappears. Let's make a separate script for that -- separating scripts by function is an important practice in programming. A big jumble of blocks makes it harder to figure out the problem when something goes wrong.
Here's our coin collection script:

This is pretty easy: whenever Mario touches a coin, the collection sound plays and the coin hides. In the coin animation code, we've placed a Show block so the coins re-appear when you restart.
Scroll Coins and Clouds
You're almost there! Since Mario doesn't move but the ground scrolls, we need to make sure that the coins scroll too so Mario can collect them. Here's how that works:

This places the coin at a Y value (that's vertical screen position) where Mario can easily grab it. It then uses similar logic to the ground blocks to scroll towards Mario. Note that we've increased the scroll rate to 0.75 so that coins move towards Mario quickly. For the second and third coins, we increase the set y to field to -40 and -20 so they're a little higher up and harder for Mario to grab. In the Set x to block, increase the 150 * 1 to 150 * 3 and 150 * 5 for the second and third coins to place them further to the right, off-screen.
The clouds use a nearly identical block of code:

Again, this places a cloud at a specific height, then scrolls it as Mario moves. For a second cloud that's in front of Mario instead of behind him, change the set x to block to (ScrollX * 0.1) + (150 * 1), just like the coins.
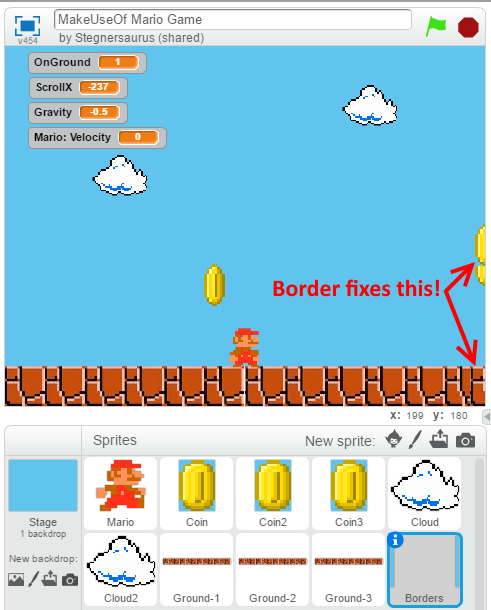
Add Borders
Because of the way that we implemented the ground and coins, you'll see coins stuck at the edge of the screen until they scroll into view. This is unsightly, so you should create a quick border sprite that's the same color as the background to hide this on both the left and right sides.
The easiest way to do this is to right-click on the stage and click Save picture of stage. Open this in Paint.NET and use the pipette tool to select the blue background color. Add a new layer using the bottom-right dialogue. Then, use the rectangle tool to draw a filled blue rectangle on either side of the screen. Cover about a half of each block, then delete the background layer.

Save this as a PNG file and upload it as a new sprite called Border. Since you drew the borders right over the screen, you can line it up perfectly.
Then, you just need a few blocks so that the border is always in front:

Expanding Your Game
Try out the final product here!
We've set up just the basics of a Mario game together. You can add lots of elements to your game from here. Try adding Super Mushrooms to power Mario up, making some pits that Mario must clear, or creating an end-level flag. With the building blocks you've picked up here, you can add more sprites, variables, and logic to make anything you want. We're looking forward to seeing what you come up with!
We'd like to give a shout-out to Scratch user dryd3418, as we used some of the code from his Super Mario: Scroll & Jump Tutorial project in our own project for this article. For more detailed help, including scripts you can copy, check out another user's guide to making a Mario game. If you want to take an easier route, check out the Create Your Own Mario Game project that lets you drag and drop sprites to make a simple game.
Note that on any Scratch project, you can click See Inside to open the project up in an editor just like you used for your own project. This lets you get a glimpse into the blocks that someone used to make their project work, and can help you out when you get stuck. I've made my project available to all, so feel free to view it and have a look at the code if you need some help. I've also zipped all the assets I used in this game, so you can download them to save some time.
Interested in taking this a step up? Check out Scratch For Arduino to build projects on that platform. If you're ready to dive in, check out everything you need to make an iPhone game from "scratch."
For other fun things you can make with your kids, take a look at these sites for DIY crafts and projects for kids and teens.