Full proficiency in Microsoft Office demands the use of keyboard shortcuts. Although there are plenty of built-in keyboard shortcuts for Microsoft Excel, for the best workflow you usually need to edit or customize those shortcuts to better fit your needs.
Luckily, Excel supports some customizable keyboard shortcuts, and we're here to show you how to create your own.
A Note on Default Excel Keyboard Shortcuts
Unfortunately, it's not all perfect in the Excel custom shortcut realm. Excel doesn't offer the functionality to override standard shortcuts, so you can't adjust the shortcut key for something that already exists.
Thus, there are three main types of keyboard shortcuts:
- Standard shortcuts, like Ctrl + I for italics, which you cannot change in Excel.
- Alt shortcuts, where you press the Alt key to activate shortcuts for Ribbon items. For example, pressing Alt > N > T will select the Insert tab on the Ribbon, followed by the Table option.
- Macro shortcuts, which are completely customized. We'll discuss these in a bit.
So while you can't tweak any of the default shortcuts, you can still access quite a bit of functionality on the Ribbon or create macros. Thus, we'll use those options to make custom shortcuts.
1. Custom Quick Access Toolbar Commands
The Quick Access Toolbar (QAT) is a helpful strip of commands that always stays at the top of your screen. By default, it only includes a few options, such as save, undo, and redo, which you might want to remove, since they already have easy keyboard shortcuts. But you can add many more commands to the QAT.
We mentioned that Alt codes let you access anything on the Ribbon. If you press Alt, you should notice some popup shortcut keys that also appear near the QAT, giving you a one-step shortcut to any Excel command you wish.
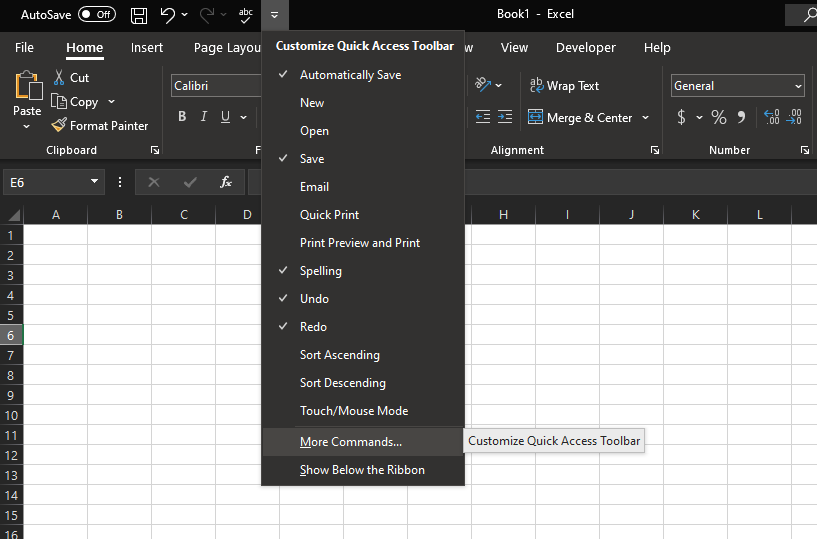
To set up the Quick Access Toolbar in Excel as you like, click the dropdown arrow to the far right of the current icons. You can check a few common options here, but for a full list, you'll want to select More commands.
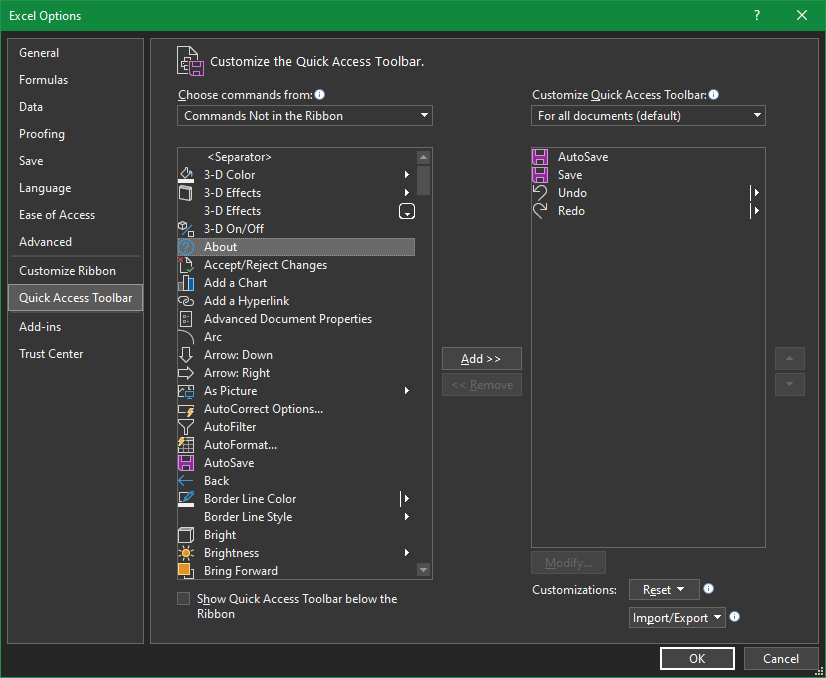
This opens the customization window, where you'll see a list of available commands in the left box and your current QAT commands on the right.
Customizing the Quick Access Toolbar
Click any command in the right box and hit the Remove button to erase it or use the arrow buttons to the right of the box to re-order the current items. Once you've got that sorted, check out the left box to find new commands you want to add.
By default, the dropdown box shows Popular Commands, but you can change it to Commands Not in the Ribbon if you want to avoid duplicating what's already there. You can also show All Commands, but be warned that there's quite a long list.
Have a look through the list and select any functions you'd like instant access to. The QAT allows for lots of commands, so don't be afraid to pick several of your favorites or even find some new features to try.
If you want to create groupings, there's an option called <Separator> that lets you add a divider between icons. And to preserve your setup for the future, use the Import/Export button in this window to export your customizations.
Once you've got everything in order, just click OK to return to Excel with your new and improved QAT. When you want to access one of its functions, press Alt, followed by the number of the command, to execute it right away.
This is a lot faster than hunting through menus to find the right command.
2. Create Your Own Excel Macros
Macros are an extremely useful (yet often overlooked) feature of Office that allow you to record a series of actions and automatically play them back. If you have trouble remembering complex formulas, for example, you could create a macro to automatically apply the formulas to specific cells.
Macros are really just Visual Basic code running in the background to make Excel perform actions, but you don't have to know how to program to take advantage of macros.
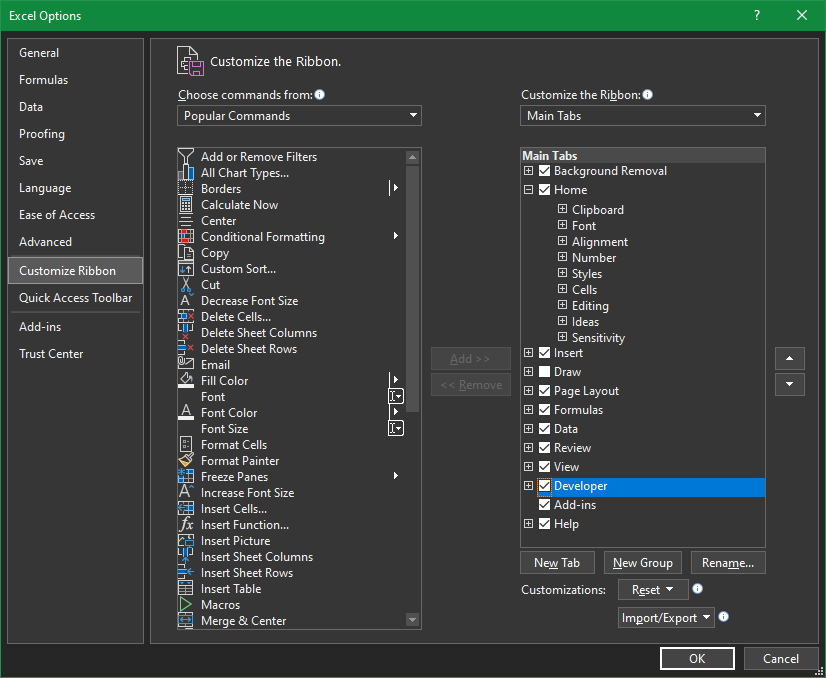
To get started with using them, enable the Developer Ribbon tab by going to File > Options and choose Customize Ribbon on the left pane. On the right side, make sure Developer is checked, then press OK to return.
Recording New Macros
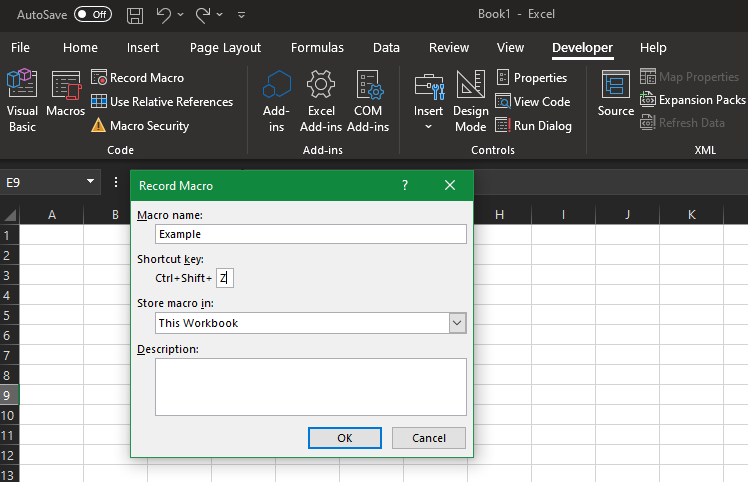
Now you can record your first macro. Head to the Developer tab on the Ribbon and choose Record Macro in the Code section. Give it a name to remember it by (it can't have spaces) and assign it a key that works for you.
The shortcut box shows Ctrl + another key, but you can also add Shift to this by holding it while you select a key. Bear in mind that you can override standard keyboard shortcuts here, so if you make your macro run with Ctrl + Z, you won't be able to use that shortcut to undo anymore.
Under Store macro in, select Personal Macro Workbook. This is a file that allows you to share macros between Excel workbooks, which is perfect for defining shortcuts. If you want to run macros on only one workbook, change this setting to This Workbook instead. Give your macro a brief description if you like, then click OK.
From here, everything you do is recorded. Any cell you select, font changes you apply, or characters you type become your macro. So you could, for example, make a macro that selects cell B3, types "test," and formats it as bold. Once you've performed exactly the action you want to record, select Stop Recording on the Developer tab to end the macro.
Using and Editing Macros
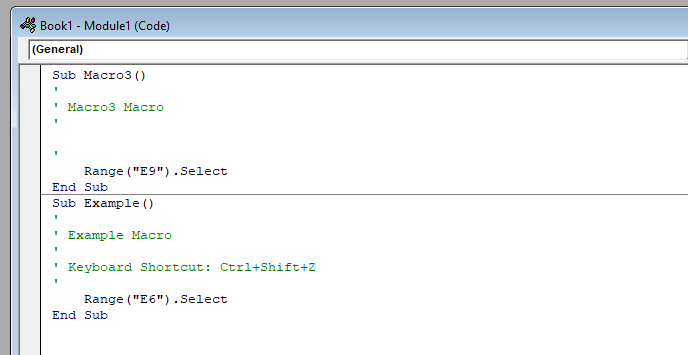
After this, you can access your macro by choosing Macros from the same Code section of the Developer tab. This shows a list of your macros; press Edit to view the Visual Basic code for the macro, if you like. This is a good way to make sure you didn't record any extra steps, even if you don't fully understand the code.
Once you're satisfied, you can press the key combo you assigned at any time to run your macro. To change the key combination later, select it in the list of Macros and choose Options.
Here's an advanced tip: you can even combine macros and the QAT. Once you've saved a macro, open up the QAT menu again and change the Choose commands from box to Macros. Select a macro you've created from the list, and you can add it to the QAT just like any other action.
Thus, if you have trouble remembering macro shortcut combos, you can instead run them from the QAT with Alt and a number.
What you do with macros is up to you, but there are tons of possibilities. Think of anything you do in Excel on a regular basis that you'd want to automate, and try making a macro for it. Automating these tedious tasks can save you hours of time.
Have a look at our guide to making Excel macros for more ideas and help.
Easily Create Custom Excel Shortcuts
Now you don't have to waste time performing repetitive tasks or hunting through Excel menus to find a particular feature. Shortcuts take a bit to set up and everyone will want different ones, but they're vital for Excel efficiency.
Macros aren't scary once you've done a few, and the QAT is handy for everyone. But those aren't the only timesavers Excel is hiding.
Image Credit: GooDween123/Shutterstock

