Have you ever wanted to design your own game controller? It's easier than you think!
In this short project we will build a simple custom game controller to use with the Unity game engine. This controller will be powered by an Arduino Uno, though you could use one of the many alternatives out there for this project too. We will also create a basic game where you will use your controller to avoid falling objects and slow down time.
For This Project You Will Need
- Arduino or similar microcontroller
- 1 x 10k Ohm resistor
- 1 x Momentary switch
- 1 x Potentiometer
- Hook-up wires
- A breadboard
- Unity game engine
- The Uniduino plugin from Unity Asset Store ($30)
- Complete project code, in case you don't want to write it out (doesn't include the Uniduino plugin)
Most of these things are available in an Arduino starter kit. If haven't got a starter kit check out our guide for choosing the best one for you.
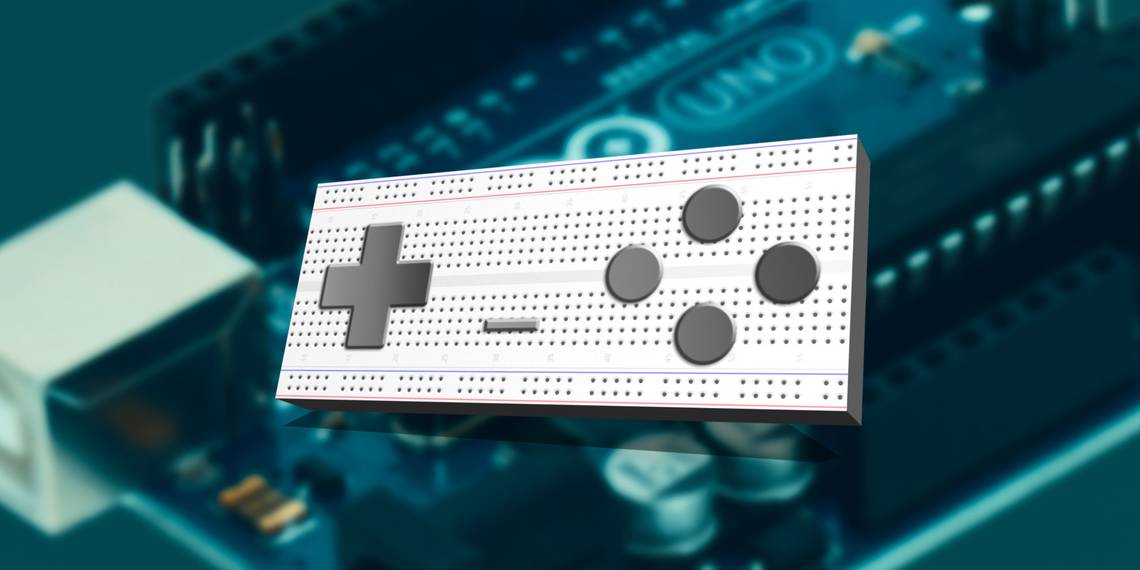
You can make your controller as complicated as you wish, though for this example we will set up a potentiometer and a button - perfect for controlling a simple arcade game.

Assembling Your Controller
Set up your breadboard and Arduino as shown in the image below. This is what we will be using as our game controller, although you could use almost the exact same setup as a DIY midi controller too!

Preparing Your Arduino
Once you have everything wired up, connect your Arduino via USB. In Arduino Software IDE head to Tools > Board and Tools > Port to select which microcontroller and port you are using. The Arduino IDE comes bundled with the sketch we need, and you can find it under File > Examples > Firmata > StandardFirmata. Click Upload and you will be ready to go.
If you are new to Arduino and your head is melting slightly, check out our Beginner's Guide to help you get it talking with your computer nicely.
Setting Up Your Unity Project
In Unity, open Window > Asset Store to access Unity's Asset Store from within the Unity Editor. Search the Asset Store for the Uniduino plugin. This plugin will allow you to receive and send data to and from your Arduino pins inside Unity. The plugin at the time of writing costs $30. It is possible to do this project without buying the plugin, though it is rather more complicated and you may find the plugin more convenient all round.

This video from the creators of the plugin takes you through the process of testing everything is working, along with first time setup. Note that you may also have to reset the Unity editor on Windows.
We can use this same test panel to test out our controller. Set Pin D2 to INPUT and Digital. Further down, set Pin A5 to ANALOG. Your potentiometer and button should display values on screen next to their pin numbers now. Progress!

Now to Make Something We Can Control
So we have a controller, but what shall we control? Well, the possibilities are endless, but for today we shall create a very simple dodging game to test out our new control system. We will move over the game setup quite quickly, so if you are totally new to the Unity engine you may find our Unity Game Programming Beginner's Guide useful to get your bearings.
We will build a very basic game in which your aim is to dodge your sphere to the left and right to avoid falling cubes, which will utilize your newly made custom controller.
Create a new scene and drag the Uniduino prefab from Assets > Uniduino > Prefabs into your hierachy and drag the Uniduino prefab into the hierarchy. We need it there to do the talking between our game and controller.
In the Unity hierarchy click Create > Sphere and use Transform tab in the Inspector to move it to the bottom of the game screen.

It's Time to Get Coding
Now to add some code to this party. With the sphere selected in the Hierarchy, click Add Component > New Script at the bottom of it's Inspector window. Name it sphereMover and select C Sharp from the drop down menu. Click Create and Add and the script will be added to the GameObject. Double-click on it to open the script and enter this code:
        using UnityEngine;
using System.Collections;
using Uniduino;

public class sphereMover : MonoBehaviour
{
 //Headers aren't scrictly neccesary, but they make life easier back in the Inspector.
 [Header("Arduino Variables")]

 //we need to declare the Arduino as a variable
 public Arduino arduino;

 //we need to declare an integer for the pin number of our potentiometer,
 //making these variables public means we can change them in the editor later
 //if we change the layout of our arduino
 public int potPinNumber;
 //a float variable to hold the potentiometer value (0 - 1023)
 public float potValue;
 //we will later remap that potValue to the y position of our capsule and hold it in this variable
 public float mappedPot;

 //public int for our button pin
 public int buttonPinNumber;

 [Header("Sphere Variables")]

 //variables to hold the values we noted earlier for the sides of our screen
 public float leftEdge;
 public float rightEdge;

 // Use this for initialization
 void Start ()
 {//and initialize we shall, starting with the Arduino Variable.
 //we are only using one arduino, so we can use Arduino.global to grab it.
 arduino = Arduino.global;
 arduino.Setup(ConfigurePins);
 }

 void ConfigurePins()
 {
 //configure the Arduino pin to be analog for our potentiometer
 arduino.pinMode(potPinNumber, PinMode.ANALOG);
 //Tell the Arduino to report any changes in the value of our potentiometer
 arduino.reportAnalog(5, 1);
 //configure our Button pin
 arduino.pinMode(buttonPinNumber, PinMode.INPUT);
 arduino.reportDigital((byte)(buttonPinNumber / 8), 1);
 }
}
Take a moment to read through the code comments. So far, we have declared some variables for our Arduino, its pins, and our Sphere. We have also used the
Start and ConfigurePins methods to initialize our Arduino on run time. Lets save our script, and go back into the Unity editor and see what's changed.

We can now see our public variables in the Inspector window. Let's see what we can enter at this stage to help us later. We know what pin's we are using on the Arduino from our build earlier, we can enter them. We also know from our experiment earlier how far we want our sphere to be able to travel left and right so it does not fall off the screen. Lets enter these values now.

First Signs of Life
It's time to actually see values from our Arduino inside the Unity Editor. For now, we can add one line of code to our sphereMover script's Update function, and save the script again.
        void Update ()
{
 //We assign the value the arduino is reading from our potentionmeter to our potValue variable
 potValue = arduino.analogRead(potPinNumber);
}
Now that we have our potValue variable being updated every frame, we can see it's value in real time in the Unity Inspector. Before we give it a test, now would be a good time to check that the Uniduino plug in is listening on the right port. Click on Uniduino in the Heirarchy, and check it's Port Name in the Inspector. If it is blank, fill in the correct port number for your Arduino. In this case it was COM4, though it may be different for you. Check using the Arduino IDE if you're not sure.

Select your sphere in the hierarchy and click the Play button at the top of the screen. The system needs a few seconds to initialise, after which you should start seeing the Pot Value variable change in the inspector when you move the potentiometer.

Now we are talking! Well, strictly speaking Unity and the Arduino are talking, but who's counting? If you have got this far and are not seeing the value change in the inspector, check over the setup steps, and make sure you have the correct Port selected for your Arduino.
Let's Move This Sphere
Now that we have out potValue variable being updated, we want to use this value to move our sphere. When the potentiometer is all the way to left we want the sphere to be at the left side of the screen, and vice versa. Objects in Unity are positioned at a point in Vector space, determined by the values of it's Transform.position. In the below image, where the sphere is at the furthest point to the left we would want it, you can see that it's position vector is 9.5, -4, 0.

We want to affect the sphere's X position. Unfortunately using the values from our potentiometer directly will not work, as when the potentiometer is all the way to the left it gives a value of 0 -- which would put our sphere right in the middle of the screen. At the other extreme, the potentiometer's top value, 1023, would place the cube way off to the right of our screen. Not useful. What we need here is some math.
Why Do Math When Unity Will Do It For You?
For those of you out there dreading staring at a piece of paper covered in nonsensical numbers (although there are some great websites that can help you learn Maths), fear not. We need a way of making our potentiometer values to correspond with our sphere's X position. Luckily, we can use an Extension Method.
An Extension Method is a script that does a specific job for us. In this case, we give it the values we have, and it returns them mapped to one an other, ready to be used in our sphereMover script. At the top of the Project panel, click Create > C# Script and name it ExtensionMethods. Enter the code below into the script:
        using UnityEngine;
using System.Collections;

public static class ExtensionMethods {

 //our handy dandy Remapper function
	public static float Remap (this float value, float from1, float to1, float from2, float to2)
	{
		return (value - from1) / (to1 - from1) * (to2 - from2) + from2;
	}
}
Save the script, and head back to your sphereMover script. We can now use this Remap function in our ExtensionMethods script in our Update function to convert our potentiometer values into useable values in our game. Under where we just assigned the potValue variable, type the following:

The prompt shows us that our Remap takes two sets of From and To values, and maps them together. We can enter our values into this.
mappedPot = potValue.Remap(0, 1023, leftEdge, rightEdge);
Save your script, head back to the Unity editor, and hit the play button. You should now see that the Mapped Pot variable changes when you move the potentiometer, to correspond with the values we determined for our Left and Right Edges. Take a moment to sit back and thank your ExtensionMethods script. Not a calculator in sight.

Note: if you are noticing that your values are reversed, so when your potentiometer is all the way to the right you are getting a negative value for your Mapped Pot variable, you may have your potentiometer set up the wrong way round. Luckily, you can fix this without doing any rewiring. You can simply switch the values when you remap them:

Now we finally have usable values. Now all that is left to do is to assign those values to our sphere's X position:
        //Assign the mapped pot value to the sphere's x position
 transform.position = new Vector3(mappedPot, transform.position.y, transform.position.z);
Save your script, head back to the Unity editor and press play. You should now be able to move your Sphere to the left and right using your potentiometer!
Putting the Button to Work
Now that we have our sphere moving, wouldn't it be nice to have a way to slow things up a bit when we get in a tight spot? We are going to use our button to slow down time in our game. Open your sphereMover script, and add this code to your Update function
        //if Unity detects the button is being pressed, the time scale slows down
 if (arduino.digitalRead(buttonPinNumber) == 1){
 Time.timeScale = 0.4f;
 }
 else Time.timeScale = 1.0f;
Now we have the mechanics of our game, let's add some obstacles! We are going to use the natural enemy of the sphere, the cube. In the hierarchy, click Create > 3d Object > Cube. In the cube's inspector, Add Component > Physics > Rigidbody. Set the Drag value of the rigidbody to 5. Also, under the Box Collider component in the inspector, select Is Trigger. This will allow us to detect collisions with our Sphere.
Create a script on the cube and call it collideWithSphere, open the script and delete the Start and Update functions as we won't be needing them this time. Enter this code:
        using UnityEngine;
using System.Collections;

public class collideWithSphere : MonoBehaviour
{
 void OnTriggerEnter(Collider other)
 {
 Destroy(other.gameObject);
 }
}
OnTriggerEnter sends a message whenever the trigger collider hits another collider. In this instance, we are telling it to destroy whatever it touches. Save the script and head back to the Unity editor. Drag the cube from the hierarchy to the Project panel. You'll notice the text of the cube in the hierarchy has turned blue. This is because we have created a prefab and saved it in our project. Delete your cube from the hierarchy now.
All we need now is a script to spawn the cubes. In the hierarchy click Create > Create Empty, and rename it to Game Manager in the Inspector and add a script to it called gameManager. Open the script and add this code:
        using UnityEngine;
using System.Collections;

public class gameManager : MonoBehaviour {

 //a variable to hold the prefab we want to spawn
 public GameObject cube;

 //we want some variables to decide how any cubes to spawn
 //and how high above us we want them to spawn
 public int numberToSpwan;
 public float lowestSpawnheight;
 public float highestSpawnheight;

	// Use this for initialization
	void Start ()
 {
 for (int i = 0; i < numberToSpwan; i++)
 {
 Instantiate(cube, new Vector3(Random.Range(-9, 9), Random.Range(lowestSpawnheight, highestSpawnheight), 0), Quaternion.identity);

 }
 }

	// Update is called once per frame
	void Update ()
 {

	}
}
Save the script. Back in the editor, select the Game Manager in the hierarchy, and drag your cube prefab from the project panel to the Cube variable in the Inspector. Fill out the values for your spawning here too. You can fiddle with it to make it as hard or easy as you like. Note that it is worth having your lowest cubes spawn high enough to allow Uniduino to initialise -- losing the game before you are able to move may be frustrating!

The Finished Project
Now when you press play, the cubes will spawn above you and fall. You can use your potentiometer to avoid them, and your button to slow down time.
In this project we have created a custom controller with an Arduino, configured Unity and Uniduino to communicate with it, and created a simple game to test it out. The concepts here can be applied to almost any project, and there are even game jams which specialize in custom controllers.
With Arduino and Unity you could create a custom controller from almost anything. Have you created a hi-fi that controls a spacecraft? A toaster that controls a platform game?
If you've made a project like this I'd love to see it! Post it in the comments below!