For the ultimate immersive viewing experience on a TV, nothing beats an Ambilight. These dynamic lighting systems extend your screen by reflecting the on-screen content onto the wall behind. Not only do they look incredible, they also help to reduce eye-strain.
Unfortunately, Ambilight is an exclusive technology that's only available in a few Philips TV models. But there's a few alternatives to get the same effect, including a DIY option we'll build today, that costs as little as $50. Interested?
Non-DIY Alternatives
Before we tackle our DIY Ambilight, you should know that there are a few non-DIY options available to purchase which may be more suitable.
Govee TV Immersion Backlight
The easiest off-the-shelf option is also the cheapest, at under $100. The Govee TV Immersion Backlight fits TVs upwards of 55-inches, and uses a low-cost camera to "watch" the TV. This gives a dynamic lighting effect without needing to intercept the HDMI signal. The control box is equipped with Wi-Fi too, so the LEDs function as a smart lighting system and even have a music reactive mode.
Philips Hue Lights
Certainly not a cheap option, and limited to playback from your PC (the same as our DIY project below), the Hue Sync software enables any color Hue lighting fixtures to be used as ambient lighting that reflects content on your desktop.
To set this up, just create an Entertainment Zone in the app, position your lights, and download the Hue Sync app.
The overall effect won't be nearly as impressive as a pixel LED strip, but if you already have Hue bulbs, it's a quick way to see if you even like the experience of dynamic ambient lighting. Though it looks great in video demos, some people find it extremely distracting in real life!
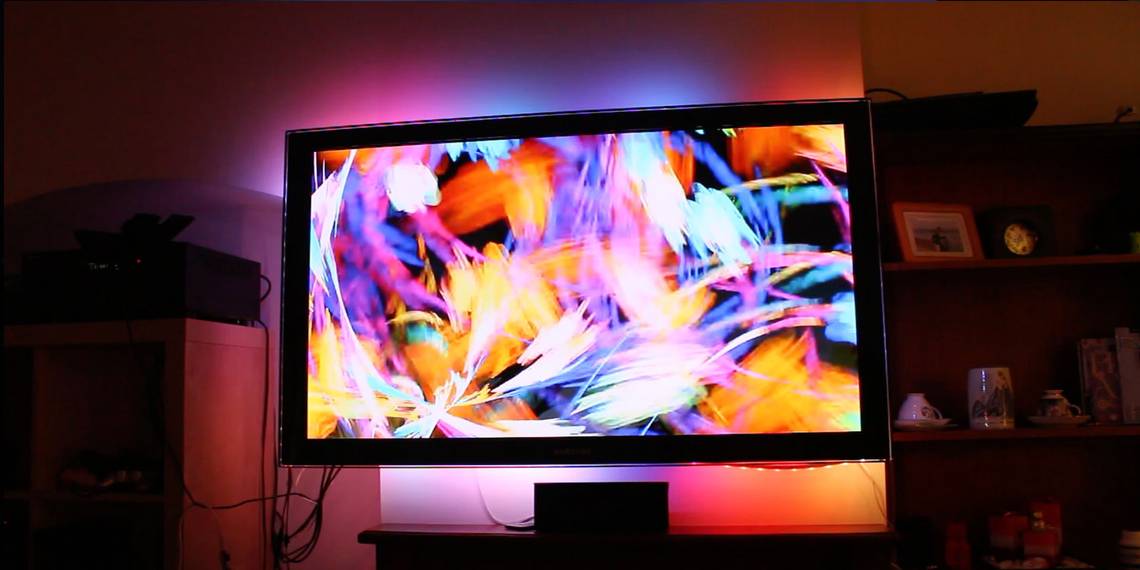
DIY Amblight: Demo
First, a demo of what we're making. In case you're curious, the video playing is Electric Sheep, a 3-hour long psy-trance trip. It's a perfect match to demonstrate ambilight technology. Of course, not all video is going to produce the same pleasing results. Many movies are just too dark, or are presented in a cinema format that results in black bars (and consequently, no color data). I found the best results occur with bright, vivid colors found in most animations, as well as action movies with elaborate CG effects.
It's worth nothing that this DIY version only works with some software running on the computer side; it doesn't work with a generic HDMI signal. So it's great for things like VLC, Plex, or PC gaming.
What You Will Need

The parts list is short—no complex electronics here:
- Arduino Uno
- 5V power supply
- WS2812B 5-meter LED strip
- Double sided tape (don't make the same mistake I did. Use good quality 3M tape)
- Processing installed on the PC
The main part of this ambilight clone is a string of individually addressable WS2812B LEDs. Each LED has its own chipset and single line is used for communication. You can find a five meter strip on Amazon for around $30.
I used an old ATX power supply that I'd previously converted into a bench supply as a suitable 5V power source for this project, but you should calculate your own requirements at a rate of around 50mA, or 0.25W per LED. The strip linked above is a total of 360 LEDs, and therefore requires 90W at full brightness, or 18A at 5V. A 5V/20A power supply should suffice if you purchased the same LED strip.
Wiring

Let's test the lights first to ensure the power supply is sufficient and the basic communication is working.
Connect pin 6 from the Arduino to the line labelled DIN on the LED strip. Your strip should have a breakout lead on one end, so use a male-female jumper wire.
Also connect the GND pin from the Arduino to GND (or -ve) on the strip. Do not connect the LED strip to the 5V pin on the Arduino. You will fry the Arduino and your USB port very quickly and irreparably. Instead, use an external 5V power supply for the strip. The Arduino will receive power from the USB port on your PC.
Again, to emphasize this point, only the signal (DIN) and GND should be connected from the LED strip to the Arduino.
Note that these strips have a specific direction in which the signal must flow, indicated by arrows. If you're connecting multiple strips, you may also need to re-inject the power midway to avoid voltage drop, but I found this was unnecessary with just 5 meters.
Load the Arduino code and Test

There's both an Arduino and Processing part to the project. First ensure you've added FastLED to your Arduino libraries directory, then download this code. Modify line 7 for the number of LEDs you have; and if you find the color profile is broken, modify line 47. For the strip I purchased, it's using chipset WS2812B and color order of "GRB". See the FastLED documentation on how to calibrate to your strip.
Lastly, you need the Processing components from the Adafruit project code. For testing, open up Colorswirl.pde. Again, modify the number of LEDs on line 29; and the serial device on line 44. If Arduino is the only COM device plugged in, Serial.list()[0] is fine. If not, try Serial.list()[1]. Run the app and with any luck, your strips will show a beautiful swirl of colors.
Note that you're not limited to Processing. Anything which is compatible with the Adalight (such as Prismatik) can also be configured to work with this, but we'll only be covering the setup procedure for Adalight in this tutorial.
Measure and Cut To Size

Pull your TV off the wall or turn it around, and measure up. I'm assuming you'll be sticking the strips directly to the TV, but if that's not the case you'll need to build a frame. Try to ensure you get a pixel directly in each corner, but otherwise this step should be easy. Go ahead and cut the strip into shorter lengths - cut only between the copper pads where the dashed line indicates; and apply 3M double-sided sticky tape to each length.
If you need to leave a gap at the bottom due to a TV stand, do so, but make sure your strip starts on either side of that and not in the corner. You can configure those missing pixels later in the software side of things.
Attach to Your TV and Join

Go ahead and stick the strips to the back of your TV, remembering that each strip has a direction that the signal must follow. It doesn't matter which corner or which side of the TV stand you start from.
To join the corners, simply connect each of the 3 pads to their counterpart in the next strip. Again, applying a little solder to the wires before you attempt to join it to the pads is a lot easier. Leave the final strip as is - don't connect it back to the start!
Test Again

Let's make sure we didn't mess up the soldering there - load up the color swirl app again and check. Once you're happy, return your TV to the right position and tidy up the wires. Let's move on to configuring the software.
Configure Adalight
The is the most tedious part of the project. Each individual LED must be defined in the software. Load up Adalight.pde in Processing and first change the variable that defines the number of pixels along the sides and top (ignore any missing ones for now) - this is on line 87. In my case, I used 35 pixels on the top and bottom, and 22 at the sides, so this was defined as {0,35,22}.
Just underneath this is where you'll find the "per-LED information" - a long list that defines every single LED around the TV. Each LED is defined as a set of 3 numbers:
- Monitor number (Mine is 0, but yours might be otherwise)
- X coordinate. 0 is the left (facing the TV screen)
- Y coordinate. 0 is the top (facing the TV screen)
If you get errors when compiling, it means you've missed a comma somewhere or have too many curly braces.
Sit Back, Watch a Movie!

Run the code and launch a movie with your favorite software. The debug console of Processing tells me my computer manages a good 15 frames per second (that's the refresh rate of the LEDs, not the video playback). Any modern computer should be able to handle that. There's a few more variables you can adjust such as minimum brightness and the fade delay between refreshes. As ever, you're encouraged to read through the code, understand it, and modify.
Congratulations, you now have an awesome DIY Ambilight system for around $50 (and some LEDs left over, probably).
If all that seems like far too much bother, and you'd be happy with something less dynamic, have a look at our roundup of the best TV bias lighting kits.