If you use a Mac in the workplace, then you likely use the Mail app for your email communications. This built-in macOS utility offers flexible features that make it a useful tool for professionals.
Maybe you simply haven't had the time to explore these features or perhaps you're a new Mac user. Either way, this list of professional productivity tips for Mail on Mac can help you set up the app for success.
1. Use VIPs for Your Boss or Client
Mail's VIP feature (available on Mac as well as iOS) gives you a great way to easily spot emails from your most important contacts. Because of its dedicated mailbox, this is a convenient way to make sure you always see messages from your boss or client quickly.
You can set up your VIPs and then give them custom notification sounds. This way, you know that an incoming email is from a VIP, even if your eyes are someplace besides your screen.
Set Up a VIP in Mail
Designating a contact or email sender as a VIP is as simple as a few clicks:
- Select an email in the Mail app from the sender you want to make a VIP.
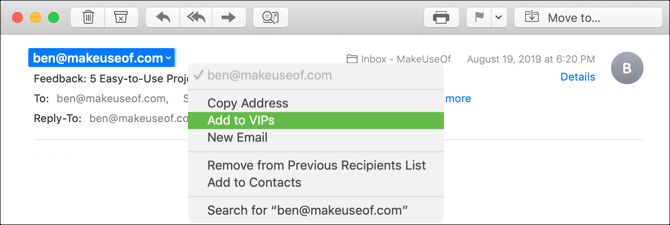
- Click their name in the email header.
- Choose Add to VIPs from the shortcut menu.
Once you do this, you'll see a few changes happen immediately. First, the person's name in the email header will now have a star next to it. Second, their name and emails will appear in your VIPs mailbox.
Set Up a Custom VIP Notification
While this part is optional, it can be quite handy. You can set up a custom notification sound for emails that arrive from those on your VIP list by following these steps:
- Click Mail > Preferences from your menu bar and go to the Rules tab.
- Click Add Rule.
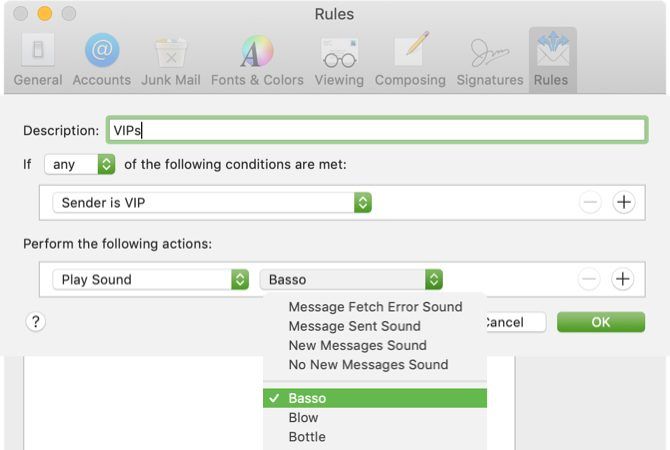
- Give your rule a name and leave the If [any/all] of the following conditions are met set to any.
- For the condition, pick Sender is VIP.
- For the action, pick Play Sound. Then select the sound you want to use in the box to the right.
- Click OK. In the subsequent box asking if you want to apply the rule to the messages in your inbox, you can pick Don't Apply.
Now, when your head is down reviewing a document, you'll know when a VIP email arrives just by the sound.
2. Create Email Groups for Teams or Employees
If you work with a project team daily or email your employees frequently, using a group for those contacts makes it easy to email them all at once. While you must use the Contacts app to create your group, you can then use the Mail app to send your emails to them.
Create Your Group
To start, open the Contacts app on your Mac. You then have a couple of quick ways to create your group:
- Click File > New Group from the menu bar or click the plus sign that appears next to one of your contact categories like iCloud or Gmail. Name the new group and hit Return. You can then drag contacts from their various locations into that new group.
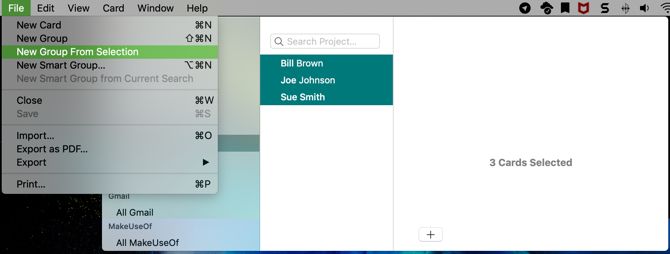
- Select all the contacts you want in the group. You can click the first, then hold down Command and click each additional one. Then select File > New Group from Selection in the menu bar and name your group.
Create a Group Email
Once you have your group set up in the Contacts app, addressing an email to them is a breeze. Plus, you can do it in either the Contacts or the Mail app.
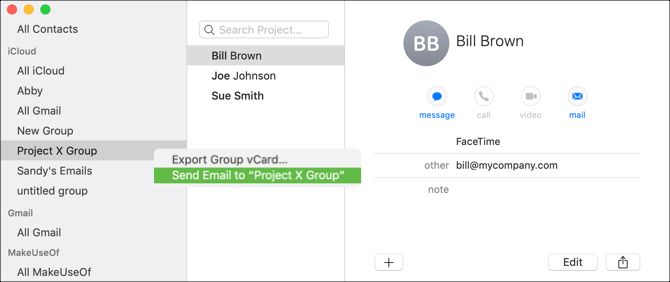
In the Contacts app, right-click the email group and pick Send Email to [group name]. The new message window in the Mail app will then open with that group in the To field.
In the Mail app, begin typing the name of your group in the To field. When the group displays in the list of suggestions, click it.
Whichever way you go about creating that group email, this tip makes it convenient to email several individuals at once, especially if you send messages to those same people often.
3. Set Up Mail Rules for Project Emails
If you set up the custom notification sound for your VIPs as mentioned above, then you've already delved into using rules in the Mail app. But you can do so much more with those Mail rules for your emails than just setting notification sounds.
By setting up Mail rules for emails pertaining to a project, or even a particular topic, you can have the app perform actions automatically. This is a terrific way to organize your inbox by keeping similar messages together or marking emails in a particular way to spot them quickly.
Move Emails to a Folder
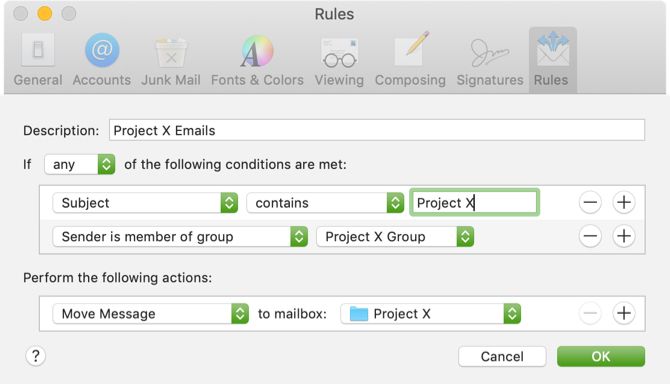
For this first example, we'll move all emails for Project X to the Project X mailbox. This will include messages with the phrase "Project X" in the subject as well as those from the Project X Group team members.
- Click Mail > Preferences from your menu bar and move to the Rules tab.
- Click Add Rule.
- Give your rule a name. For our example, we'll call it Project X Emails.
- Leave the If [any/all] of the following conditions are met set to any so that it captures any of the conditions you set.
- For the condition, select Subject in the first dropdown box, contains in the second one, and type "Project X" in the text box.
- Click the plus sign to the right to add another condition.
- For the next condition, select Sender is member of group in the first dropdown box and Project X Group (the group we created earlier) in the second.
- For the action, select Move Message in the first dropdown box and Project X in the second one.
- Click OK, then decide if you want the new rule to apply to your inbox by picking Don't Apply or Apply.
Mark Emails With a Color or Flag
Maybe you don't want to move emails to a particular folder, but would rather be able to spot them quickly in your inbox. To achieve this, you can use colors, flags, or both with the Mail rules.
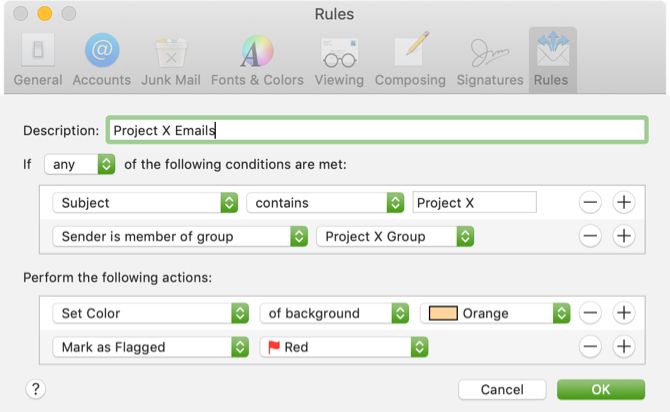
Using our Project X example above, follow steps one through seven to set up your conditions. When you get to step eight for the action, select one or both of the following:
- Set a color: In the first dropdown box pick Set Color, in the next one choose Background or Text, and then pick a color in the third.
- Mark as flagged: In the first dropdown box pick Mark as Flagged and in the next one choose the flag color.
Continue with the last step by clicking OK and whether or not you want to apply the rule to your inbox.
With these types of rule set up, you can move messages automatically or spot those project emails at a glance in your inbox.
4. Create Smart Mailboxes for Unanswered Emails
Smart Mailboxes in the Mail app are like rules, in a sense. You add conditions that apply to incoming emails, but rather than move, mark, or play sounds, Smart Mailboxes hold those emails.
The emails remain in their original inboxes, so they don't actually leave that particular email account. However, they also display in the Smart Mailboxes area in their own mailbox.
As you look through the conditions you can apply to a Smart Mailbox, you'll likely find ones that will be useful to you. But one excellent example is a mailbox for your unanswered emails. If you receive tons of emails each day that require a response, you can see them all in one place with a Smart Mailbox.
To set this up:
- Click Mailbox > New Smart Mailbox from the menu bar and give your mailbox a name.
- In the Contains messages that match [any/all] of the following conditions, pick all. (This maybe be different for you if you use the Smart Mailbox differently.)
- For the condition, select Message was not replied to in the dropdown box.
- Click the plus sign to the right to add another condition.
- For the next condition, pick Date received in the first dropdown box and then select is today in the second. (You can also choose from options like yesterday, this week, or last week per your preference.)
- Click OK.
With this Smart Mailbox setup, you can look through it at the end of each day to see which emails you did not reply to, so you never miss an opportunity to respond.
Do More With Mac Mail
These productivity tips for the Mail app on Mac are just the start of the ways to use it more efficiently. You can also take a look at some ways to make Mail a better desktop email client overall.
But if you're still not convinced and want to look at other email options, check out why you should use Spark for managing your Mac and iOS mail.


