Mail Merge can save you time and effort, so learn the process from start to finish with this guide.
Just about everyone who's familiar with the Office suite has heard of Mail Merge, but many don't know exactly how the process is carried out. It's easier than you might think — so long as you're clear on how to set up your documents beforehand, and merge them in Word.
Once you're up and running, you'll be using this feature to create everything from customized index cards to a mass mailing at your place of work. Mail Merge is only daunting for the first time, and you can prove that for yourself by working through this walkthrough.
We have used the new Office 2016 for this guide, but the process applies to older versions of Microsoft Word and Excel.
How to Set Up the Source Document
Mail Merge works by populating specified fields on a document with data from another source, typically a database or spreadsheet. The first step toward a successful Mail Merge is setting up the source document, and ensuring that it's formatted in a way that Word can understand.
Given that it's the most common usage of this technique, our example will centre around placing individual names and addresses on a generic mass mailing. The fields we'll include are Name, Company, Address, City, State and Zip Code — but these specifics aren't essential, so long as you're following the overarching process.
Using Excel
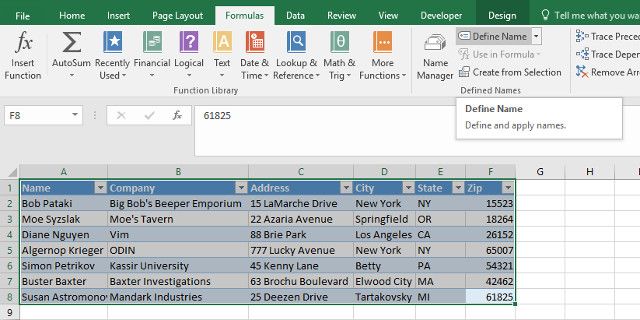
If you're using Excel to build your source document, you simply need to produce a table of all the pertinent information that might be included in this Mail Merge, or a future mailing.
The basic idea here is to split up your various piece of information into separate columns, and give each one an appropriate header. This makes it easy to pick and choose from those details later on, making it possible to use the same source document to create anything from an ID badge to an address label.
Next, select all your data (including column headers), navigate to the Formulas tab and select Define Name.
You'll be asked for a name for your data set, so choose something appropriate. If you're likely to oversee multiple Mail Merge projects for different mailings, it's wise to add something recognizable to differentiate them further down the line. Once that's done, save your work and close the spreadsheet.
Using Word
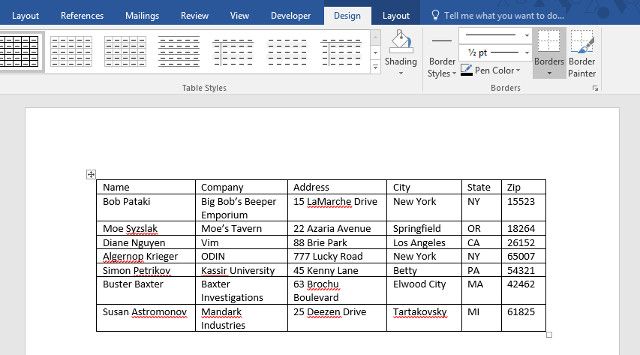
You can also use a Word file as your source document, but it requires a bit more effort. You'll need to set up a table to keep things regimented, so head to the Insert tab, find the Tables section and click the dropdown. Stipulate the size of table required for your project, and then start filling it with your data.
There's no need to worry too much about formatting here, as this document is purely intended to act as a source file for your Mail Merge. However, accuracy is key, so make sure that all your data has been placed in the correct columns and properly titled. When you're finished, save the document and close it for the time being.
Starting Your Mail Merge
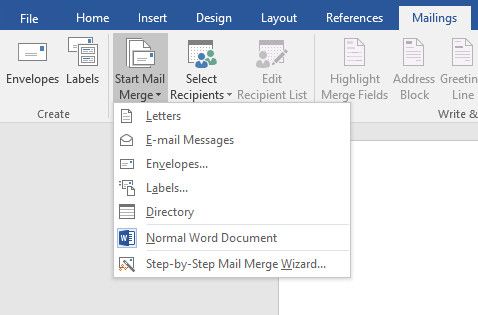
Open Word and create a new document. Head to the Mailings tab and click the Start Mail Merge dropdown to select your desired project.
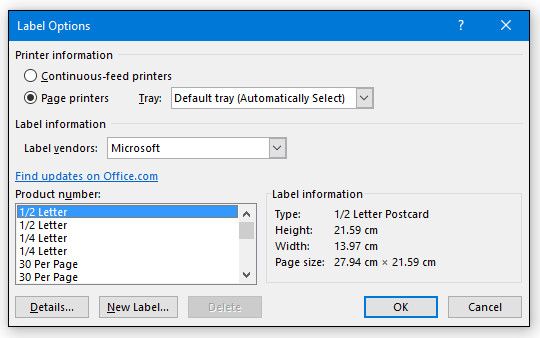
Here's where the process might diverge a little, depending on what you're looking to make. If I were making a label, or something else that might be printed on non-standard paper, I would be presented with another screen that allowed me to stipulate some additional printing options.
In this case, choose the Default tray, unless you have reason to do otherwise, and then select the appropriate product number such that Word can apply the correct template.
Importing Source Data
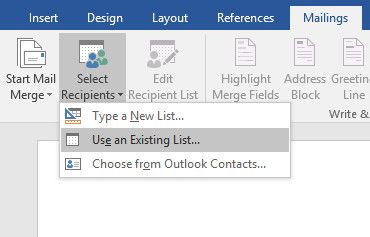
With those foundations laid, we can now start importing information that we entered into the source document at the beginning of the process. Head to the Mailings tab once again, click on Select Recipients and choose Use Existing List.
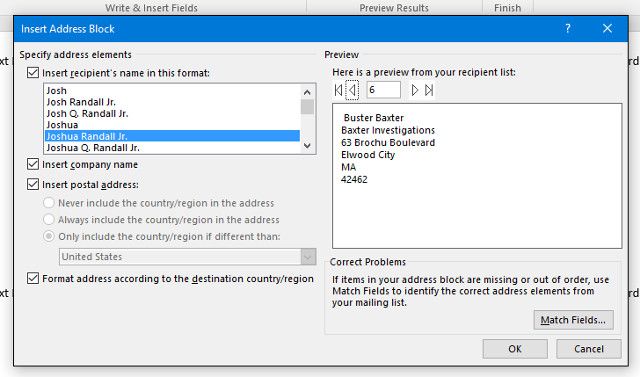
Navigate to your source document, whether it was created in Word or Excel — Microsoft's Office suite will work together nicely in most situations. If you're using a spreadsheet, you'll be asked to confirm which table you're selecting, and you should make sure the box marked First row of data contains column headers is ticked. Now head to the Write & Insert Fields section of the Mailings tab and click on Address Block (or whatever makes sense for your project).
Here, you'll be able to fine-tune exactly which fields are transferred from your source document to your finalized mailing. For even more options at this stage, we could have added the first, middle and last names of our recipients as individual columns, which would expand the list of available choices in the Insert recipient's name in this format field. However, this is strictly optional.
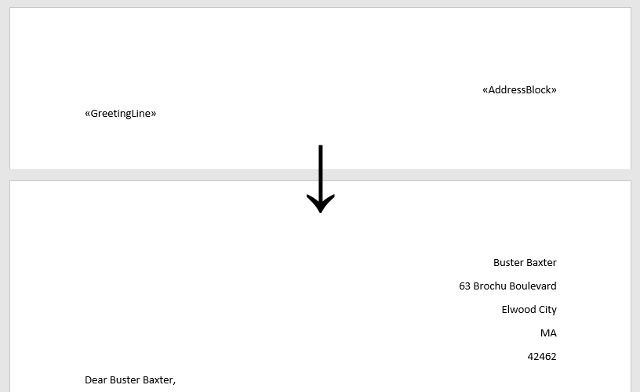
The Address Block tool is great for anyone looking to speed through their Mail Merge, but if you want to stipulate exactly how your document is laid out, consider using the Insert Merge Field option under the Write & Insert Fields section to place each field by hand. Once you've inserted your fields into the document, you can use Preview Results to see how it will print once populated.
Now is the time to make any formatting tweaks that you might need to perform; changing the font, adjusting how each field will sit on the page, and any aesthetic flourishes you want to add. Once that's done, navigate to the Mailings tab once again and click Finish & Merge under the Finish section. Your completed documents should be ready and waiting for you to print and mail.
For something a bit simpler, check out the best label makers you can buy.

