Last week, I talked about how important jQuery is to any modern web developer and why it's awesome. This week, I think it's time we got our hands dirty with some code and learnt how to actually make use of jQuery in our projects.
I'll say this now - you don't need to learn Javascript in order to use jQuery. It's probably best if you think of jQuery as an evolution of Javascript - a better way to do it - than simply a library that adds functionality. Any Javascript you need will be picked up on the way. It is assumed however that as a web developer you have a pretty good knowledge of HTML and CSS (and here's out helpful free xHTML guide if not!).
Document Object Model
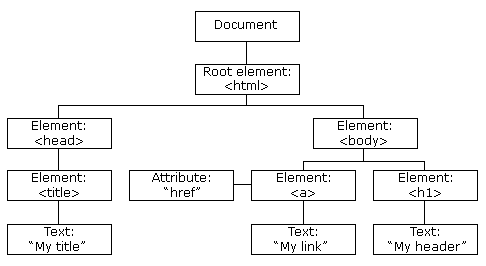
jQuery is all about traversal and manipulation of the DOM - the Document Object Model. The DOM is a hierarchical tree representation of the page, built by browsers after reading in all the HTML code. In jQuery, we'll use terminology like parent, children, and siblings quite often, so you should have an idea of what this means in relation the DOM.
This simple diagram from w3schools explains the concepts fairly well. You should be able to see that the parent of the <body> element is <html>, whilst the <a> element has an immediate <h1> sibling.
Getting Started: Adding jQuery
The latest version of jQuery is about 91KB when compressed, so it adds about the same page weight as a small photograph or screenshot. The easiest way to include jQuery in your project is to paste a reference to the most recent hosted version into your site header section:
<script src="http://code.jquery.com/jquery-latest.min.js"></script>
Note however that if you're running Wordpress, this may cause problems because it already has its own copy of the jQuery library. Plugins can request that this be loaded, and Wordpress will intelligently only load jQuery once regardless of how many plugins have asked for it.
If you add the following line to your functions.php theme file, you'll add another request for it to be included. Wordpress will then know to always load it if your theme is active.
wp_enqueue_script("jquery");
The second thing to bear in mind is that when jQuery is added using the standard method, it will be loaded as $. Anything you do with jQuery will be preceded by this $, such as:
$.ajax
or
$("#header")
However, when jQuery is loaded through Wordpress, everything is done using the jQuery variable instead of $, so for example:
jQuery("#header")
Although this isn't a huge problem when writing your own code, it does mean that cutting and pasting snippets of jQuery you find on the web will need to be translated to use jQuery instead of $ - that's all.
One way around this is to wrap $-style code you find like so:
        (function($) {
// paste $ code in here
})(jQuery);
This takes the jQuery variable and passes it into an anonymous function as $. I'll explain anonymous functions next time - for now, let's learn the basic structure of a bit of jQuery code.
To add your code to an HTML or PHP page, enclose everything within <script> tags, like so:
        <script type="text/javascript">
 // jQuery code codes here
</script>
$('selector').method();
That's it, in the title up there. That's the basic structure of a single piece of jQuery code to manipulate the DOM. Easy, right?
The selector tells jQuery to find things which match this rule, and is the same as CSS selectors (and then some more on top). So, just as in CSS you would style all links with
a { }
The same would be done in jQuery as
$('a')
This can be done for any HTML elements - div, h1, span - whatever. You can also use CSS classes and IDs to be more specific.
For example, to find all links with the class "findme", you would use:
$('a.findme')
You needn't specify the type of element each time - but if you do, it simply makes the rule more specific. You could have just said
$('.findme')
which would match everything with the class findme, whether or not it was a link.
To use a named ID element, use the # sign instead. The key difference here is that an ID selector will only ever select one object, whilst a class selector may find more than one.
$('#something')
Basically if you can do in CSS then jQuery will do it too. In fact, you can also some fairly complex CSS3 style pseudo selectors like :first
$('body p:first')
Which would grab the paragraph of the page. You find elements with certain attributes too. Consider this example; we want to find all links on the page which point internally to makeuseof and highlight them in some way. Here's how we could find them:
$('a[href*="makeuseof"]')
Isn't that cool? Well, I think it is.
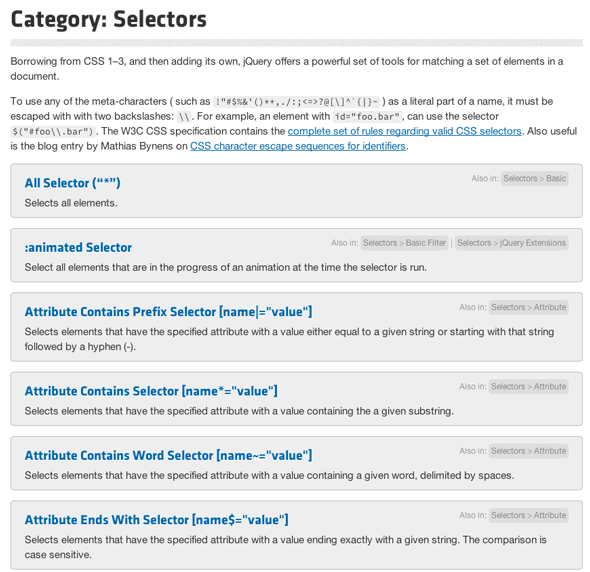
Your next port of call should be the jQuery API documentation for selectors. It's a huge list of all the different kinds of selectors available to use, and no one would expect you learn them all.
The next part of the equation is method - what to do with those things once you've found them all - but we'll leave that for next lesson. If you want to get started with trying out various selectors now though, I suggest you stick to the following css method. This takes two parameters - a CSS property name, and a new value to assign to that property. So, to give all links a red background color, you would do:
$('a').css('background-color','red');
Simple enough! Whilst this might not be of any practical use, it will let you easily see any elements located using your selectors. Now go forth, and select - the DOM awaits you.
I hope this tutorial has been useful to you; I've tried to make it as simple as easy to understand as possible. Feel free to ask any questions you have or leave feedback, but be aware that I'm certainly no elite jQuery ninja.


