Ethical hacking is a great way to uncover your inner Mr. Robot. And what better way to build those skills than by using one of the foremost hacking toolkits?
We're talking Kali Linux on your Raspberry Pi 3! A Raspberry Pi 3 running Kali Linux is surprisingly formidable for hacking. The tiny computer is cheap, powerful, and versatile.
In fact, Kali Linux comes packed with everything you need to expand your ethical hacking skills. Here's how you load Kali Linux onto your Raspberry Pi 3.
What Is Kali Linux?
Kali Linux is a Debian-based Linux distribution. Kali Linux is primarily used for security research, penetration testing, and security auditing---though it does have more nefarious uses, too.
In that, Kali comes packed with hundreds of specialized security tools that professionals use for digital forensics, research, penetration, malware analysis, reverse engineering, and more.
Kali Linux is a powerful tool in the right hands. But it is also a useful tool for (almost) anyone that wants to understand more about security.
What You'll Need
To complete this Kali Linux on Raspberry Pi 3 tutorial, you need the following equipment:
- Raspberry Pi 3 (though builds are available for Raspberry Pi 1, 2, and Zero)
- 8GB (or larger) Class 10 microSD with full-size SD adapter
- Ethernet cable
- HDMI cable
- 5V 2A microUSB power supply
- USB keyboard and USB mouse
You need an HDMI cable to connect your Raspberry Pi running Kali Linux to a monitor to check everything sets up properly. The USB keyboard and USB mouse are important for interacting with Kali Linux once installed. When you are completely up and running, it is possible to set up a remote connection to access and use Kali, but for now, an Ethernet connection and regular peripherals are easier to get to grips with.
Need help working through this tutorial? Check out our video below for a complete walkthrough for installing Kali Linux on Raspberry Pi 3:
Step 1: Install Kali Linux on Raspberry Pi 3
Head to the Kali Linux ARM images downloads page and open the RaspberryPi Foundation dropdown. Then select the Kali Linux Raspberry Pi 2 and 3 link (you can torrent the file if you prefer). Locate the Kali Linux folder, open it, then extract the Kali Linux compressed archive (file extension .XZ) into the same folder.
Next, you need to write the Kali Linux image to your microSD card. To do that, you need an image burning tool, such as Etcher, which you'll find at etcher.io. There are numerous tools for creating bootable drives, but in this instance, I would suggest using Rufus. Head to the Rufus download page, then download and install the image burning utility.
Insert your microSD card into your system. Open Rufus. Select your microSD card drive letter under Device. Browse to the location of the Kali Linux image using the SELECT button. Make sure Quick Format is checked, then hit Start and wait for the data to be written.
Once complete, remove the microSD card and grab your Raspberry Pi 3---it's time for the next step!
Step 2: Boot Into Kali Linux on Raspberry Pi 3
Insert the microSD card into the Raspberry Pi 3. Insert the HDMI cable and the Ethernet cable, as well as the USB keyboard and USB mouse. Finally, insert the microUSB cable to power up your Raspberry Pi 3.
The boot process shouldn't take too long, but the screen might flicker and go blank at points. The default login username is root and the password is toor.
Updating Kali Linux
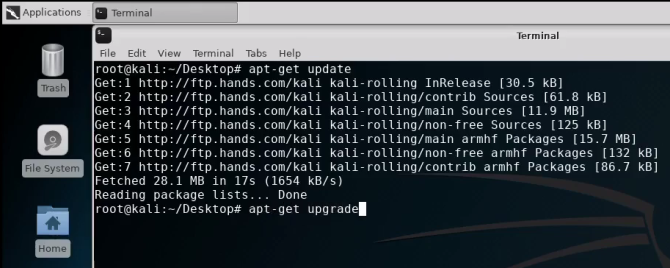
Before delving into the myriad security programs now at your fingertips, you should check for any updates. The operating system should automatically connect to the internet using the Ethernet cable.
Right-click the desktop and select Open a new terminal, then enter the following commands:
        apt-get update
apt-get upgrade
apt-get dist-upgrade
These commands update the Kali installation. Unfortunately, the update and upgrade process takes a few minutes to complete, but it is important. If you want to establish remote communication with your Kali Raspberry Pi, move onto the next section of the tutorial.
Step 3: Install OpenSSH for Remote Connections
You don’t want to plug your Kali Linux Raspberry Pi into a monitor every time you want to use it. No, that isn't entirely practical.
Instead, you can install OpenSSH to allow us to connect and run commands on the device remotely. You can complete this aspect of the tutorial while the Raspberry Pi is connected to your monitor (so you can see what you're doing).
Enter the following commands in the terminal to install the OpenSSH server:
        apt-get install openssh-server
update-rc.d -f ssh remove
update-rc.d -f ssh defaults
Next, you need to remove the default encryption keys. As they are default keys, they represent a vulnerability that is easy to remove. The following commands create a new directory to dump the old keys into while creating a set of new SSH keys in the process.
        cd /etc/ssh/
mkdir oldkeys
mv ssh_host* oldkeys
dpkg-reconfigure openssh-server
Now you need to configure the SSH login information. Edit the OpenSSH config file in nano:
nano /etc/ssh/sshd_config
You are looking for one line:
PermitRootLogin without-password
Change this to:
PermitRootLogin yes
Navigate the configuration data file using either the arrow keys or your mouse. Hit Ctrl + O to save any changes, and Ctrl + X to return to the terminal. If the setting is already set to "Yes," don't change anything.
Now you can check if the OpenSSH service is up and running using the following command:
        sudo service ssh restart
update-rc.d -f ssh enable 2 3 4 5
If the service is not running, start it using the following command:
sudo service ssh start
Now, check the internet configuration of your Kali Linux Raspberry Pi 3 by entering the following command:
ifconfig
Note the IP address of your Raspberry Pi 3---you'll need this in a moment. If your ifconfig command doesn't show your Raspberry Pi, run the following command to make sure net services are up and running:
sudo apt-get install net-tools
Then run the ifconfig command and copy down the IP address of the Raspberry Pi.
Step 4: Add Your Custom Message of the Day
When you log in to your Raspberry Pi 3 running Kali Linux using OpenSSH, you will meet a "message of the day" banner. You can edit the message of the day (MOTD) to display a personalized message.
I've gone with a very basic welcome message, but you can illustrate your hacker credentials with an Ascii image via this converter. Go ahead, get creative!
When you're done, use the following command to enter the MOTD customization screen:
nano /etc/motd
Copy and paste your message, then save and exit by hitting Ctrl + O, then Ctrl + X.
Step 5: Test Your SSH Login
Finally, you need to check that your SSH login is up and running. To do this, you need an SSH client. Microsoft added native OpenSSH support to Windows 10 in the Windows 10 April 2018 update, meaning you no longer need a third-party SSH client to connect to an SSH server.
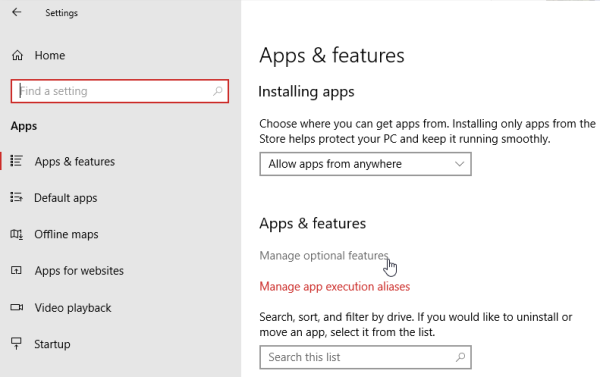
Hit Windows key + I, then head to Apps > Manage optional features. Scroll down the list and check for OpenSSH Client. If it isn't there, scroll back up and select Add a feature, locate OpenSSH Client and then Install. The installation process only takes a moment.
Next up, press Windows key + X, then select Command Prompt (Admin) from the power menu. The OpenSSH client is already active, so type the following command using the IP address copied from the Raspberry Pi:
ssh root@[your IP address]
Press Enter, then input your password (still toor unless you changed it). Your MOTD will welcome you into your Kali Linux Raspberry Pi!
Get Started With Ethical Hacking
Now you are up and running with your Kali Linux Raspberry Pi 3, you can start learning more about ethical hacking using the myriad tools available in the operating system.
Just remember that you should only practice hacking on your home network, on devices that you own and can legally attempt to break into. Otherwise, you could become a world famous hacker on the wrong side of the law.


