The Apple TV is a great AirPlay receiver and all-round set top box. It also provides a great way to share images with friends, family or colleagues.
Slideshows are perfect for accomplishing this, and there's a few ways to initiate a slideshow using your Mac and Apple TV. Whether you're using Photos for Mac, or Apple's older iPhoto app, we'll show you how to share your slideshows to the big screen.
We'll be working with the fourth generation Apple TV introduced in 2015, which runs tvOS. Instructions for older devices should be very similar, if not the same.
The Quickest Method: AirPlay Mirroring
This will work with all versions of the Apple TV, and it's arguably the quickest way of displaying photos on an external display. First you'll need to create an album of images you want to display:
Using Photos:
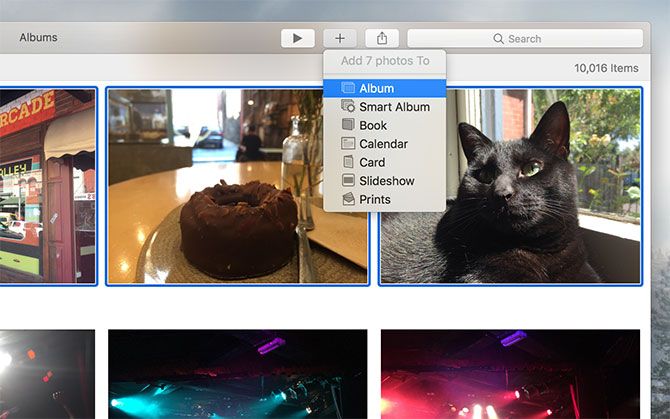
- Select an image or several images using command+click then hit the plus "+" button at the top of the screen and choose Album.
- Select New Album and give it a name, then hit OK.
- Add more photos using the same method, but choose the album you created rather than "New Album" in step two.
Use View > Show Sidebar to view all of your album on the left-side of the screen, which allows you to click and drag photos straight into albums for quickness.
Using iPhoto:
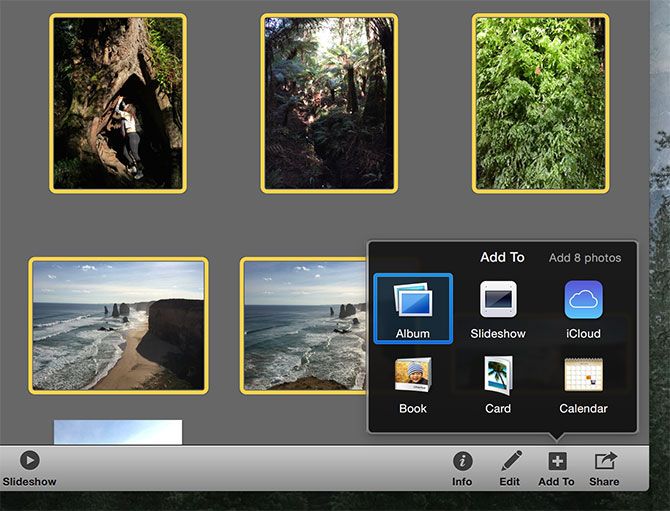
- Select an image or several images using command+click then hit the Add To button at the bottom of the screen and choose Album.
- Click New Album and give it a name, it will appear in the sidebar on the left-hand side of the page.
- Add more photos using the Add To button, selecting the album you just created. You can also click and drag photos directly into the album in the sidebar.
View the Slideshow:
Once you've created an album of images, it's time to enable AirPlay mirroring and output your Mac's display to your Apple TV. Find the AirPlay icon at the top of the screen in your menu bar (see the image below). Select AirPlay to: Apple TV or whatever you've named your receiver.
Finally, play the slideshow. In Photos simply select the album you just made and click on the "play" button at the top of the screen. In iPhoto select the album you made and click on Slideshow at the bottom-center of the screen. Both apps will allow you to choose a theme and background music before starting the slideshow.
What you see and hear on your Mac display will be mirrored to your Apple TV.
Use Albums & Home Sharing
It's also possible to use an iTunes feature called Home Sharing to share all sorts of content with your Apple TV, wirelessly. It'll work provided you're using the same Wi-Fi network as the Apple TV, and you've authorized both devices using the same Apple ID. First you'll need to create an album as described under AirPlay Mirroring above.
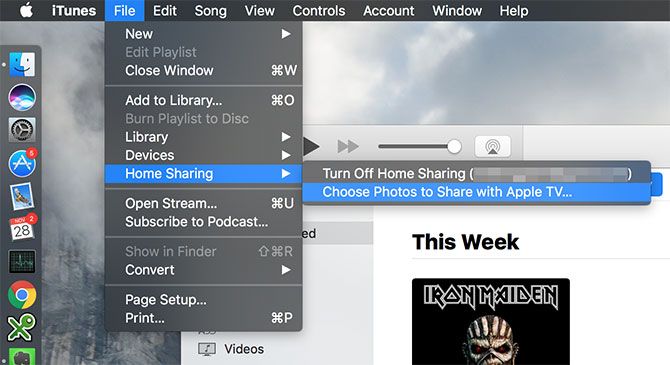
Launch iTunes and enable Home Sharing under File > Home Sharing > Turn On Home Sharing. If it's off you'll need to enter your Apple ID password. Once enabled you can specify which photos to share with your Apple TV by heading to File > Home Sharing > Choose Photos to Share With Apple TV.
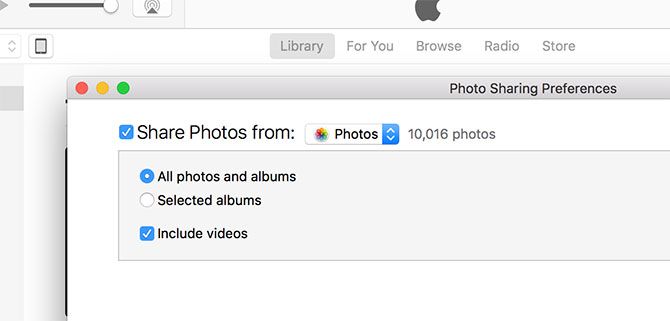
In the window that appears, check the box to enable sharing and choose between the Photos library or the older iPhoto library. You can also choose to share only specific albums, or share everything, and include videos too. Hit Done then Apply to action your settings.
To see your albums on your Apple TV, enable Home Sharing under Settings > Account > Home Sharing and sign in with your Apple ID.
View the Slideshow:
You can now view all of your Photos or iPhoto albums on your Apple TV by choosing Computers from the main menu. You'll see a list of shared libraries appear, so choose Photos. You can now pick the album you made earlier (or any album you want to make in future) and use the Play Slideshow option at the top of the screen to view your images. You can also choose options like shuffle, repeat, the time per slide, and which theme you want to use.
Problem Seeing Your Shared Photo Library?
While testing this feature out for the article, I noticed that the Photos library sometimes disappears and doesn't seem to show up again. A variety of the following have helped me solve this issue:
- Launch iTunes, head to File > Home Sharing > Choose Photos to Share With Apple TV and make a change (e.g. disable Include Videos) and hit Done then Apply. If it worked you can change the option back straight away without any issues.
- Try signing in and out on your affected devices. I found that re-authorizing Home Sharing on my Apple TV after enabling two-factor authentication on my Apple ID helped clear up some issues.
- Restart the Apple TV via Settings > System > Restart.
Export A Slideshow to Your Apple TV
It's also possible to export an actual video slideshow to your Apple TV, generated by Photos or iPhoto. This seems like an unnecessary step for displaying photos on an Apple TV, and it's more suited to uploading your video elsewhere (Facebook or YouTube, for example). But if you want a slideshow you can just set and forget, it might work for you.
In order to make the most of the feature you'll need to set up Home Sharing as described under Use Albums & Home Sharing above. Once you've done that, you can make a slideshow from a specific album or group of photos:
Using Photos:
- Select the album from which you want to make a slideshow, or simply select a group of photos using command+click.
- Click the plus "+" button at the top of the screen and select Slideshow.
- Select New Slideshow in the drop down box, give it a name and hit OK.
- Continue to add photos to the slideshow using the same method (replacing "New Slideshow" with the one you created) or by clicking and dragging photos using the sidebar.
- When you're done, select your slideshow from the sidebar (View > Show Slidebar if it's not visible) and click Export at the top of the screen.
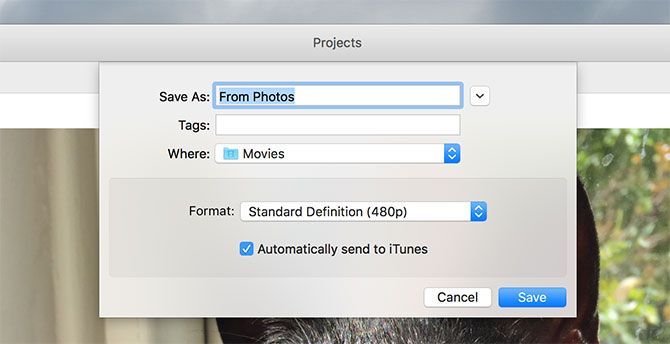
- Give the file a name, select a location, and choose from 480p, 720p, or full HD 1080p output quality; and ensure that Automatically Send to iTunes is enabled.
Using iPhoto:
- Select the album you want to create a slideshow from, or select a group of photos using command+click.
- Use the Add To box at the bottom of the screen and select Slideshow.
- Choose New Slideshow and give it name.
- Add more images using the same method by selecting the slideshow you just created, or click and drag to the sidebar.
- When you're done click on your slideshow and choose Export at the bottom of the screen.
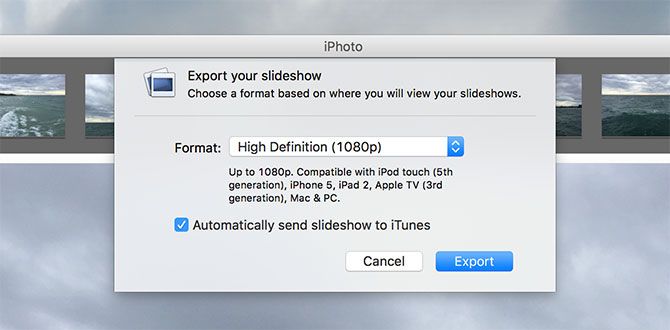
- Choose from 480, 720p, or full HD 1080p video quality and make sure that Automatically Send to iTunes is enabled.
- Hit Export and choose an output location for the resulting file.
View the Slideshow:
Launch iTunes on your Mac and make sure that Include Videos is enabled under File > Home Sharing > Choose Photos to Share With Apple TV. Now on your Apple TV choose Computers from the main menu, select your Mac's library, and you'll find your slideshow video under Home Videos.
macOS Photos & iOS Devices
iPhoto is old and no longer supported, so the new Photos app is better suited for the job. The latest version of Photos included in macOS Sierra allows you to search your photo library for objects, places, and people which makes finding images for use in albums and slideshows much easier. Ideally you should only use iPhoto if you're on an older version of OS X and you absolutely have to.
You can also use your iPhone or iPad to display slideshows via AirPlay. Launch Photos on iOS and swipe up to reveal Control Center, swipe left to show the media controls and choose your Apple TV from the AirPlay option at the bottom. Now any photos you view will be displayed on the Apple TV, including slideshows you initiate. You can even stream your own background music via Apple Music or Spotify.
Which method best suits you for sharing images using your Apple TV? Let us know in the comments below.
Original article by Simon Slangen.


