Quick Links
Key Takeaways
- You can use Quick Start or restore an existing backup to transfer your images from an old iPhone to a new one.
- The easiest way to transfer photos to someone else's iPhone without quality loss is using AirDrop or NameDrop.
- If you don't pay for iCloud, you can use a different cloud storage service to transfer images from iPhone to iPhone.
Upgraded to a new iPhone and want to move all your photos from your old device? Or perhaps you just want to transfer photos from someone else's iPhone? Here are all the ways to transfer photos between two iPhones.
Transferring Photos From an Old iPhone to a New iPhone
When you upgrade to a new iPhone, Apple offers several different ways to transfer your photos from your old iPhone. The best method depends on how long you can wait to start using your new device, how fast your internet connection is, how much iCloud storage you have, and whether you want to transfer everything or just move your photos.
When you transfer photos from iPhone to iPhone using one of these options, you will overwrite the photo library on the new iPhone. That means you shouldn't use these methods if you already have photos on the new iPhone that you don't want to lose.
1. Use Quick Start to Transfer Data
When you have a brand-new iPhone that you haven't set up yet, you can use Quick Start to transfer photos and other data to it conveniently. Quick Start uses Wi-Fi to transfer all the data from your old iPhone to your new iPhone, including apps, messages, settings, and photos.
You can't use either of your iPhones while the Quick Start transfer takes place, which could take an hour or more depending on how much data you have. To start the Quick Start transfer, move your new iPhone close to your old one after booting it up. Then, follow the onscreen prompts to transfer data from your old iPhone to your new one.
Using iCloud lets you use your iPhone again sooner, but it's only a good idea if all your data is already synced with iCloud. When the Quick Start transfer is complete, all your photos, apps, and other data will be ready to use on your new iPhone.
2. Restore an iCloud or Local Backup
If you don't have access to your old iPhone, you can use an existing backup to transfer photos to your new device instead. An iPhone backup includes every photo, app, message, and other piece of data stored on your iPhone.
A backup doesn't include any photos if you use iCloud Photos with storage optimization on your iPhone. This is because your photos are stored in iCloud, not on your iPhone storage.
If you don't already have one, you can make a new iPhone backup using iCloud, Finder on Mac, or the Apple Devices app on Windows PCs. To make an iCloud backup, go to Settings > [Your Name] > iCloud > iCloud Backup and tap Back Up Now.
To create a local backup, connect your iPhone to a computer, open the appropriate app, select your device, and click Back Up Now.

After making a backup, follow the setup prompts on your new iPhone until you reach the Apps & Data page. From this page, choose to restore your iOS backup, which could take an hour or more. During this time, you can continue to use your old iPhone if you still have it.
3. Sign Into iCloud Photos
When iCloud Photos is enabled, your iPhone uploads every photo you take to iCloud. This makes your entire photo library available on any other device using your Apple ID. So, use iCloud Photos if you only want to transfer photos to your new iPhone without touching apps and other data.
On your old iPhone, go to Settings > [Your Name] > iCloud > Photos and toggle on the switch next to Sync this iPhone. Your iPhone will upload every photo to iCloud. Follow the progress of this upload by scrolling to the bottom of the Photos app.
Once all your photos are on iCloud, open Settings on your new iPhone and sign in with the same Apple ID account. Then, go to [Your Name] > iCloud > Photos and turn on Sync this iPhone.
How to Transfer Photos to Someone Else's iPhone
The methods above won't help if you want to transfer photos from your iPhone to a friend's iPhone. In this case, you usually only want to send a handful of photos at once—not your entire photo library.
You can use any of the following methods to conveniently send photos to a friend's iPhone without overwriting the images already on their device.
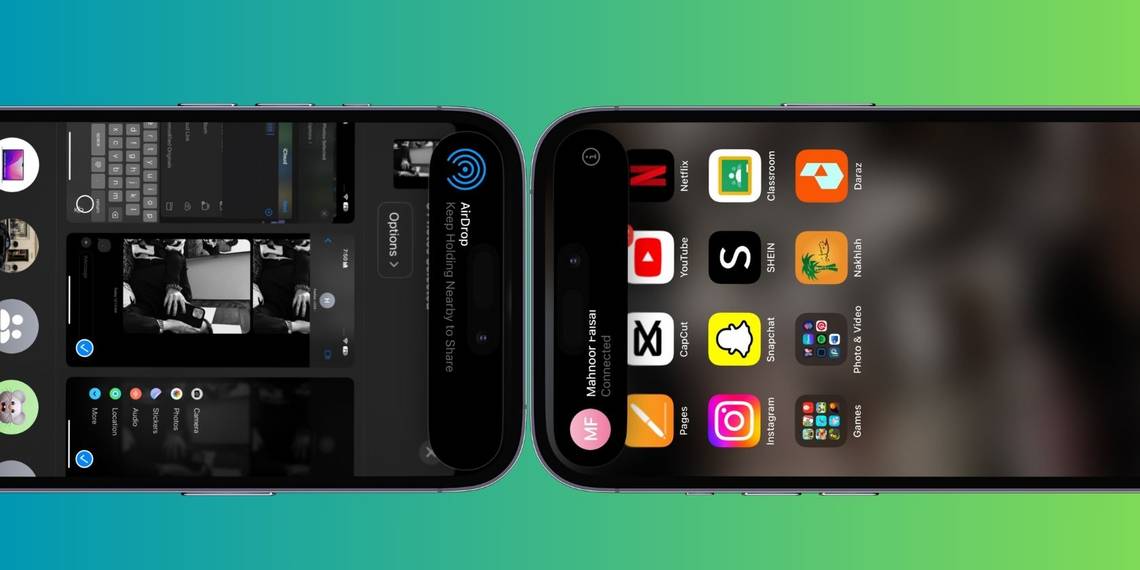
4. Transfer Photos Using AirDrop or NameDrop
AirDrop uses Wi-Fi and Bluetooth connections to transfer files between any two Apple devices wirelessly. When you send a photo using AirDrop, it transfers in full quality at rapid speed.
Fortunately, using AirDrop on your iPhone is quite simple. Open the Photos app on your iPhone and select the photo or group of photos you want to transfer. Then tap the Share button and select AirDrop. Your iPhone shows every device nearby with AirDrop turned on. Select your friend's iPhone to begin the transfer.
If you can't see your friend's iPhone, ask them to open Control Center, long-press on the top-left section with wireless options, tap AirDrop, and choose Contacts Only or Everyone for 10 Minutes.
They also need to Accept the transfer after you initiate it on your iPhone. Learn to troubleshoot AirDrop if you're facing issues while transferring photos.
Another easy way to do so is using NameDrop. While NameDrop is primarily used to share contact information wirelessly, you can also use it to share images from iPhone to iPhone, as long as both devices are running iOS 17 or later.
Simply select the images you'd like to share and position your iPhone next to the other iPhone's top edge. Once you do, you should notice your device's name appear on the receiving iPhone. All you need to do is tap Share and wait for NameDrop to do its magic!
Unfortunately, if either iPhone doesn't support iOS 17, you'll need to resort to another method.
5. Share an iCloud Link to Your Photos
If you use iCloud Photos, one of the easiest ways to transfer photos to another iPhone is using an iCloud link. After creating an iCloud link for your photos, you can share it with anyone over text, email, and instant messaging apps.
To create an iCloud link, open the Photos app and select the photo(s) you want to share. Tap the Share button, then scroll down and tap Copy iCloud Link. Your iPhone takes a moment to prepare those photos in iCloud and save a link to your clipboard.
Paste the link in a message to a friend to let them download the photos on their iPhone.
6. Upload Your Photos to a Cloud Storage Service
The best way to transfer photos from one iPhone to another without using iCloud is to save them to a different cloud storage service, like Google Drive, Dropbox, or OneDrive.
Download and sign into the relevant cloud storage app on your iPhone. Then, select the photo(s) you want to share in the Photos app. Tap Share and scroll across the second row of apps in the share sheet to find your cloud storage app. You may need to tap More at the end of the row to view more apps.
After selecting your cloud storage app, a popup window appears to let you choose where to save those photos. Once the upload is complete, share a link to those files from within the relevant cloud storage app. For instance, if you want to save an image to Google Drive, all you need to do is select the app from the share sheet and tap Upload.
7. Create an iCloud Shared Album
Whether you use iCloud Photos or not, you can use iCloud to create a Shared Photo Album to share with other people. This lets you share an album of up to 5,000 photos with up to 100 different people.
Open the Photos app and select the photo(s) you want to share. Then, tap the Share button and choose Add to Shared Album. Tap the option next to Shared Album and choose an existing shared album or tap New Shared Album. If you choose the latter, name the shared album and choose who to share it with from your contacts, then tap Post.
Whoever you share your iPhone photos with can also add photos of their own or comment on and download the photos you add to the shared album.
8. Send Your Photos Using Messages
Perhaps the easiest way to transfer photos from your iPhone to someone else's iPhone is to send them using iMessage. If iMessage isn't available, you can still send photos over MMS in the Messages app. However, your cell carrier may charge you for MMS messages, and the quality will be poor.
Open the Messages app and start a conversation with the person you want to transfer photos to. Tap the plus (+) icon next to the text box and choose Photos from the list of options. Then, select the photo(s) you want to transfer and tap the Send button.
Depending on your internet speed and service plan, Messages might compress the photos you send to reduce transfer time and data usage.
Using the methods above, you should be able to transfer photos from one iPhone to another with little trouble. Use them when you set up a new iOS device or need to share pictures with friends.