Whether you're racing the streets, defeating a boss, or simply admiring the view, there are loads of great moments that can happen while playing PS4 games.
So, in this article, we show you how to record and share your PS4 gameplay so that you can relive these moments or send them to your friends for bragging rights.
Change Your PS4 Sharing and Broadcast Settings
Before you begin capturing PS4 gameplay, you need to make sure that the settings are customized the way you want.
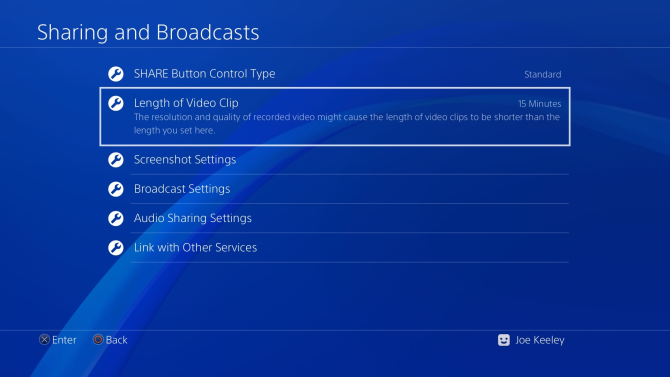
Press the Share button on your controller to bring up the Share menu. Select Sharing and Broadcast Settings.
In here are various settings that relate to screenshots and broadcasting on services like Twitch (streaming is one way to get more out of your PS4). We're going to ignore these and focus on those for recording gameplay.
First, go to Length of Video Clip. Here you can choose the maximum length of gameplay captures. They can be shorter than whatever you choose, but this is the time it will record for if you don't manually stop the capture. By default, it's set to 15 minutes, but you can go as low as 30 seconds or as high as 60 minutes.
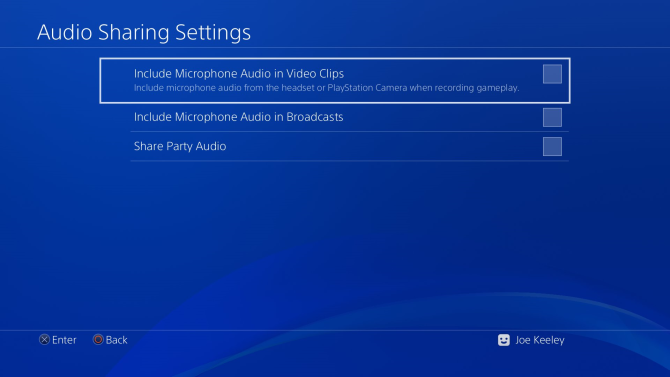
Next, go to Audio Sharing Settings. Here you can enable or disable Include Microphone Audio in Video Clips. If ticked, it will capture your microphone audio (from a headset or PlayStation camera) when you record gameplay.
Record Your PS4 Gameplay
With the settings sorted out, it's time to record your PS4 gameplay.
There's one wrinkle to this. Some games don't let you record parts or all of it. This is down to the developer. You cannot circumvent the restriction using the PS4's default recording tools. Instead, you will have to buy dedicated capture equipment. Examples of these games include Yakuza 0, Persona 5, and Tales of Zestiria.
For the instructions below, we'll be making use of the Capture Gallery. You can find this on the PS4 home screen. If it isn't there, go to Library > Applications > Capture Gallery > Start.
The Capture Gallery is great for managing videos that you have saved in the past. However, you can also access many of the same settings by using the Share button while in-game, so feel free to use that if you find it quicker.
Now, let's begin recording. You can either record a video of something that is about to happen or that has already happened.
Start a Recording
To start recording, press the Share button twice. A small notification will appear on the left of the screen to signify that the recording has begun.
Now play the game and everything you see on screen will be captured. Your recording will end automatically after the Length of Video Clip setting time period is reached. Alternatively, end the recording manually by pressing the Share button twice again.
The recording will be saved in the Capture Gallery.
Save a Recording of Something That's Already Happened
Don't worry if you just did something awesome but weren't recording it. The PS4 automatically stores the last 15 minutes of gameplay in its memory.
To grab this recording, hold down the Share button. Do not tap it because you will erase the recording. Holding it down will bring up the Share menu. With this open, press Square to select Save Video Clip.
This will be stored in the Capture Gallery.
Edit Your PS4 Gameplay Video
You might want to edit your recording before sharing it with the world. You can do that on the PlayStation 4 itself.
Go to the Capture Gallery and find the video you wish to edit.
With it selected, press Options on your controller. You have two options here: Edit in SHAREfactory and Trim.
SHAREfactory is a free app that you will need to download and install. The app includes lots of advanced editing features, like the ability to overlay audio tracks or webcam footage on the video. You can also apply themes, stickers, and text. If you want to get fancy with your editing, choose SHAREfactory.
If you simply want to crop the length of the video down, select Trim. Use the dropdown to select the editing intervals. Scroll across and press L2 to set the start point, R2 for the end point, then press OK once done.
Share Your PS4 Gameplay on Social Media
Naturally, you'll want to share your video on social media so you can let your friends see your capture.
To do this, go to the Capture Gallery and highlight the video you want to share.
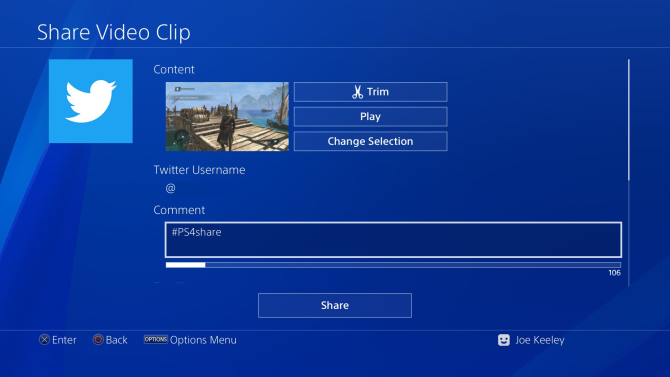
Press the Share button on your controller and select the social network you want to share to (like YouTube or Twitter).
If this is the first time you've done this, you'll need to enter your login details for the social account.
Follow the prompts through to upload your video---each social network has different requirements. For example, on YouTube you can set the privacy of the video, while on Twitter you can accompany the video with a descriptive tweet.
Transfer Your PS4 Gameplay to a Computer
You can also take your PS4 video and transfer it to your computer. To do this, plug a USB stick or external drive into the PS4. Note that the device must be FAT32 or exFAT formatted. If you need help understanding the difference, see our guide to FAT32 vs. exFAT.
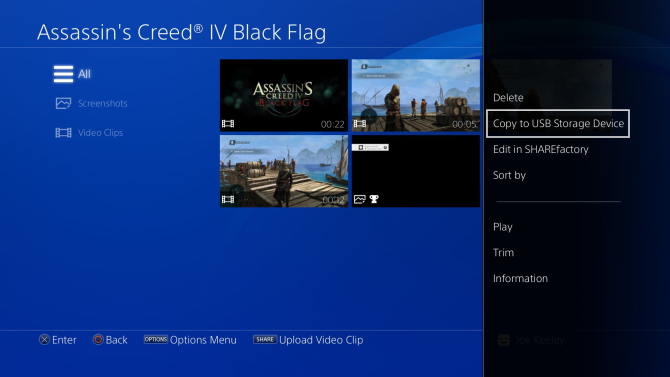
Go to the Capture Gallery and find the video you want to transfer.
With it highlighted, press the Options button. Select Copy to USB Storage Device.
Next, choose the videos you want with X. When ready, select Copy > OK.
When the transfer is complete, plug the device into your computer. Open the drive and browse to the PS4/SHARE folder to find your videos separated by game and in MP4 format.
If you prefer, you can use your computer to edit the videos or upload them to social media; do whatever you find easier.
To Capture Great Footage, Play Great Games
That's everything you need to know about recording and sharing gameplay videos on your PS4. So, go forth and record those exciting moments!
Are you in need of some great games to record? Then check out our list of the best PS4 exclusives to play today.

