Canva is an amazing design website that helps you create everything from postcards to resumes using a collection of pre-made templates. It's perfect for people who are running short on time and need a quick design, or for people who don't have design experience but still want to create something nice.
If you're using Canva and you want to create a poster for an event, how do you go about it? Here's how to make a flyer in Canva suitable for any occasion.
Step 1: Find the Right Template
On Canva’s homepage, go to Design Spotlight > Marketing > Flyers.

From there, you’ll be sent to a page that houses multiple templates for flyers. The templates are categorized by type such as advertising, campaign, event, and marketing.

You can search through the templates to find one you like or click on Design and Print Flyers to start with a blank page on the Canva Editor. This is where you’ll be able to create a Canva design with zero effort.
Step 2: What Is Your Event About?
The type of event you're holding will influence your design. It will also influence the Canva template that is best suited for it.
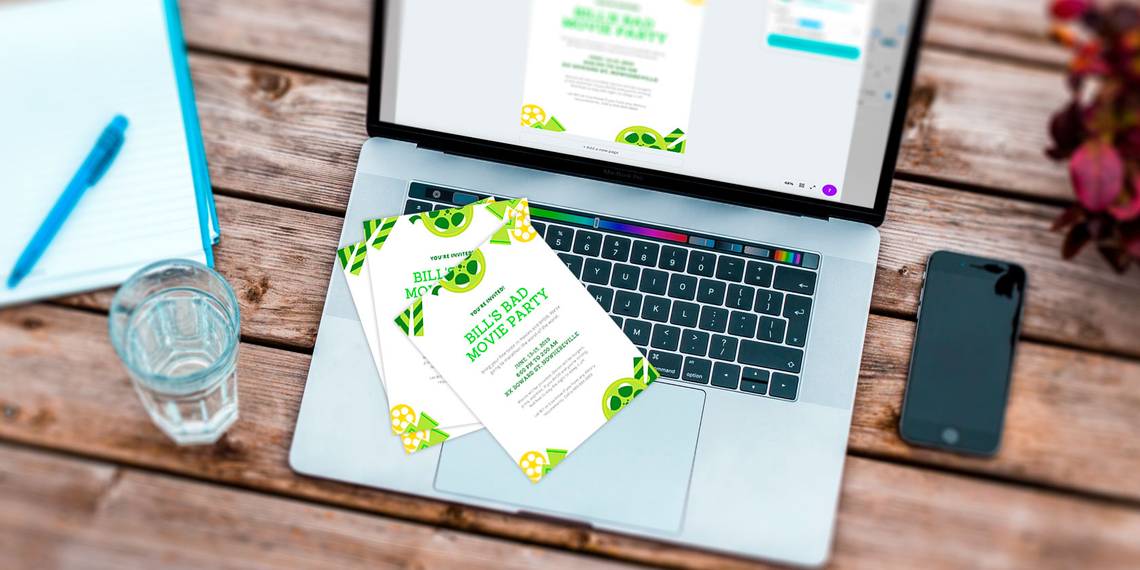
For this tutorial, let's suppose you’re designing a flyer for an upcoming birthday party. The birthday recipient's name is Bill, and the theme of Bill's party is "Bad Movies.”
The flyer should reflect the theme of the event. If you’re trying to find a template based on a specific idea, you can also search within the Canva Editor. Go to the Design tab, Templates tab, and type your theme in the search bar.

In the “Bad Movies” example, a film-related template would work. Even though the template says “Student Film Festival 2020,” don’t worry; templates are completely customizable. You can even use Canva’s Magic Edit tool to create a whole new look.
Step 3: Change Your Flyer Text
The next thing you'll want to do after you pick your template is input the information for your event. For posters, it’s best to input the text first because the information about the event will affect the rest of the design and how it's laid out.
To change the text, simply click on the text box you want to edit. You’ll need to click twice to move past the Ungroup option. Erase the placeholder information and input your own.

You can change the style of font, color, size, and spacing by using the control panel in the top toolbar of the editing screen.
Step 4: Change the Color of Your Elements
Now that you've fixed your text, it's time to adjust the visual elements on your page. It's important to note that the steps being explained here can be used on any sort of visual element in any of the other templates, regardless of the element's shape.
To modify the elements, click on one. A purple box will appear around it letting you know it’s ready to be edited.

In the top left-hand corner of the editing toolbar, you'll see the color choices and the amount being used, Edit Image, Crop, and Flip. You can use each of these components to alter the elements on the flyer.
For the example flyer, let’s change the color. To change the color, click on one of the color boxes that correspond with the color that you see in the element. When you click on the individual color swatch, your Color panel will show up. You can pick a default color from there.

Since this party is about bad movies and off-green colors can convey a feeling of “queasiness,” let's go with a lime green shade to get across that effect. Select the Change All button to apply the color everywhere.
If you don't like any of the default colors that are available, you can also pick a custom color. To pick a custom color, click on the + button in your Color panel. It will bring up the color picker, and you can add a custom color from there.

Repeat this step until all your elements have been adjusted to your preference.
Step 5: Change Your Text Color
Now that you've changed the color of the elements, you might have a better idea about the overall mood or tone you're going for in your flyer.
If you haven't changed the color of your text yet, or if you don't like the colors you picked before, you can simply click on each individual text box to fix it. Then click the Text color option in the toolbar.

There is no need to highlight the text to change its color. Just make sure you have the entire text box active—not the cursor to type new text. Canva will read the box as one unit and change all the text accordingly.
Step 6: Move Your Elements
Lastly, you might decide that you don't like your visual elements in their current positions. Maybe it just looks too uniform, or there are too many pictures and you want to switch things up.
To move your elements, click on the element you want to adjust. Then click and drag it across the page to the position you want.

If you want to get rid of the element entirely, select it so that the bounding box appears. Then hit Delete on your keyboard. If you accidentally delete an element or decide that you don't like the look of your poster once it's gone, this is an easy fix.
Just go to the top left-hand corner of your workspace. Along the blue navigation bar, you'll see two curved arrows. The left-facing arrow is the Undo button. The right-facing arrow is the Redo button.

Click on the Undo button to get to a previous stage in your design.
Step 7: Export Your Design for Print
Now that your flyer is complete, do one final check to make sure everything is spelled correctly and all the elements are where they should be. Depending on how you’re exporting your design—downloading it or using Canva’s printing services—will determine what you do next.
Download the File
If you want to download your design, simply click on Share > Download. From there, you’ll have several options for file type, size, and if you want it to have a transparent background. Click Download when done. Be aware that some options are only available on Canva Pro.

The Share option also allows you to share the design with other people or add others to collaborate. You can also share the design on social media to get the word out even quicker.
Print Your Flyer
If you’re planning to hang out or mail your flyers, you’ll need to have them printed. This is a good opportunity to try out Canva’s printing services.

Click on Print Flyers, and you’ll see an array of options to go over. This includes Paper Type, Paper Finish, and how many flyers you want printed. Click Continue to see if any issues have been detected. If not, click Checkout or Add to Cart to have your flyer ready for purchase.
Use Canva’s Flyer Feature for Your Next Event
If you're planning a party with your friends, you have a chance to do something really fun with the design. That is where creating the perfect flyer can come in handy.
By following the tutorial above, try creating a flyer using Canva. It’s certain to bring some traction to your next event.