Camera sliders are excellent creative tools that can really improve your filmmaking. Whether you're starting a YouTube channel or making a short film, sliders are a great way to add a bit of variety to your shots.
Today I'll be showing you how to make your own camera slider for under $35. Make sure you watch our full video tutorial below, or keep reading for the full written tutorial.
What Is a Slider?
Put simply, a slider is a tool for adding movement to your shots. Sliders can be as simple as pushing a camera on a table, or incredibly large devices, able to support a camera rig.
Sliders can be purchased or made in a variety of sizes and configurations. The most common is a linear slider, designed to take a small payload camera such as a DSLR or mirrorless camera. It's possible to purchase a larger slider (known as a "dolly") or sliders with curved rails or motors -- but these are even more expensive to purchase and complicated to operate.

The slider we're looking at today is a very simple one: good enough to move a small camera left or right, and nothing more.
You may be wondering why it's worth bothering with a DIY slider. There are thousands of sliders made by hundreds of manufacturers. The problem is good sliders are not cheap (prepare to spend a minimum of $100) and cheap sliders are not good. Making your own slider is a fun way to get a good slider without breaking the bank.
What You Need
This is a simple project, but it does require a few components that you may not already own.

- 1 x Set of 3D printed parts
- 2 x 20mm x 20mm x 500mm v-slot aluminum extrusion ($5/ea)
- 4 x Dual-V wheels with bearings ($4.75/ea)
- 12 x M5 drop in Tee Nuts ($12.99/100)
- 1 x 1/4-20 10mm bolt ($10.86/50)
- 4 x M5 washers ($7.97/100)
- 4 x M5 Nyloc nuts [Broken URL Removed] ($9.14/100)
- 4 x M5 x 30mm countersunk allen bolts ($11.47/50)
- 12 x M5 x 10mm countersunk allen bolts ($8.19/100)
- Assorted rubber bands
- 1 x Ball head (optional)
- 1 x Tripod (optional)
Total cost: $32.50
Of course, this price assumes you can purchase one or two of each component -- you may have to visit a local hardware store if you don't wish to buy in bulk!
Let's break down these parts. As I live in Europe, I've provided component specifications in the metric system of measurement. If your country does not use the metric system, you can substitute most of these parts for a local equivalent, but you may have to experiment to find similar sizes. The 1/4-20 10mm bolt is the only part that you cannot change -- this is a standard thread on the bottom of the vast majority of cameras, and is not in the metric system.

The v-slot aluminum extrusion is the "rails" of the slider. This is what the wheels will sit on, and will ensure the slider movement is smooth and steady. The outer diameter needs to be 20mm square, and each length needs to be 500mm long. If you want to make a longer or shorter slider, then increase these lengths accordingly. If you'd like to know more about v-slot, then make sure you check out our guide to v-slot aluminum extrusion.
The dual-v wheels are manufactured to fit in the groove in the v-slot. You can purchase these in either metal or plastic, just make sure you get four wheels with a pair of bearings for each wheel. Don't cut corners here, as premium bearings will directly increase the quality and smoothness of the slider.
The drop-in t-nuts are very cool. These will bolt the 3D printed frame sections to the v-slot. Once tightened, they rotate and lock against the v-slot, providing a secure fixture.

The Nyloc nuts secure the bearings to the carriage (the part the camera will sit on). If you've never used a Nyloc or locknut before, you use them exactly like a regular nut. The difference is that Nylocs have a plastic insert that resists movement, meaning you don't have to tighten the nuts right up against the bearings (which could impede their ability to spin freely).

Finally, you will mount the slider on top of the tripod, and the ball head will sit on the slider with your camera on top. This means you can freely rotate and adjust the angle of the camera, increasing the flexibility of the slider.
In addition to these parts, you'll need a few basic tools. Two allen keys and a spanner in suitable sizes will be enough.
The 3D Printed Parts
While it's possible to make this slider in wood, plastic, or metal, I highly recommend you use the set of 3D printed parts. You can download the .stl files from Thingiverse.
Don't worry if you don't own a 3D printer! Online services 3D Hubs and Shapeways provide online printing services for reasonable prices.

If you're new to 3D printing, make sure you read our guide to 3D printing. And if you'd like to know how I designed these parts, you can read our beginner's guide to OpenSCAD.
There are four key components that need to be printed:
- 2 x Frame support
- 1 x Frame support/tripod mount
- 1 x Carriage
- 1 x Bearing riser
When printing these parts, take note of their correct orientations. Print all the parts upright, and not laying down flat. I found this out the hard way: 3D printed parts are structually weak along the Z axis (up and down). If you print these parts laying flat, this fault line is right along the critical corner -- the parts will break!
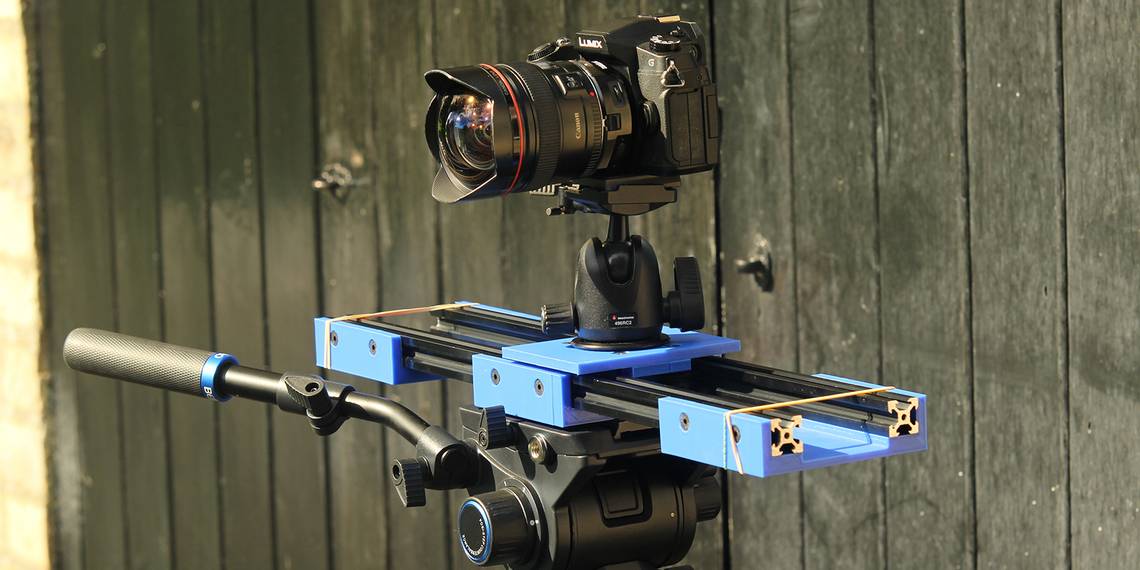
Assemble the Carriage
Now that you have all the parts, let's get on with the assembly.
The carriage is the part that moves. The camera will sit on this, and the bearings and wheels need to be bolted to it.
Identify the top and bottom of the main carriage plate. The top has countersunk holes for the bolts to fit into.
Insert the four M5 x 30mm countersunk allen bolts so that the heads are flush with the top surface. Flip the carriage over (be careful the bolts don't fall out), so that the bottom is now facing up.

Add the bearing riser -- there's only one way it will fit.

Next, add an M5 washer to each bolt:

Now add a wheel assembly to each bolt. Each wheel will come pre-assembled, and should consist of a wheel with two bearings inside:

Add the M5 Nyloc nuts and tighten them up. Don't over tighten! The Nylocs will not work loose. Tighten them just enough to stop the wheels from wobbling, but not so tight that the wheels do not spin.

Give each wheel a spin with your finger, and ensure it can rotate freely and smoothly. If not, simply back off the nut until it does (but not so much as to introduce wobble). You will need to use a spanner and allen key to tighten the Nylocs.

Finally, insert the 1/4-20 10mm bolt through the hole in the middle from the bottom. This should protrude through the top surface. This may be a tight fit, so use an allen key if you need to.

Go ahead and attach a ball head if you are using one.

Assemble the Frame
It's a straightforward process to assemble the frame. The v-slot rail needs to be bolted to the interior side of the frame pieces. If you're making a longer slider, you may need to print more frame supports, to strengthen the slider. As it is, three frame supports is sufficient for a 500mm slider.

Roughly line up the frame supports and v-slot, ensuring that the frame support with the tripod mounting hole is in the middle of the slider.
Insert the M5 x 10mm countersunk allen bolts from the outside of the frame supports. Install an M5 Tee nut on the inside of the frame, but don't tighten it too far.

Slide the v-slot over the tee nuts and then tighten everything down. The tee nuts will automatically rotate to 90 degrees and lock against the inside edge of the v-slot.

At this point, all the frame pieces should be secured to the v-slot.

Finishing Off
Now that the slider is assembled, it's time to finish it off. Add the carriage into the frame from one end -- it will only fit in one orientation.

Slowly slide it back and forth to ensure it moves smoothly. If it doesn't, remove it and double check that:
- All the frame pieces are securely attached to the v-slot.
- The v-slot is not damaged or marked, specifically the inside edge where the wheels sit.
- The carriage wheels have enough play to spin freely, but not enough to wobble.
Once the carriage is sliding smoothly, add several rubber bands over each end. These serve two purposes: they prevent the carriage (and your camera) from falling off the end of the slider, and they smoothly stop the motion at each end.

If you had plastic here to serve as an end stop, the carriage would come to a sudden halt, and this would show in your videos. Elastic bands allows the carriage to slow down gently.

If you want to use a tripod to mount your slider, go ahead and use a nut, bolt, and washer to attach it to your tripod's quick release plate. Any nut and bolt will do, providing it leaves enough clearance for the carriage to get past, and for the quick release plate to fit back onto the tripod.

Some Final Slider Tips
Now that you have your own slider, go out there and practice! All sliders have some degree of 'wobble' or play in the movement. With a bit of practice, you will learn where the sweet spot is, and how best to move the carriage to achieve the smoothest results.

If your camera has IBIS (In Body Image Stabilization) or OIS (Optical Image Stabilization), turn this on. This feature can really help to smooth out any slider shots. Similarly, shooting in a higher frame rate (slow motion) can also help to smooth out footage.
If you don't own a camera yet, you should consider purchasing a tripod phone mount, which allows you to mount your phone on this slider. There's also nothing stopping you from using a GoPro on this slider, it's just a matter of purchasing the correct mount.
But if you do want a camera and aren't sure what type of camera you should purchase, then take a look at our guide to choosing a type of camera. You'll be shooting like a pro in no time!
Have you made your own camera slider? Are there any tricks we are missing? Let us know in the comments below!