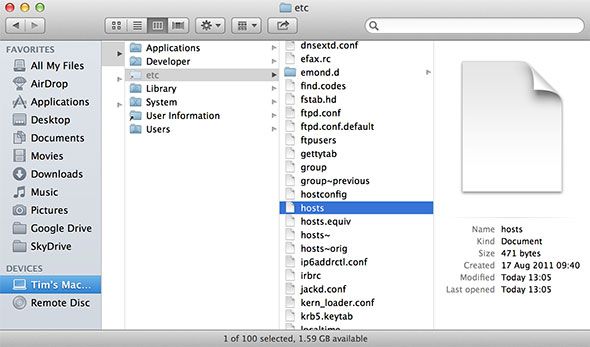
The hosts file is used by your computer to map hostnames to IP addresses. By adding or removing lines to your hosts file you can change where certain domains will point when you access them in a browser or using other software.
This is an important file and one that is under the computer administrator's control, so you'll need an account with full privileges to make any changes. On Mac OS X the process is a little more complicated than simply opening a text file, adding some lines and saving it again; but it's still easy enough for even complete newbies to do with little trouble.
If you're running Windows you can find instructions for your operating system here.
What It Does
If you've landed on this page from a search, there's a good idea you already know why you want to change the hosts file (and can go ahead and skip down the page to the "Making Changes" section of this article). Still reading? I'll assume you're not familiar with this file then.
The hosts file is used to route hostnames including website addresses to IP addresses. If an existing domain is added to this file along with an IP, it will call on that IP rather than where the domain name normally points. There are a range of uses, though the vast majority involve security, blocking hostnames and preventing connections being made.
As an example, web developers often have to use this file to access developer servers which aren't tied to a domain. By pointing a domain or sub-domain like "mysite1.mysite.com" to the IP at which the development site is located it is easier to access the site. This also helps prevent the rest of the web accessing that server easily.
Another example would be to block access to a domain, so when a website redirects you to an adserver or partner site, you could block that site by adding a line in your hosts file which redirects the IP to your local machine (127.0.0.1). Of course, this only provides a loose safety net as advertisers, spammers, malware distributors and anyone else you might want to keep out are wise.
Your computer (be it Windows, Mac or Linux) will always check for the hosts file on boot, and you won't need to do anything to enable it. It's already there. If you're reading this article you're probably using a Mac, and you should know that making changes to this portion of the disk will require administrator access.
By far the easiest way of making changes to your hosts file is by using the Terminal app, rather than the Finder.
Making Changes
This tutorial is for Mac OS X Lion 10.7 and later unless otherwise specified. In order to change the hosts file you should first open the Terminal app. At the prompt type the following:
sudo nano /etc/hosts
When prompted, type in your administrator password and hit Enter.
Users on Mac OS X 10.6 or earlier will find the file in the /private/etc/hosts location instead.
To give you an idea of what's going on here, the sudo command provides temporary root-level access, while nano is the name of the program used to make the changes to the file, and /etc/hosts is the location of the file.
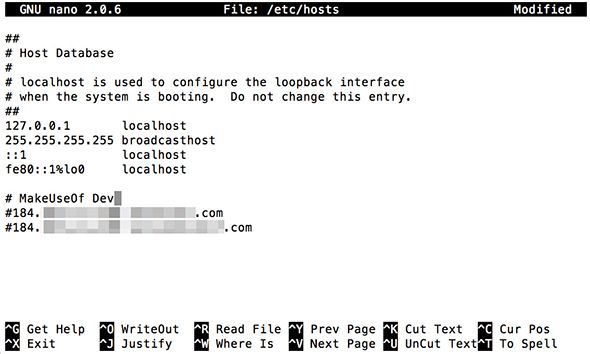
Once you've entered a password and loaded nano, you'll see a window that looks roughly like the screenshot below.
You'll have to use the arrow keys to move the cursor around as your mouse pointer will not work here. Pay attention to the comments, which are signified by "#" symbols. If a line starts with a # it's ignored, so you can use these lines to help keep the file tidy with descriptions of what each addition does. Similarly, you can use comments to quickly enable or disable changes without removing the rule entirely. This is known as "commenting out".
Rules should be added in the following format: <IP address> <hostname>, for example: adding "127.0.0.1 google.com" would redirect all google.com requests (but not www.google.com requests) to your local machine, essentially blocking your machine from accessing Google's servers.
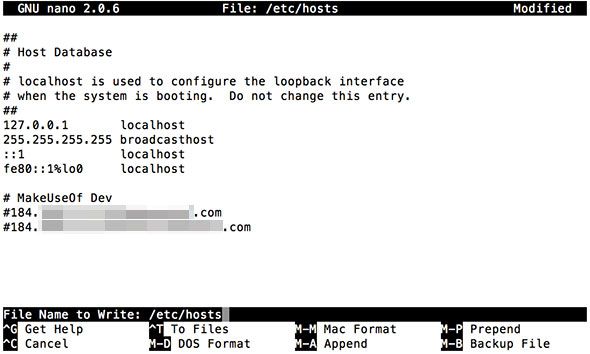
Once you've added a commented-out description, an IP and a domain you should save the file using the keyboard shortcut Control+O which calls the WriteOut function. You will be asked for a location and file name, but seeing as you're overwriting a file all you need to do is press Enter. Remember you're only able to do this because you used the sudo command to gain admin privilege, otherwise you would not have permission to overwrite what the system considers to be a very important file.
Once you've hit Enter nano will report how many lines were written, and the changes will be saved. You can quit nano using Control+X to return to the prompt, the changes should be instant.
In the event that your changes don't register immediately you can flush your DNS by opening Terminal and entering the following:
sudo killall -HUP mDNSResponder
For users on OS X 10.6 or earlier the following Terminal command is used to flush DNS instead:
dscacheutil -flushcache
All Done!
And that's it, you've now changed your Mac OS X hosts file and can confidently do it again whenever you want using a few Terminal commands.
Let us know what you've been doing to your hosts file in the comments, below.


