You can do so many cool things with Adobe Photoshop it's difficult to know where to begin. In this article we show you how to create an online photo frame using Photoshop. One which you can use across websites and apps, whether surrounding your avatar or in the header of your blog.
Step 1: Set Up Your File
Before we start this tutorial, you'll need to know the basics of the Custom Shape Tool. To do so, check out our article detailing how to use the Custom Shape Tool in Photoshop.
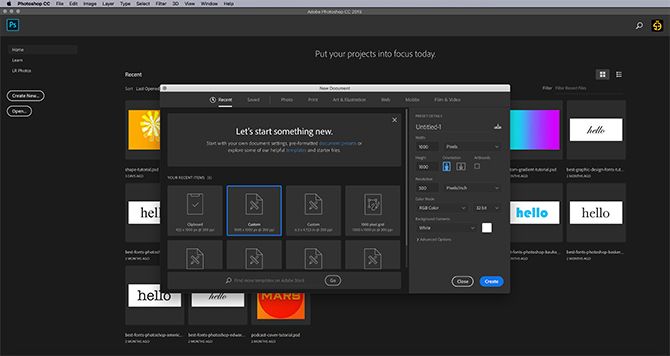
Next, open up Photoshop to set up your document. For this tutorial, let's say the picture frame you're creating is a social media avatar. Avatars are usually equal dimensions on all sides, regardless of whether they are circle-shaped or square.
With this in mind, set your document size to at least 1000x1000 pixels, although you can go larger. These dimensions will act as a guide for your picture frame.
Step 2: Set Up Your Custom Shape Tool
After your file is set up, create a new layer in your Layers panel---this is where your frame will go.
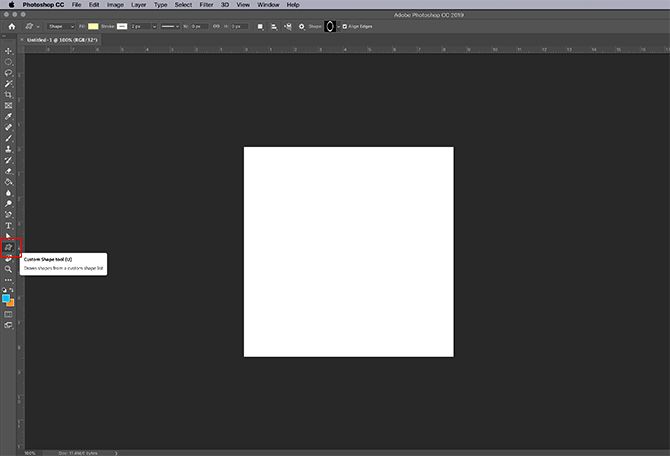
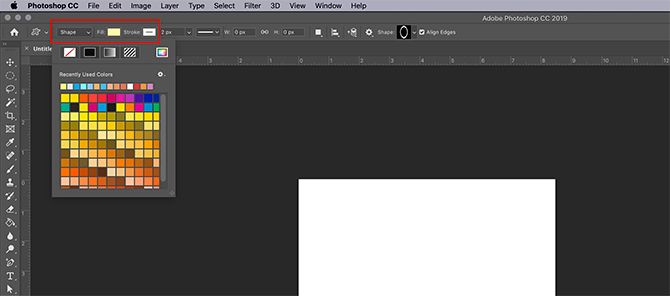
Next, make sure your Custom Shape Tool is active. Then check the colors for your Custom Shape in the Fill and Stroke sections.
At the moment I currently have the default color palette active. I don't want to use those colors on my picture frame, however, so I'm going to switch them out.
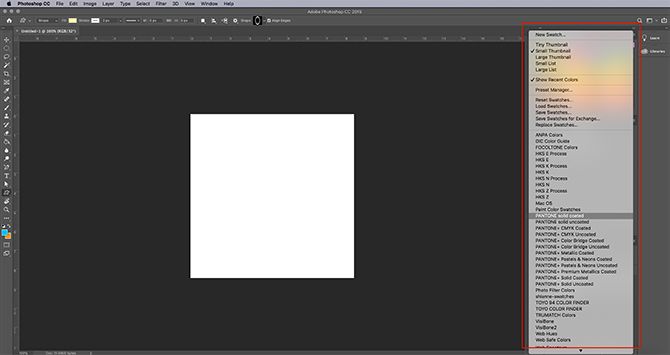
To switch these colors, go to your Swatches panel. Click on the icon for the dropdown menu. Choose a pre-built palette from Adobe's list of options.
You can also load a custom color palette if you've already created one. If you haven't made one before, check out our tutorial explaining how to create a custom color palette in Photoshop.
Now that the new palette is loaded, go back to your Fill and Stroke options for your Custom Shape Tool. Choose the colors that you want to use.
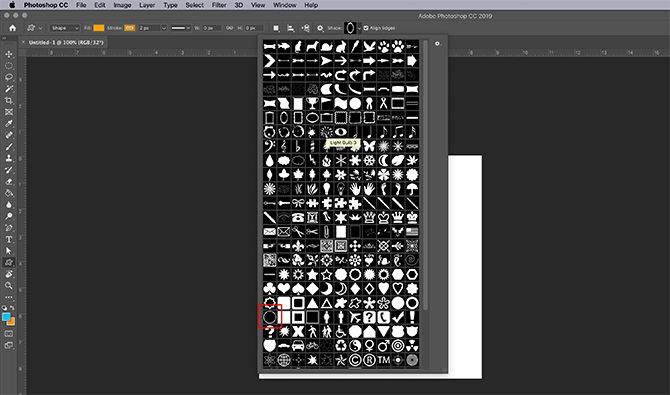
After that, go to your Shape dropdown menu and pick the design that will be best suited for your picture.
For this tutorial, scroll down until you find the hollow circle and square shapes. Pick the hollow circle to use as your picture frame, seen here in red.
While Adobe does have a lot of pre-build frames, they're a bit too fancy for our purpose. This circle should do the trick.
Step 3: Draw Your Shape
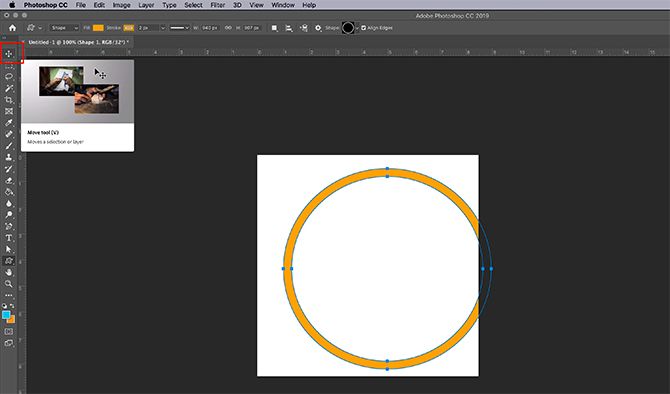
After you've picked your shape, click and drag your cursor across the page to create it.
If you've accidentally drawn your image off the page---like I have---don't worry. You can either use the Path Selection Tool or the Move Tool to center your frame. It's been highlighted here in red.
Step 4: Apply a Layer Style
Once you have your frame centered, you might want to apply an effect to it, to make it look more "3D".
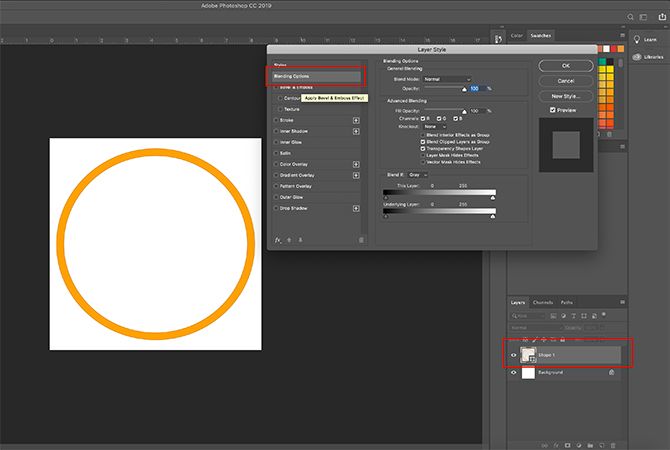
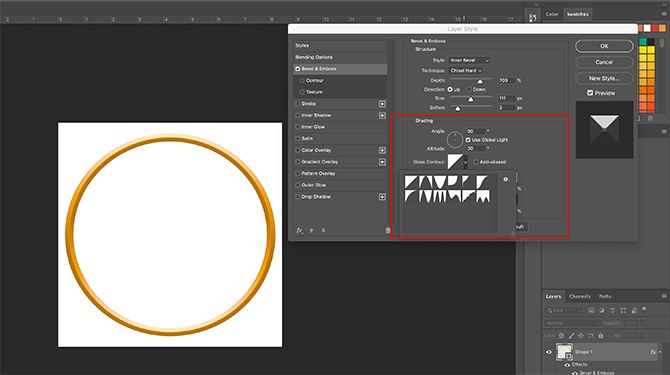
To do this, go to your Layer panel and double-click on the layer that contains your shape. A box will pop up that says Layer Style.
Under Blending Options, you'll see Bevel & Emboss. Click on this option to activate it, and make sure the checkbox next to the name is filled.
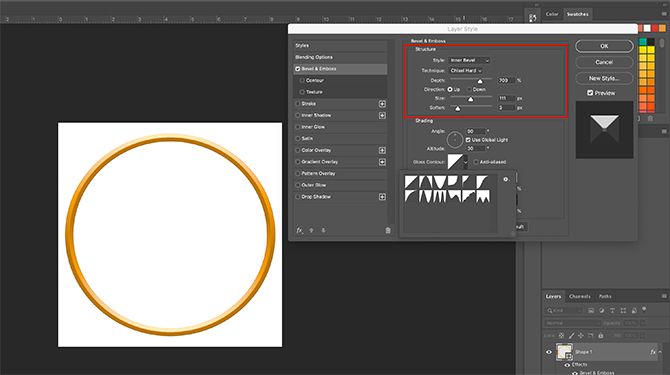
Once that checkmark is active, you'll see that your photo frame has taken on a more 3D quality.
Under the Structure section, you can choose what type of bevel to apply to your shape, the depth of the bevel, the size, and how much you want to soften its edges.
Under Shading, you'll be able to change how your highlights look. You can change the angle that the light hits the object, and how the light interacts with the object, too.
Once you have all your settings fixed to your satisfaction, click OK.
Step 5: Rasterize Your Layer
After you finish your bevel, you'll want to select your frame to create a "frame selection". This will allow you to call up the "shape" at a later date and easily apply a color fill in the shape of that selection---just in a different layer.
Think of it like a shortcut to editing.
When you select your Magic Wand Tool, make sure your image is currently set to 16 Bits. You'll get a warning from Photoshop if it's not.
If it isn't, click on Image > Mode > 16 Bits. Because you're working in different layers, Photoshop will ask you if you want to merge these layers when you reduce your document depth.
Click Don't Merge. You still want these layers separate.
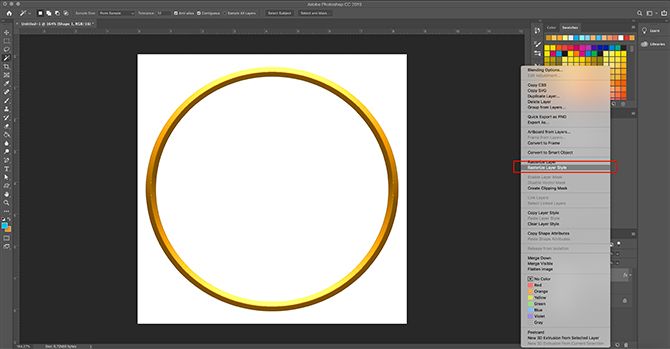
After you change the depth of your image, you'll still need to "rasterize" your layer in order to use your Magic Wand. This means you're converting a vector graphic into a pixel-based one.
To rasterize your layer, right-click on the layer that contains your photo frame, and choose Rasterize Layer Style.
Step 6: Make a Selection
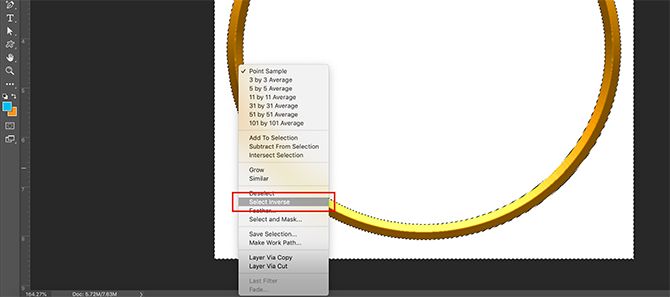
Next, go back to your Magic Wand Tool and select the empty space on the inside and outside of your picture frame.
When those two areas are selected, right-click on the empty space, and choose Select Inverse. Photoshop will select the shape of your frame instead.
This might seem like a convoluted step, but there's a good reason to do the selection in this order.
If you try to click on your 3D frame directly, Photoshop will only select the colors with the exact same value and hue---not the whole thing.
With Select Inverse, you now have a clean selection of your frame.
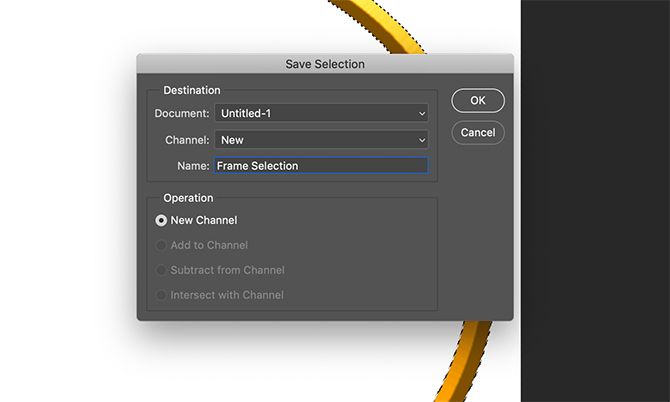
To save this selection for further use, go to your menu bar at the top of your workspace. Click Select > Save Selection.
Give your selection a meaningful name, then click OK.
Step 7: Adjust the Color
Now that you've created your online photo frame, you might want to adjust the color of it.
To adjust the color, go to your Layers panel, and create a new layer on top of the layer that holds your picture frame. Then click Select > Load Selection.
From the Channel dropdown list, choose the selection that you made of your picture frame.
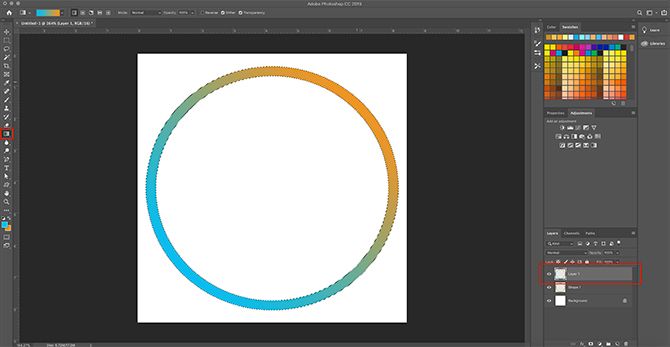
Once the selection is active, go over to your Paint Bucket or Gradient tool, and apply some color to that layer. It will stay within the confines of that selection.
After you have your color down, you'll want it to interact with the picture frame beneath it.
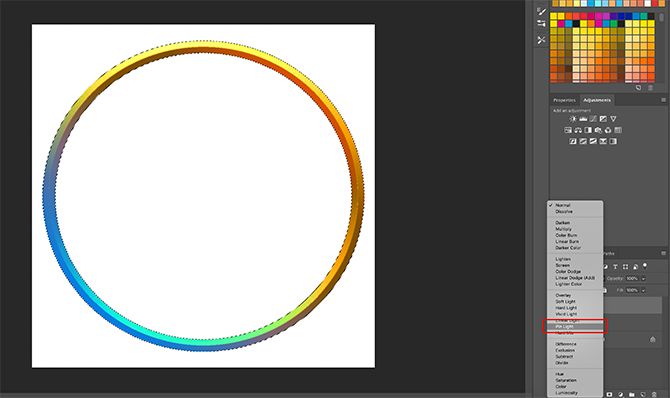
To do this, click on the Blending Mode dropdown menu in your Layers panel. Choose an effect.
As you can see, this effect brightens my frame while also picking up the light and dark hues of the 3D bevel beneath.
Step 8: Add Your Picture
After you're done with the picture frame, you'll probably want to place a picture inside it. To demonstrate this part, I've used a headshot of myself.
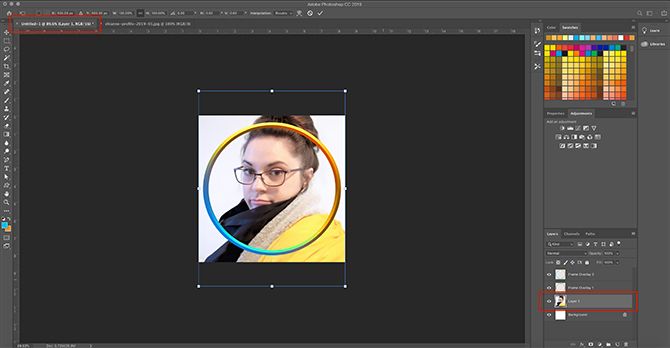
To bring this headshot into your frame, select the Move tool, then click and drag your headshot to the file tab for your picture frame along the top. I've highlighted the tab in red.
Once you drag the headshot to the tab, Photoshop will bring the headshot into your picture frame workspace.
Release the file. Photoshop will automatically place the headshot in a new layer in your Layers panel.
Once this headshot is in a new layer, move that headshot layer beneath your picture frame layer. The frame needs to be visible on top.
If needed, adjust the headshot to better fit your frame by going Edit > Free Transform. Drag the anchor points inward to make it smaller.
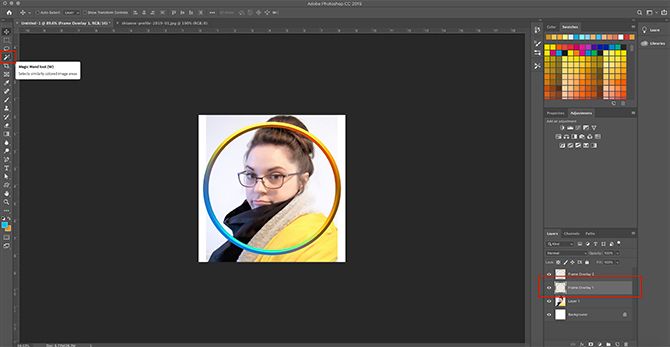
Next, go to your picture frame layer. Activate your Magic Wand tool, then select the space around the outside of your frame.
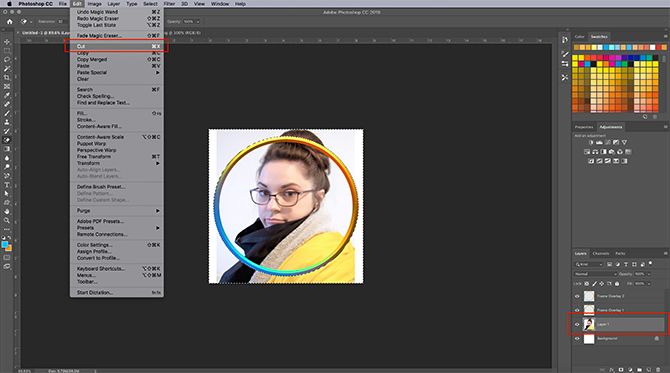
Once the area outside of your frame is selected, go back to your headshot layer. Go to the menu at the top of your screen, then click Edit > Cut.
This will quickly remove the rest of your picture outside of your frame, creating that "picture-like" effect.
Step 9: Save Your File for the Web
Now that your headshot is inserted and your picture frame is done, you're ready to save.
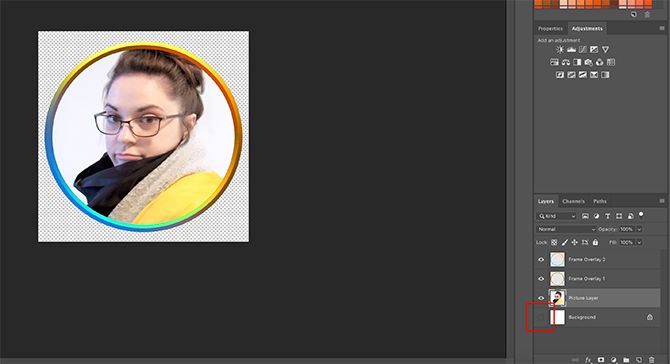
Before you save, make sure the background layer in your file is turned off. Your picture frame is round and there will be some transparency around it. If you keep this background layer on, this transparency won't take affect.
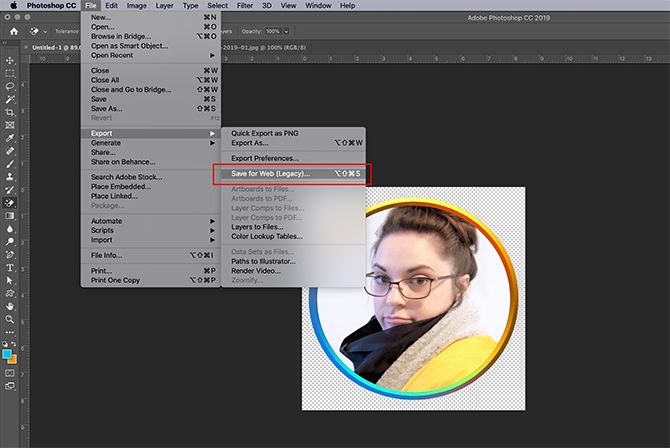
After your background is turned off, go to File > Export > Save for Web (Legacy). Save your file as a PNG. And there you have it. You're done.
Customizing Your Online Presence
Now that you know how to create a digital photo frame you can use it to customize your online presence, giving you a consistent look across various sites and apps.
However, don't stop your Photoshop education there. We recommend learning how to create a custom gradient using Photoshop next.


