Photoshop is a wonderful tool for editing images -- and it's no secret that we're big fans of it here. We've previously covered how to design a simple logo, and how to fix overexposed photos, so automation is the next logical step once you've mastered the basics.
You may have heard of Photoshop Actions. These provide a simple way for you to automate tasks. Today I'll be showing you how to use Photoshop Scripts. Photoshop Scripts are slightly more powerful than actions, and provide you with the ability to alter the behaviour of the script at runtime -- something actions cannot do!
Don't worry if this sounds complex: scripts are written in JavaScript, a simple but powerful language.
If you're a fan of GIMP or don't want to spend the money on Photoshop, then check out our guide to automating GIMP with scripts.
Your First Script: Resize Images
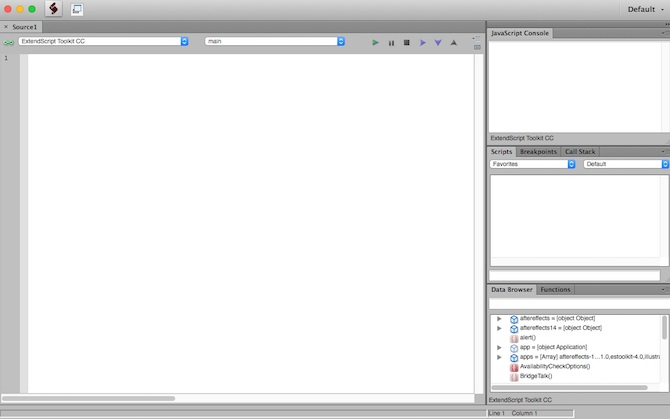
When writing scripts, you can use the ExtendScript Toolkit. You don't have to use this, you can use any text editor you like (I like Sublime Text), but there are a lot of benefits to using this toolkit instead. The biggest advantage is that you can set breakpoints, which make it very easy to debug your code and identify any bugs.
The ExtendScript Toolkit is included with your Creative Cloud Subscription, so go ahead and install it from your Creative Cloud App or the website above.
Open the toolkit once installed. You'll be presented with this rather dated looking interface:
Here's the code for your first script -- copy and paste this into the main code window on the left:
        current_document = app.activeDocument;
new_width = 670;

current_document.resizeImage(
  UnitValue(new_width, 'px'),
  null,
  null,
  ResampleMethod.BICUBIC
);
Let's break down what this code is doing. The current_document variable stores the active document object from Photoshop. This is accessed using the app.activeDocument syntax. If you don't have Photoshop running with a document open, this code will throw an exception. Exceptions are ways for code to halt execution -- this script cannot continue if there is no document!
The new_width variable stores the width you would like your new document to be.
Finally, the resizeImage method resizes the image. This has to be accessed through the current_document variable. You need to pass in your new width (converted to pixels through the UnitValue method), and the ResampleMethod of BICUBIC.
There are five main resampling methods available to you. These all vary in terms of speed and quality, so play around with them (although Bicubic is fine for most purposes). Here's a quick summary of the differences:
- Nearest Neighbor: Very fast but basic.
- Bilinear: Better than Nearest Neighbor, but slower and not as good as Bicubic.
- Bicubic: Very good results, but computationally expensive.
- Bicubic Smoother: An enhanced version of Bicubic for upscaling (making larger).
- Bicubic Sharper: An enhanced version of Bicubic designed for downsampling (making smaller).
Remember to capitalize these when using them in your code.
Now that you understand the code, it's time to run it! Ensure you have Photoshop open, along with a document.
At the top of the ExtendScript Toolkit, change the target dropdown menu (top left) from ExtendScript Toolkit CC to Adobe Photoshop CC 2017 (or whatever your particular version of Photoshop is). If you're writing scripts for other Adobe apps, you can change this to those instead.
Now press the Play button to the right of the target dropdown, on the Top Right of your code.
If everything ran correctly, you document is now resized (don't forget to save it). The JavaScript Console on the top right of your toolkit will show the output of your script. As there is no output, this will say Result: Undefined.
If there's a problem (such as an exception thrown), your code will not run, and you will get an orange bar in roughly the location of the problem.
This may be a simple typo, so after stopping the script (Top Right Controls > Stop Button), double-check:
- Your code is correct and has no typos.
- Photoshop is running.
- You have a document open in Photoshop.
Running Scripts
Now your code is running correctly, it's time to add it to Photoshop.
Inside your toolkit, go to File > Save, and save your script in a suitable location with a suitable name. By default, this will be the Adobe Scripts folder. Notice how scripts have to end in the .jsx format.
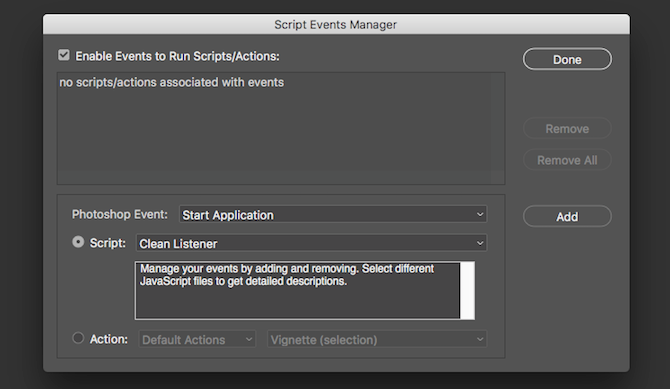
Inside Photoshop, go to File > Scripts > Script Events Manager. Tick Enable Events To Run Scripts/Actions.
Once enabled, this interface allows you to configure existing scripts to run when certain actions occur. There are several key areas:
- Photoshop Event: This is when the script will run. You can choose from a variety of options, such as when printing, when opening a new document, and many more.
- Script: This is the script to run. There are a few basic ones built in, but you can also assign one of your own scripts here.
- Action: If you're not using a script, you can choose a basic action to perform instead, such as save to PDF.
Select Script, and then choose Browse. Select your script. Go ahead and choose an event, which will trigger your script.
Once set up, click Add and then Done. This menu is also where you can edit or delete any scripts previously configured.
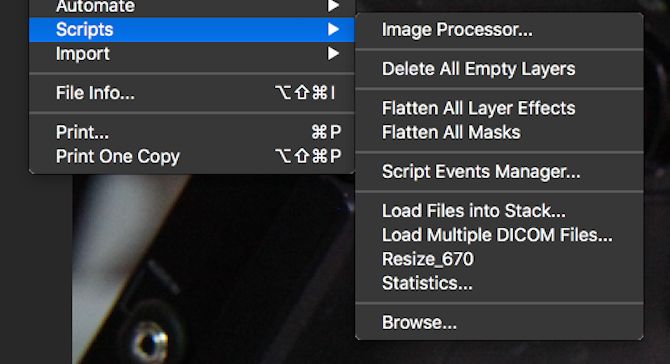
If you don't want to tie your script to an action, it's even easier to setup. Go to File > Scripts > Browse. Navigate to your script, and then press open. Your script will immediately run.
If you would like to see your script in this script menu, then you need to copy it into the appropriate folder. This can be found in the Presets > Scripts folder of your Photoshop installation.
Once copied, restart Photoshop. Once restarted, your script will be visible as a menu item in the File > Scripts Menu.
Resize Images: Making It Better
Now that you have an understanding of Photoshop Scripts, it's time to improve the code.
This code works very well at resizing images to 670px (or whatever size you changed it to), but it could be better. Fortunately, JavaScript is a very flexible language!
Let's modify the code so that any images smaller than the new size won't get resized. Here's the code:
        current_document = app.activeDocument;
new_width = 670;

if(current_document.width > new_width) {
  current_document.resizeImage(
    UnitValue(new_width, 'px'),
    null,
    null,
    ResampleMethod.BICUBIC
  );
}
There's only one change here. An if statement is wrapped around the resize method. If the current document width (accessed through current_document.width) is less than the new width, don't resize.
This ensures that small images don't get enlarged, which would reduce the quality.
When you start typing code in the toolkit, it provides suggestions for valid changes you can make, methods to call, or properties to access. This is very useful, and you should take full advantage of it!
Here's one final change:
        current_document = app.activeDocument; // Get the active document
new_width = 670; // new width to ressize to

if(current_document.width > new_width) {
  // if document is larger than new size
  current_document.resizeImage(
    UnitValue(new_width, 'px'),
    null,
    null,
    ResampleMethod.BICUBICSHARPER
  );
}

current_document.activeLayer.autoContrast(); // Apply contrast
current_doc.activeLayer.applySharpen(); // Apply Sharpen
This code now contains comments, something that all code should have, and which will help you out in the future.
The resample method has changed to Bicubic Sharper -- this produces slightly better results when downscaling images.
Finally, contrast and sharpening has been applied as last step.
What Will You Code?
By now you should know all you need to automate anything in Photoshop! If you can do it in Photoshop, you can probably automate it. The Photoshop API provides access to many features, and their documentation describes nearly every feature you can access.
Of course, today's examples were only basic, but they cover the core details -- you can implement a script specific to your requirements!
Did you learn anything new today? What are your favorite scripts? Let us know in the comments below!
Image Credit: whiteMocca via Shutterstock.com


