3D printing is a great new hobby to pick up, but how exactly do you start? How do you make your shiny new printer convert all that plastic spaghetti to something you can use? How do you 3D print anything? Here are the basics you need to know to begin 3D printing right now.
How to Use a 3D Printer
3D printing an object is simpler than it sounds. Once your printer is ready to go, there's a simple process to follow:
- Download or design a 3D model
- Convert this model into printer instructions
- Send these instructions to your printer
- Begin printing
If you're using a central library or other on-demand 3D printing services, this process is even easier. You deliver your 3D file to the technician or librarian, and they will handle the rest of the printing process for you.
Many popular 3D printers come with several designs ready to print. These are often included as a set of instructions for your printer to follow and can be the quickest way to get a print going on your machine.
What Is an STL File?
STL is an abbreviation of "stereolithography". An STL file (files ending with ".stl") is a 3D model ready for 3D printing. This common file format works with a huge variety of 3D modeling tools and is a great way to share 3D models for printing.
STL files describe the surface geometry of a 3D model. There's no color, material, or texture information, as 3D printing doesn't need any of this information. STL file sizes vary depending on the complexity of the model and the level of detail contained. STL files for large models may be upwards of 200MB, whereas smaller files can range from 500KB to 5MB.
Where to Get STL Files for 3D Printing
There are two ways to get STL files. You can design your own 3D models, or you can download models designed by other people.
As STL files are basic 3D models, almost any 3D modeling package can produce models for printing. Our beginner's guide to OpenSCAD is a good place to start designing your own models. The vast majority of design packages can save your design as an STL file.
If you don't want to design your own models yet, then there is a huge variety of free and premium model websites hosting thousands of different designs from people all over the world. Thingiverse is one of the most well known websites, and it's 100% free to use.
Once you have a file you are almost ready to begin printing. As mentioned above, if you're using a friend's printer, central library, or other 3D printing services, you don't need to perform any more work. Share your STL file with the printer operator and they will handle the rest.
3D Printing Basics: Slicing and G-Code
Once you have a suitable STL file, you need to convert it into instructions for your printer. These instructions vary between different printers and materials. You may want an ultra high-quality print or a fast but low-quality print. If you're using a new material you may need a very low temperature or your filament starts to burn. For these reasons, it's almost always best to slice your own model.
G-code is the name for the instructions your printer follows. This has been around for a long time, before 3D printers. G-code consists of a series of step-by-step instructions like a recipe. It contains details on speed, direction, temperature, flow rate and more. Once you have the G-code for your printer and model, you do not need to keep the STL file (although it's often a good idea, in case you need to make any changes).
"Slicing" is the name given to the process of converting STL files into 3D printer G-code. This is because 3D printers deposit plastic in many layers, so your 3D model needs cutting up into specific steps for every layer.
Many free slicing tools exist to convert your model into G-code. Some of the popular packages are:
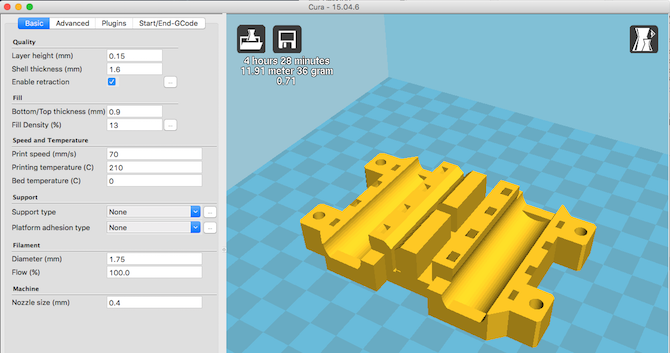
Slicers usually come with presets for popular printer models. If not, you may need to enter some basic information about your printer. This may be the print bed size, preferred speeds, type of plastic filament you are using and more. Once configured, you can begin slicing.
Our ultimate 3D printing guide covers slicing in greater detail, but generally speaking, you import your STL file and export the G-code. Large complex designs may take several minutes to slice. Once you have the G-code for your machine, it's a good idea to label it with the model, any dimensions, estimated print time, or any other information you need. Over time you can build a collection of G-code files ready to print.
How to 3D Print for the First Time
You've chosen a model, sliced it into G-code, and now you're ready to print. To start printing, your machine needs to know the G-code instructions required for every step. Sending your G-code to your printer varies by model, but there are several common methods:
- Save the files to an SD card
- Control the printer with your computer
- Use a 3D printer control system such as a Raspberry Pi
If your printer supports it, saving G-code to an SD card is often the simplest way to print things. Printers with SD card support almost always have display and control buttons. Navigate to your G-code file and choose the print option. Insert the plastic filament and ensure the printer is set up following the manufacturer's instructions.
Connecting a 3D printer to your computer over USB lets you control it using the slicing tool of your choice. This option works well but requires your computer to remain on and connected to the printer for the duration of the printing.
Finally, OctoPi is a Raspberry Pi based 3D printer controller. This is a good way to control your printer over the network but requires some initial configuration.
Whatever option you choose, you should soon hear the robotic sounds of your 3D printer producing your first print! This is an exciting time, and it is tempting to watch the whole process. 3D printers are sometimes fickle machines and minor draughts can impact the print in undesirable ways. Try to observe from a distance if possible, or position your machine somewhere it won't encounter regular draughts.
The Basics of 3D Printing
It's a great feeling when your first 3D print finishes and some printers often emit a special sound to let you know it's ready. Don't worry if something went wrong, or the quality isn't what you expected---3D printing is a complex process. Often, several rounds of trial-and-error happen, with each step refining the process and improving the quality.
If you're stuck, you can share details with the Reddit FixMyPrint community, where knowledgeable experts can share their thoughts on what went wrong.
If you don't yet own a 3D printer, then these best websites to order 3D prints from are excellent resources to use for on-demand 3D printing.
Image Credit: tinx/Depositphotos


