The first thing you want to do with a new computer is jump right into using it. But we don’t recommend doing that. There are some tasks that you must take care of before you start using the new PC.
The steps you take now can save you time and effort. In the long run, it'll make your machine safer, faster, and better poised for the future. Complete these Windows customizations before using your new computer.
1. Review the Update Settings
Microsoft releases periodic updates to Windows 10. Quality updates consist of bugs and security fixes. They get delivered at least once a month and as often as once per week. Feature updates are major upgrades.
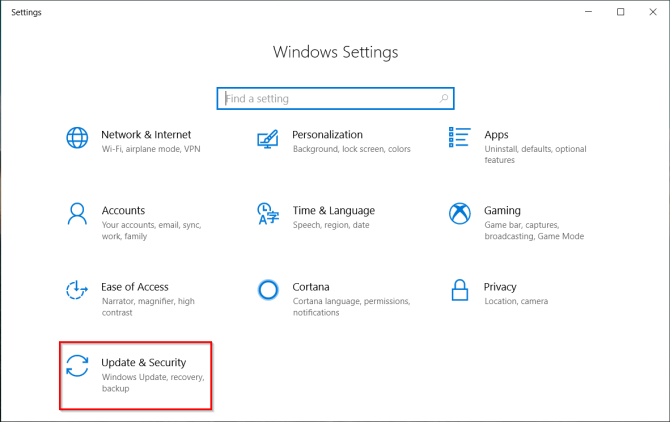
To avoid disruption, Microsoft adjusted its release schedule so that the H1 release is a major upgrade while the H2 release is a quality update. Windows Update is available in the Settings app. Navigate to Update & Security > Windows Update.
Click Change active hours to prevent Windows from automatically restarting your PC. View update history categorizes the updates installed on your system. If an update is causing a problem, click Uninstall updates and follow the dialog prompt.
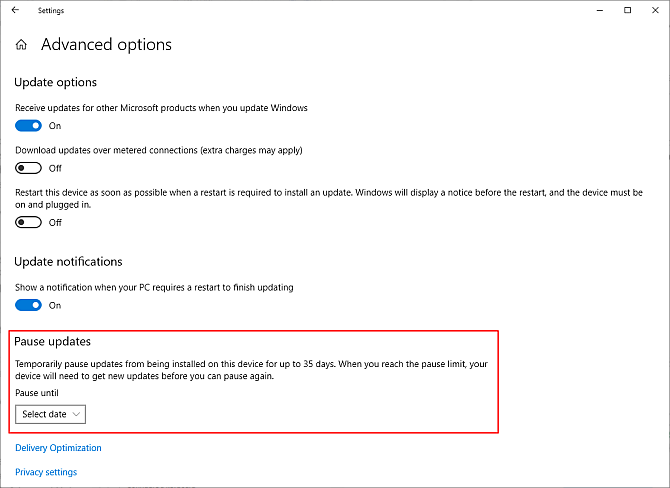
In older versions, you get to defer both feature (up to one year) and quality (up to 30 days) updates. Starting with Windows 10 version 2004, Microsoft removed the Choose when updates are installed option on the Advanced Options page. Regardless of the product edition, you can defer updates for up to 35 days.
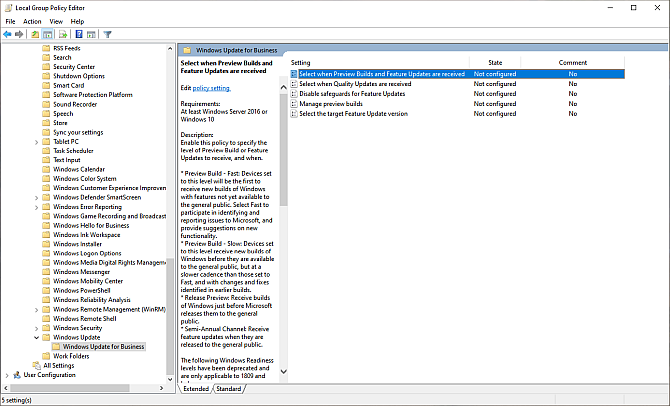
If you wish to continue to leverage deferrals, you can use Local Group Policy. You'll find the policy settings in the Windows Update for Business folder. Double-click the policy and configure the schedule as per your needs.
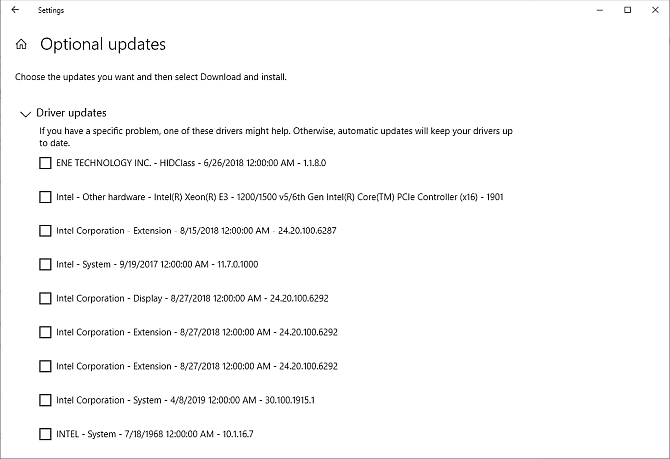
When your device gets any optional updates, you can manage it through View optional updates. That means you no longer need to utilize Device Manager to search for driver updates.
2. Check the Power Plan
You must pay close attention to power management settings to extend battery life and balance resource usage while doing an intensive computing task.
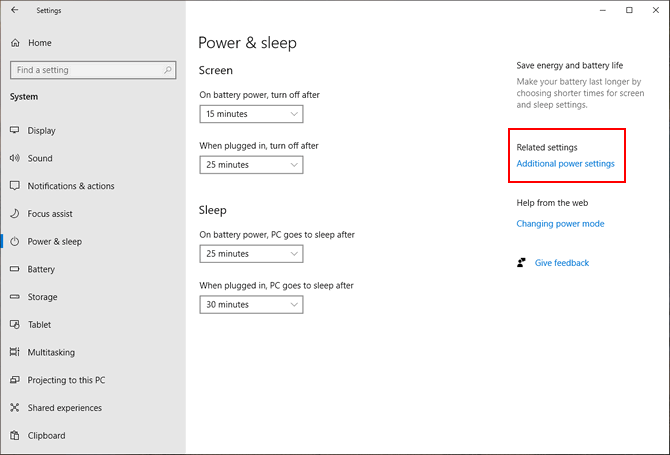
Open the Settings app and navigate to System > Power & sleep. Set the idle time before the screen goes dark and the time before it goes to sleep.
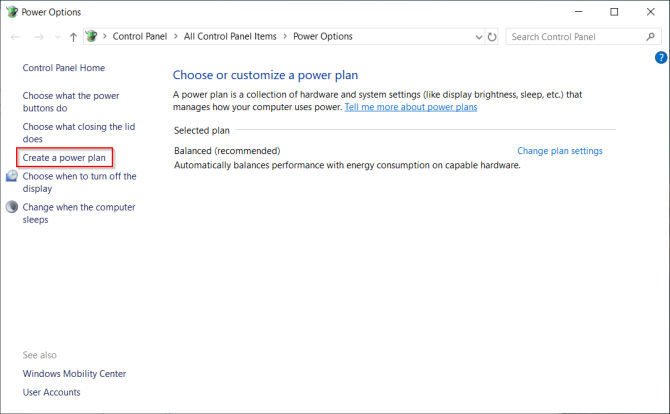
Click the Additional power settings link to open the Power Options page in Control Panel. You can create a custom Windows power plan according to your needs.
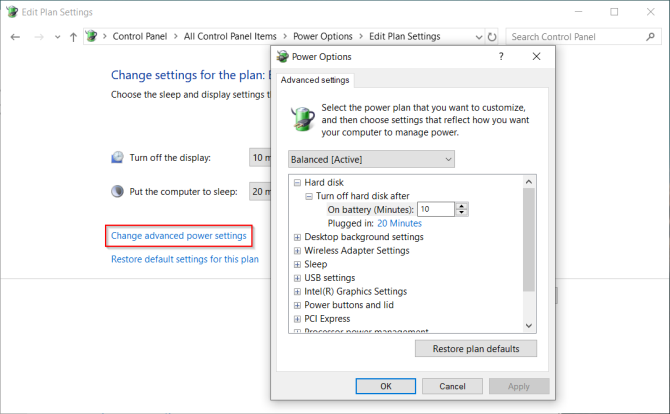
If you want to fine-tune it further, click Change advanced power settings. The options on this dialog box provide a great deal of granular control over power-related events. You can tailor them to your hardware and software needs.
3. Battery Health and Calibration
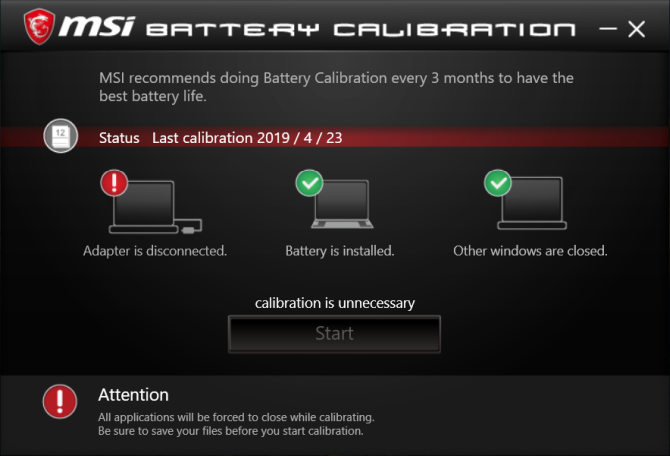
We’re often less informed and least excited about laptop battery health. When you buy a new laptop, it’s necessary to monitor battery health right from the beginning. Over time, the capacity of any battery diminishes.
The battery stops holding its charge and shows fluctuating readings. A flawed discharge estimation is also common. Monitoring the battery health periodically will tell you when to calibrate the battery and take corrective steps.
Visit your laptop's manufacturer website for details on the calibration procedure. If you're just getting started, follow this guide to know some of the best third-party diagnostic tools to analyze laptop battery health.
4. Rename Your PC
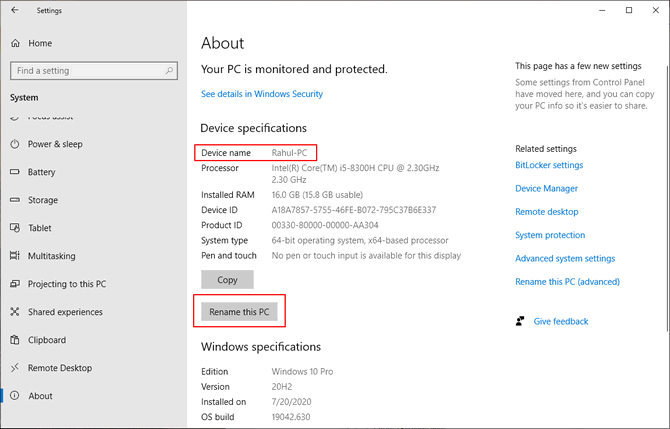
The default Windows setup creates a nonsense name for the PC. While it may seem small, you'll see your PC's name in OneDrive, Microsoft services on the web, and elsewhere.
Press Windows Key + X and choose System. From the About page, click Rename this PC and type in a name. Reboot your computer.
5. Create a Recovery Drive
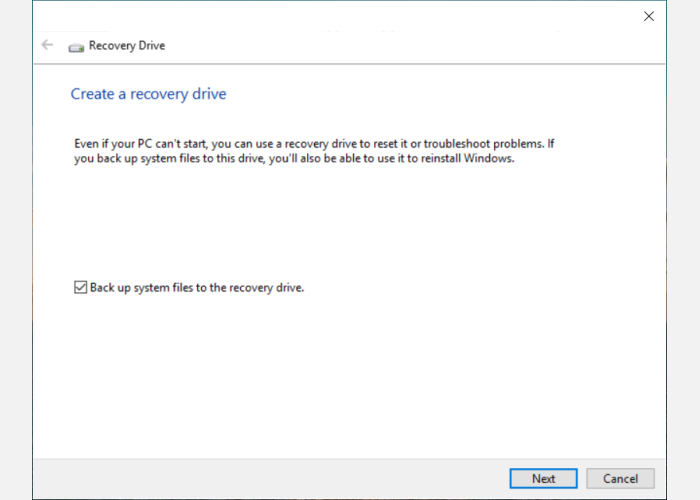
When your PC runs into problems and won’t start, a USB recovery drive can help you troubleshoot and fix those problems. The recovery drive boots your PC into a Windows Recovery Environment, which consists of many helpful utilities.
To create a recovery drive, type “recovery” in the search box and choose the Recovery Drive app from the results pane. Make sure to check Back up system files to the recovery drive.
Once checked, you’ll be able to use Reset this PC and access Windows Recovery Environment tools from the drive. For best results, choose a 16GB USB drive.
6. Uninstall Bloatware and Turn Off Annoyances
Bloatware is an app that comes pre-installed with your PC. They may include trial versions of antivirus, games, or even Microsoft Office. Pre-installed apps consume disk space and litter the Start menu. Here's our guide on easily removing bloatware in Windows 10 and using third-party uninstaller utilities to remove faulty apps.
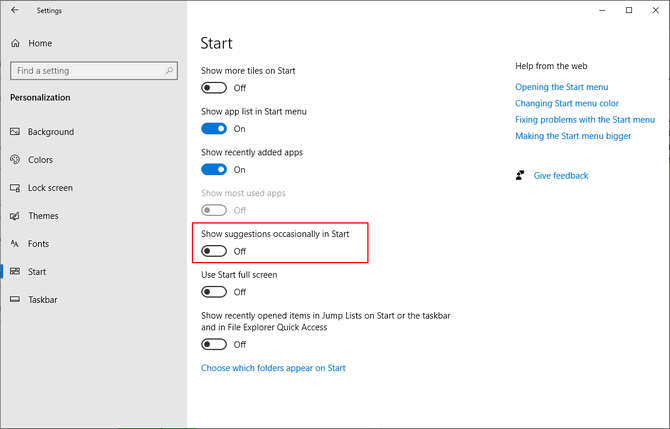
Turn Off Start Menu Advertising: Navigate to Settings > Personalization > Start and turn off Show suggestions occasionally in Start.
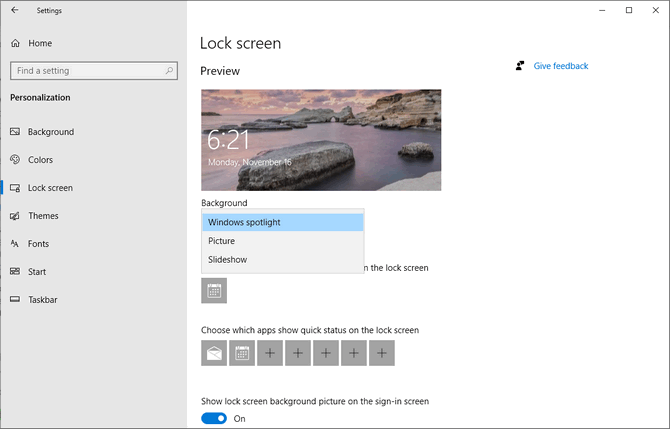
Lock Screen Ads: Sometimes, you may see adverts for Microsoft products via Windows Spotlight. Navigate to Settings > Personalization > Lock screen and set the background to a Picture or Slideshow.
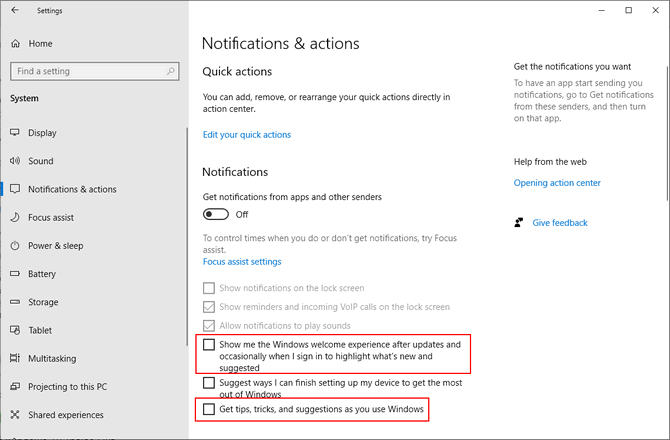
Taskbar Pop-Ups: You might get persistent notifications on product recommendations in the disguise of Windows 10 tips. Go to Settings > System > Notifications & actions and turn off Get tips, tricks, and suggestions as you use Windows.
Also, turn off the Show me the Windows welcome experience after updates and when I sign in option.
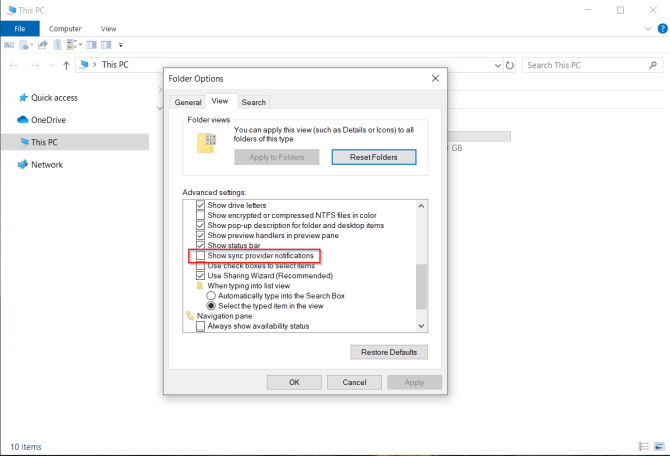
File Explorer Advertising: You might see ads on File Explorer if you use the free plan of OneDrive. Go to View > Options > Change folder and search options. In the Folder Options window, navigate to the View tab and turn off Show sync provider notifications.
7. Create a Standard User Account with Password
When you configure Windows 10 for the first time, the setup program creates a profile for the administrator account. With it, you can change system-wide settings, run all installed apps, install new hardware, and do pretty much anything on the computer.
Whether you're a newbie or a professional, we always recommend starting with a standard user account. These limited accounts can run apps and change settings that don't affect other users.
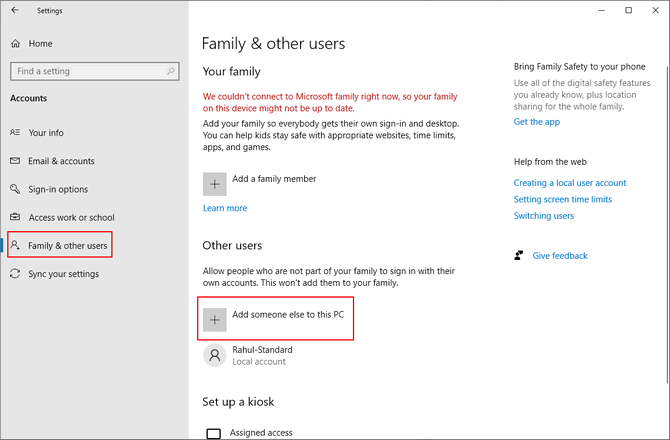
An administrator has the ability to add a user account. Go to Settings > Accounts > Family & other users. Click Add someone else to this PC.
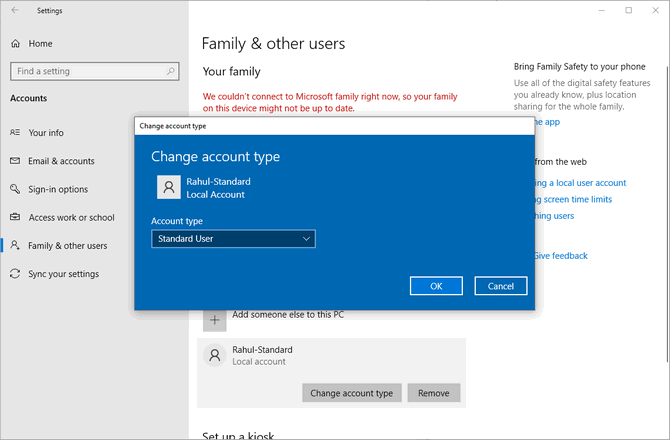
Walk through the steps and click Add a User Without a Microsoft Account. Specify a user name and password. You'll also be required to choose and answer three security questions. At last, when prompted for the account type, choose Standard User.
8. Create a System Restore Point
The System Restore feature lets you undo any recent changes in hardware or software. It comes useful when a recently updated driver, a faulty device, or apps are causing problems.
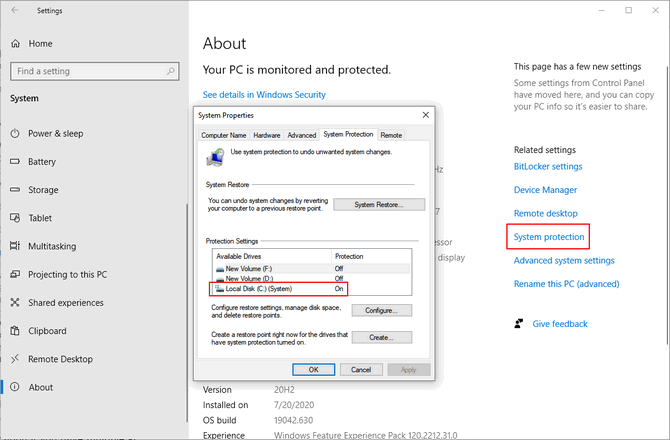
Go to Settings > System > About. Click System Protection, and from the window that appears, ensure that the restore point for C:\ drive is On.
9. Setting Up Windows Security
Many people ignore setting up Windows Security option before using a new computer. As of Windows 10 1809, all the options have moved to Windows Security app. To set up, go to Update & Security > Windows Security.
Virus & Threat Protection
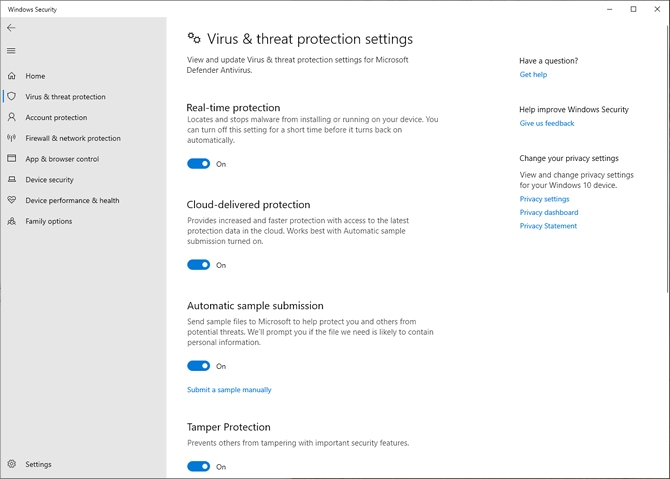
Under Virus and threat protection settings, select Manage settings. From here, you can configure the basic Windows Security settings, such as Cloud-delivered protection or the automatic submission of sample blocks virus and malware in real-time.
Ransomware Protection
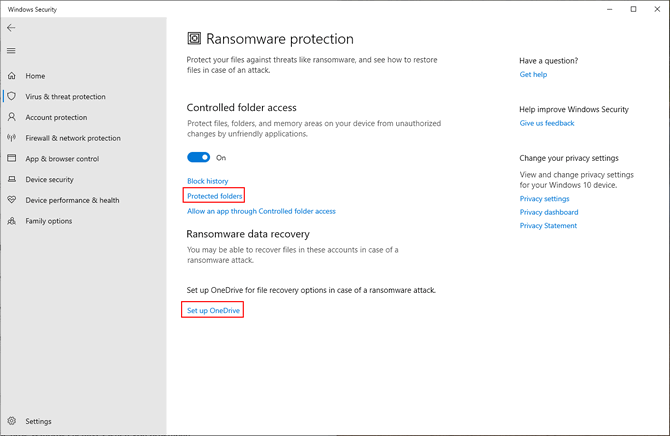
Click Manage ransomware protection to prevent suspicious apps from making changes to any files. Turn on Controlled Folder Access and click Protected folders to restrict unauthorized apps from accessing your folders.
App & Browser Control
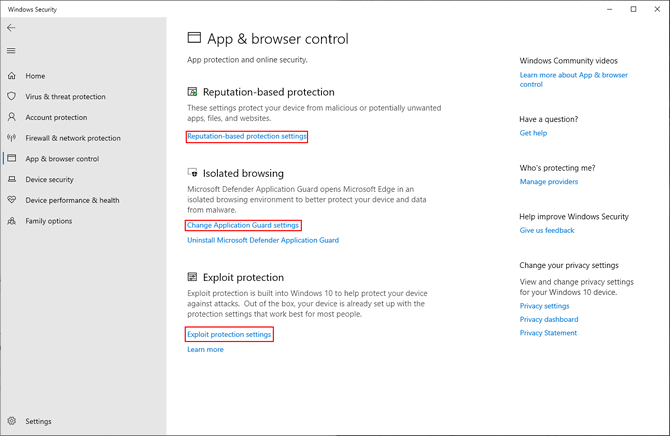
You can manage how Windows behaves when you download potentially unsafe apps from the web, encounter malicious websites, or configure how the Edge browser should act in unprotected situations (like airport Wi-Fi) to protect data.
The built-in settings include SmartScreen for Edge, installed apps, and files. Also, exploit protection functionality protects your system from getting compromised. It includes DEP, ASLR, and SEHOP settings.
Device Security
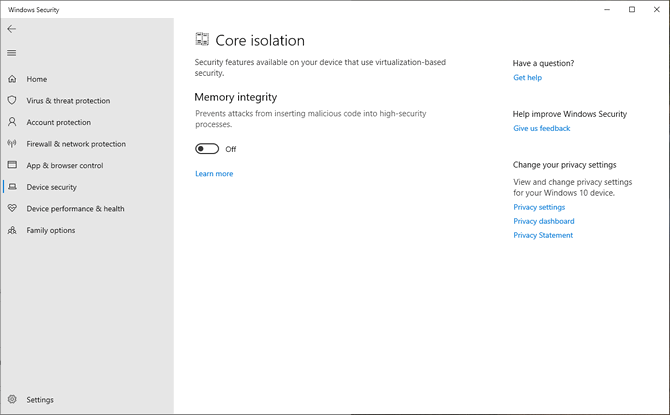
Windows 10 comes with built-in virtualization-based security to prevent attacks from malicious code.
10. Setting Up Scheduled Backup Routine
No amount of maintenance guarantees against hard drive failure or theft. Any potential catastrophe could imperil your computer and data. To keep your data safe, take regular backups. Here's our ultimate guide on backups and best practices on hardware and software:
- One or two external hard drives (minimum 1TB) and decide whether you'll attach it to your PC (RAIDs) or over the network (NAS). You can partition the drive and use one for system backups and another for data.
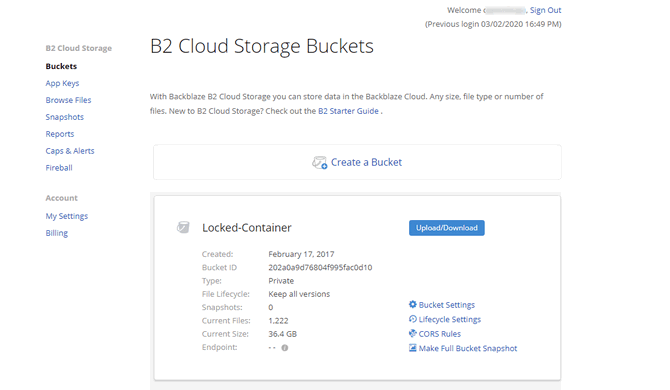
- Choose an app to backup your data automatically on a fixed schedule. Cloud storage services work best to sync your files, but for backup, consider Backblaze, Backblaze B2, Amazon S3, or Glacier.
11. Use Ninite to Install Multiple Apps
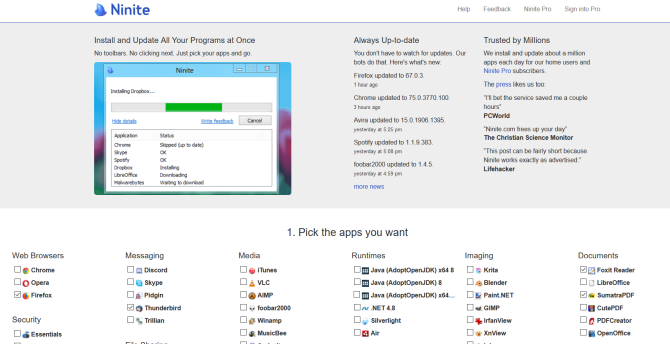
Having to download, install, and keep your apps up-to-date is time-consuming and annoying. Ninite lets you automatically install multiple apps in one fell swoop and save time. Check the apps you want and click the Get Your Ninite button.
Run the customized installer. The apps will silently install in the background with default settings.
With Ninite Pro, you can patch and deploy apps right from your browser. Install the lightweight Ninite agent on your machines and get a real-time view with simple point-and-click management of your apps.
Best Time to Buy New Computer
Getting a new computer is an exciting time. Although at first sight, these tips may seem a lot, it’s not tough. Your PC will be safer, faster, and better equipped for your tasks.
It can be expensive to buy a new computer, so it makes sense to time your purchase for when you can secure a bargain. While prices are always subject to change, you can get your favorite computer at a discount with these tips.


