When many beginner and intermediate photographers are critiquing their photos, they find that the images lack a sense of depth, and instead feel a bit "flat." This can be a difficult problem to overcome, but with these six tips and some practice, you'll be taking photos that feel more alive and communicate a stronger sense of depth in no time.
Add Foreground Objects
When you have an object in the foreground, it serves as a focal point for the viewer: they'll look at the foreground first, and then their eyes will move to the rest of the photo. By giving them two different things to look at, at two different distances from the camera, you give the impression of depth. This might seem obvious in portraiture or product photography, but it can really make a difference in landscapes.

In the image above, for example, the bike in the foreground draws your eyes first, and then you move to the background. The foreground object emphasizes that there are multiple different levels of depth in the photo. Here's another example:

See what I mean? The fence serves as a foreground object, giving context to the lake and trees in the distance. Keep this idea in mind next time you're photographing a landscape, and your photographs will turn out a lot better (remember that exposure blending can also make a huge difference in the quality of your landscapes, too).
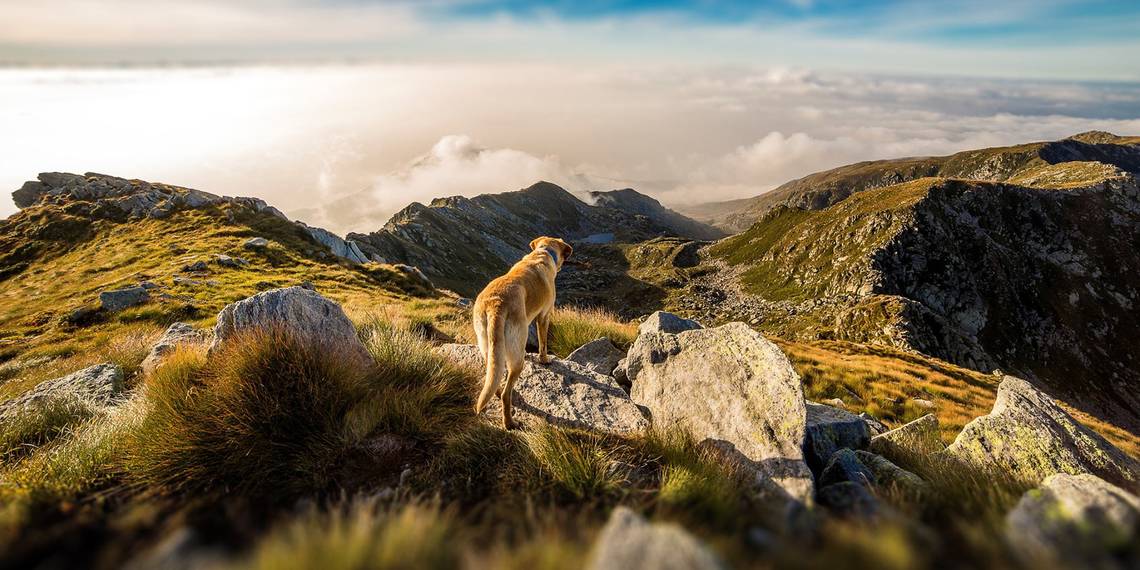
Use Leading Lines
The path that your viewer's eyes follow through the photo is very important to how the picture is perceived, and if you can include something in the photo that guides their eyes in a certain way, you'll have control over that perception. Humans have a tendency to follow lines, so if there are lines in your photo, it's a good bet that's where viewers' eyes will be.

In the photo above, your focus likely started in the bottom left corner and continued up into the middle of the photo. This has photo has depth precisely for that reason. You can also take advantage of "converging" lines to create depth by simulating the phenomenon that we use to judge distance in real life. The lines of the rooftops on both sides of this photo converge towards the center:

Either of these two strategies works well for adding depth to almost any kind of photo, but they're especially prevalent in landscape photography. Finding converging lines can be very helpful when you're in an urban or indoor setting, where it can be tough to communicate a sense of scale and depth. Shooting in portrait orientation, like the first image above, can also help in these situations.
Get Low
Shooting from levels other than eye-height and angles other than the ones that you're used to seeing makes for some really unique photographs, and it can also help provide the impression of depth in your pictures. When you include more of the ground, you exaggerate the difference between the foreground and the background in your photo.

As you can see, this works for much the same reason as adding an object of interest in the foreground. In essence, you're replacing the object of interest with the ground itself, and using this to emphasize the difference between foreground and background.

In both of the images above, the low angle creates a strong contrast between the ground, which feels very close, and the buildings in the background, both of which feel very large and looming. Taking photographs from difference angles is a great skill-building exercise, too, so don't be afraid to get low next time you're out taking pictures!
Find Lighting Contrasts
When you're judging the depth of a scene with your eyes, one of the cues that you use is light—especially shadows. Shadows can give you a lot of information about where objects are in relation to each other, and you can take advantage of that fact when framing up your photos.

In the photo above, the gradual transition from light to even lighter across the anvil combined with the sharp contrast between the anvil and the shadowed background make the foreground "pop." You can also use the opposite configuration to get a similar effect:

It can be difficult to properly expose a photo when you're working with areas of light and shadow, and you might end up underexposing a bit. That's when lightening in post-production can really come in handy. And practicing your low-light photography skills can also help you better understand how to expose correctly for these difficult situations.
Frame Within a Frame
"Frame within a frame" is a phrase you hear in photography every once in a while, and it's a really fun way to add depth to a photo. In short, you use something in your picture to frame the rest of the photo. A very clear example is taking a picture out of a window or door:

The viewer really gets a sense of being "in" the scene, as it accurately recreates the feeling of being there when you took the photo. It doesn't always have to be this literal, though—sometimes you can use something in the background of your photo to frame the foreground, or use natural features to frame.

As you can see, the frame doesn't need to be a complete frame around the object: it could be present on three, or even only two, sides of the photo. The effect is very similar to adding a foreground object, and works for much the same reason.
Play with Depth of Field
A photograph's depth of field is simply the distance covered by the in-focus part of the photo. This photo, for example, has a very shallow depth of field:

The part of the picture that's in-focus is very small—only a fraction of the book spines is clear, while the rest of the photo is out of focus. This mimics how our eyes have difficulty seeing into the distance clearly, giving the photo a sense of depth. You don't need to use this degree of shallowness, though; you can also use a deeper one to get the same effect in portraits, for example:

The subject is in focus, while the background is blurry, creating a more obvious difference between the two. Learning to use depth of field to fight the "flat photo" phenomenon is a great thing to practice when you start using your camera for more serious photography.
Combine Tactics
You may have noticed by now that many of these strategies work very well together—using a shallower depth of field and adding a foreground object, or getting a low angle and adding a frame within a frame, for example. All of these strategies can be effective on their own, but using more than one in a single photo will help you even more to communicate a sense of depth. Practice all of them to develop an eye for picking out great composition in your photos to get rid of flat pictures once and for all!
Do you have trouble with flat-feeling pictures? Have you found other ways to give the impression of depth? Share your best tips below!
Image credits: Beverly Goodwin via flickr, Beverly Goodwin via flickr, Andrés Nieto Porras via flickr,