Power Query for Microsoft Excel is a program designed to take large sets of data and allow you to make changes easier. It was created to make complicated tasks simple.
Importing data and performing basic changes in Microsoft Power Query is a good way to create a script, and begin learning how they work. Let's go step-by-step into generating a script, making changes, and seeing the results.
The "M" Language
Before we dive in, a little to know about the language that runs Power Query. Microsoft created the "M" language to build Power Query.
If you're not a programmer, not to worry. You don't need to know how to code using the "M" Language immediately, but it is helpful to be aware of its format as you begin to learn Power Query.
Basic "M" Language Format
In its most basic form the "M" language is structured as a "let-in statement", like this:
In a Power Query script, let is where you place the code you wish to run (input), and in is where you wish to run it (output). The code that is run inside of the
let
statement can be made up of variables, expressions, and values.
Variables can be named in two ways. The first is with words and no spaces. For example: "Variable" or "MyVariable".
If you would like to use a space in your variable name, just start with a
#
. For example: #"My Variable" or #"New Variable". Each of these variables has a space in the name but is still valid.
With this in mind let's get started on our Power Query Script.
Importing Data Into Power Query
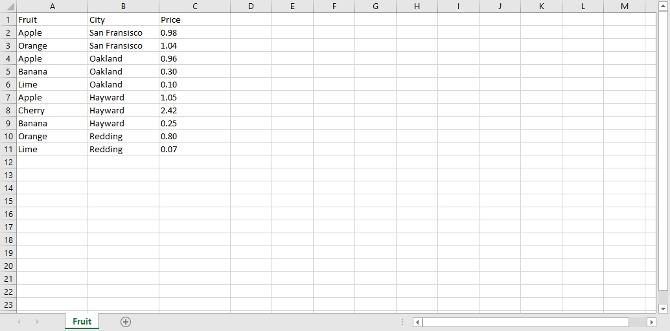
For this example, let's take a table we create called Fruits.xlsx which displays various fruits and their prices. There are some simple columns for
"Fruit"
,
"City"
, and
"Price"
.
The goal of this tutorial is to take the
"Price"
column and convert the data from a number to a currency format using Power Query.
We have this table saved to the desktop. Let's create a new Excel workbook called Fruit Data.xlsx to import our data.
In the toolbar select Data and click on Get Data. This will give you options to choose your data source, we want it From File > From Workbook.
This will open your file explorer. Go ahead and select the Fruits.xlsx workbook to import, and click OK.
Using the Power Query Editor
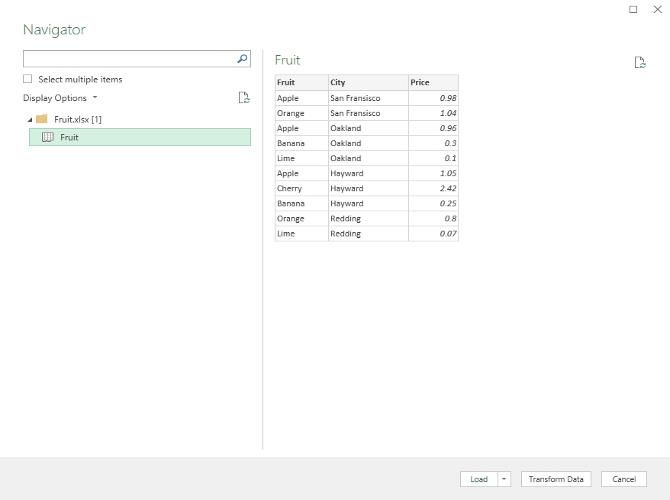
Once you click OK, the Power Query Navigator will pop up to choose data in the workbook. Select the Fruit table from the workbook, a preview of the data you select will appear on the right, to confirm your selection.
Click Transform Data to open the Power Query Editor.
Viewing the Script
At first glance, there is a lot going on, but let's focus on getting the script.
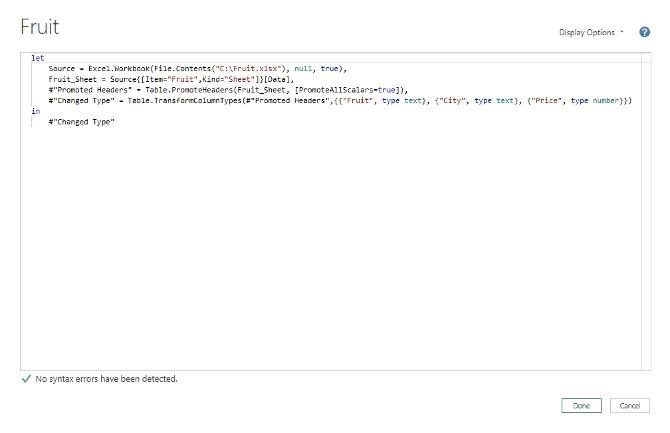
With the Power Query Editor open, in your toolbar under Home click on Advanced Editor to open the script. The Advanced Editor will open, and inside you will see the Power Query script in the M Language.
The contents seem very wordy, so let's break down the script before we make a change.
Script Contents
First off, notice that the script is the "let/in" format we went over with the M Language. Inside of "let" are the lines of code that make your changes, and the "in" code is where the changes will be output.
Let's go line by line to get a better feel for the code. This will need a close look and it may be easier to understand looking at it a couple of times.
        letSource = Excel.Workbook(File.Contents("C:\Fruit.xlsx"), null, true),
Fruit_Sheet = Source{[Item="Fruit",Kind="Sheet"]}[Data],
#"Promoted Headers" = Table.PromoteHeaders(Fruit_Sheet, [PromoteAllScalars=true]),
#"Changed Type" = Table.TransformColumnTypes(#"Promoted Headers",{{"Fruit", type text}, {"City", type text}, {"Price", type number}})
in
#"Changed Type"
Script Breakdown
The code begins with a
let
statement, which starts every block of code. The first thing Power Query will do is import the file into a variable called
Source
which is simply the Fruit.xlsx file we chose to import.
Note the comma at the end. Each statement will end with a comma, which just tells the code to read the next line.
From there, Power Query takes the sheet from Fruit.xlsx and sets it to a variable called
Fruit_Sheet
.
Line three is using a function
Table.PromoteHeaders
that takes the column headers we were using in Excel and making them headers in Power Query.
The next line starting with
#"Changed Type",
Power Query is changing the type of each column's data. The
"Fruit"
column is changed to
type text
,
"City"
is
type text
, and
"Price"
is
type number
. Power Query is smart and tried to determine what type of data is stored in the table.
Lastly, the
in
statement outputs the code to our editor, by outputting it to the last variable it can recognize which is
#"Changed Type"
.
It's important to recognize one thing here: Each variable created on a line is used in some fashion on the following line. Think of it like a chain where every link is connected to the last.
Editing the Query
Now that the script is in view and we have reviewed the code let's make our edit. Remember, the goal was to take all the data in the
"Price"
column and change it to currency.
Fortunately, we already have an idea for how to accomplish this. Recall this line of code:
#"Changed Type" = Table.TransformColumnTypes(#"Promoted Headers",{{"Fruit", type text}, {"City", type text}, {"Price", type number}})
We have the code which changed the data types for the entire table! This is where we can make our adjustment, and get our result.
Each column is assigned a type one-by-one, so let's make the change directly in the code. Currently, the
"Price"
column is assigned
type number
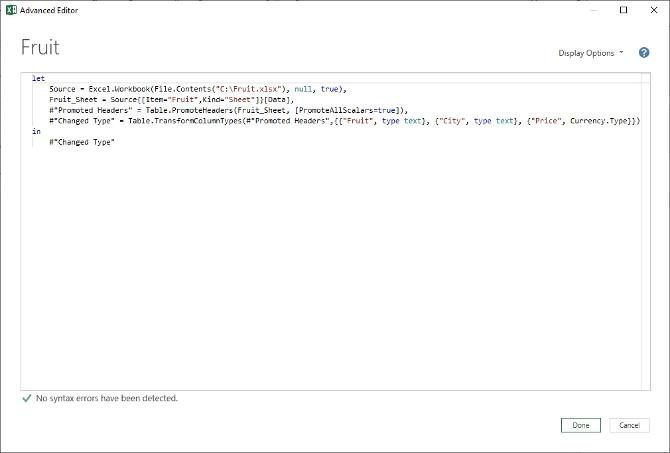
. We want it to be currency, so let's change this code to
Currency.Type.
Here's what it looks like:
Click Done to be taken back to the main screen. The type symbol is now a dollar sign, which means the type has been converted to currency.
Better Data Analysis in Microsoft Excel
This was just scratching the surface of Power Query scripts using the M Language. With more power to work with Excel, it's easier than ever to convert data to pivot tables to use for data analysis or make a chart in Excel.

