
PDF is a multi-platform document format. So there's no shortage of PDF apps and software to manage all your PDF needs. One such need is the ability to extract a specific page or a set of pages from a larger PDF document.
Third-party tools can do it easily, but did you know that Windows 10 has a native tool that does the same job? It's called Microsoft Print to PDF, and here's how to use it.
How to Extract Pages From a PDF in Windows 10
The Print to PDF feature is baked into Windows 10 and is available to any app that has a print feature. You can find it in the Print dialog of the applications. Also note that "extracting a page from a PDF" keeps the original PDF document intact. The extracted pages are "copied" as a separate PDF and saved in your desired location.
The process is simple. We are using Google Chrome to open and extract the PDF pages:
- Open the PDF file you want to extract pages from with a program that supports PDF. Browsers like Chrome and Microsoft Edge are ideal candidates. Even Microsoft Word can do the job.
- Go to the Print dialog or hit the universal shortcut key Ctrl + P. You can also right-click and select Print from the context menu.
-
In the Print dialog, set your printer to Microsoft Print to PDF.
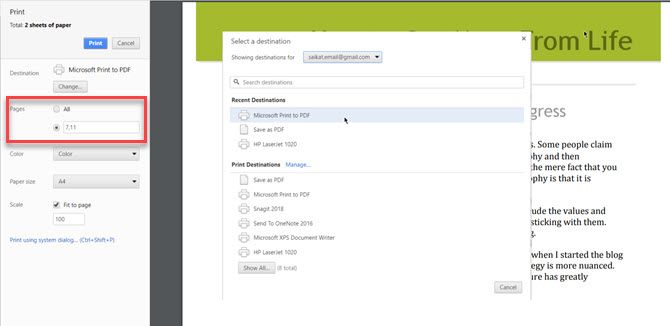
- In the Pages section, select the option for entering a page range and enter the page number which you want to extract. For instance, if you want to extract Page 7 of a PDF file, enter 7 in the box. If you want to extract a few non-consecutive pages like page 7 and 11, enter 7, 11 in the box.
- Click Print and browse to the location where you want to save the file.

Multiple extracted pages are saved as a single PDF document. To separate them as different documents you need to extract them one by one.
The ability to extract PDF pages is useful in many everyday scenarios, just like these free tools that help you edit PDF files anywhere.