Excel is a powerful tool when your data is complete. But wouldn't it be nice if it could solve for unknown variables?
With Goal Seek and the Solver add-in, it can. And we'll show you how. Read on for a full guide on how to solve for a single cell with Goal Seek or a more complicated equation with Solver.
How to Use Goal Seek in Excel
Goal Seek is already built into Excel. It's under the Data tab, in the What-If Analysis menu:

For this example, we'll be using a very simple set of numbers. We have three quarters' worth of sales numbers and a yearly goal. We can use Goal Seek to figure out what the numbers need to be in Q4 to make the goal.

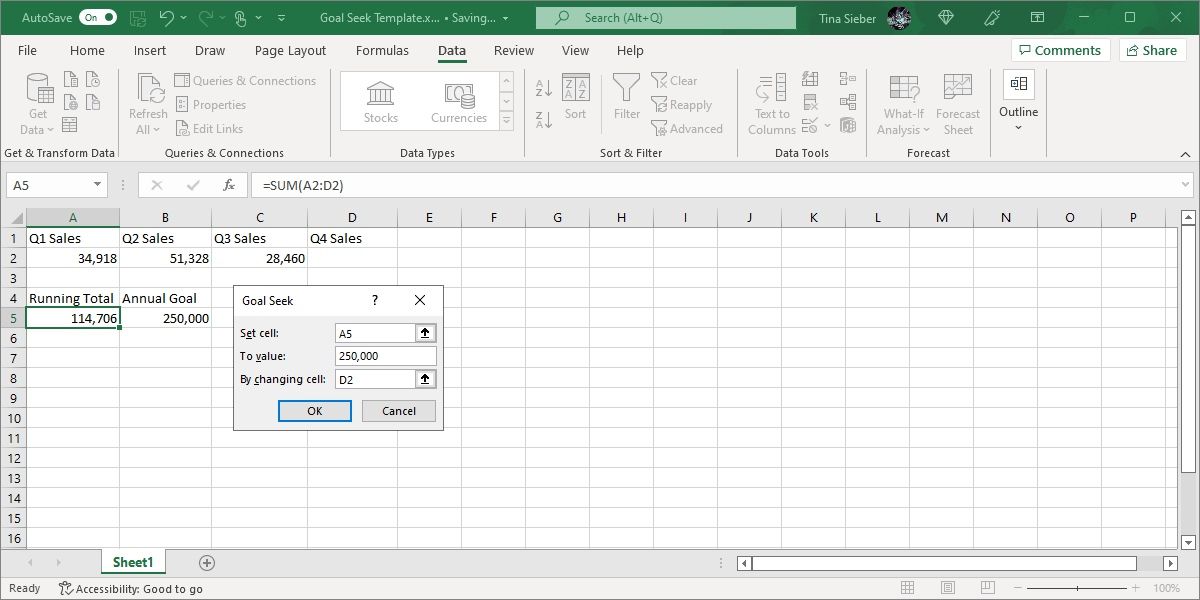
As you can see, the current sales total is 114,706 units. If we want to sell 250,000 by the end of the year, how many do we need to sell in Q4? Excel's Goal Seek will tell us.
Here's how to use Goal Seek, step by step:
- Click on Data > What-If Analysis > Goal Seek. The Goal Seek window will pop up.
- Put the "equals" part of your equation in the Set Cell field. This is the number that Excel will try to optimize for. In our case, it's the running total of our sales numbers in cell A5.
- Type your goal value into the To value field. We're looking for a total of 250,000 units sold, so we'll put "250,000" in this field.
-
Tell Excel which variable to solve for in the By changing cell field. We want to see what our sales in Q4 need to be. So we'll tell Excel to solve for cell D2. It'll look like this when it's ready to go:
-
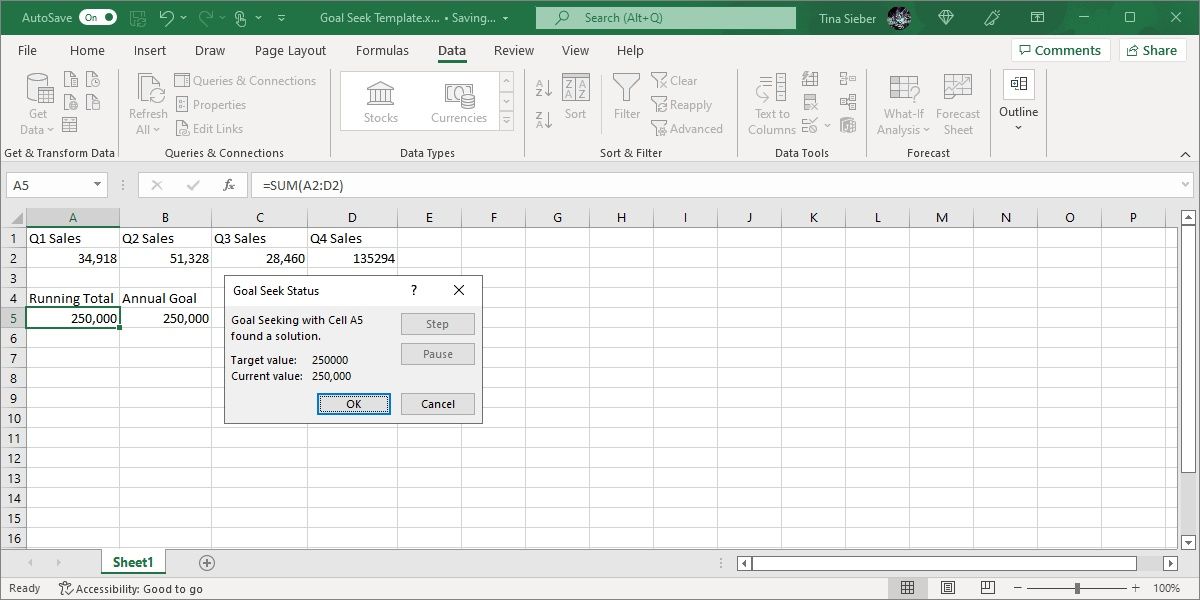
Hit OK to solve your goal. When it looks good, just hit OK. Excel will let you know when Goal Seek has found a solution.
-
Click OK again, and you'll see the value that solves your equation in the cell that you chose for By changing cell.
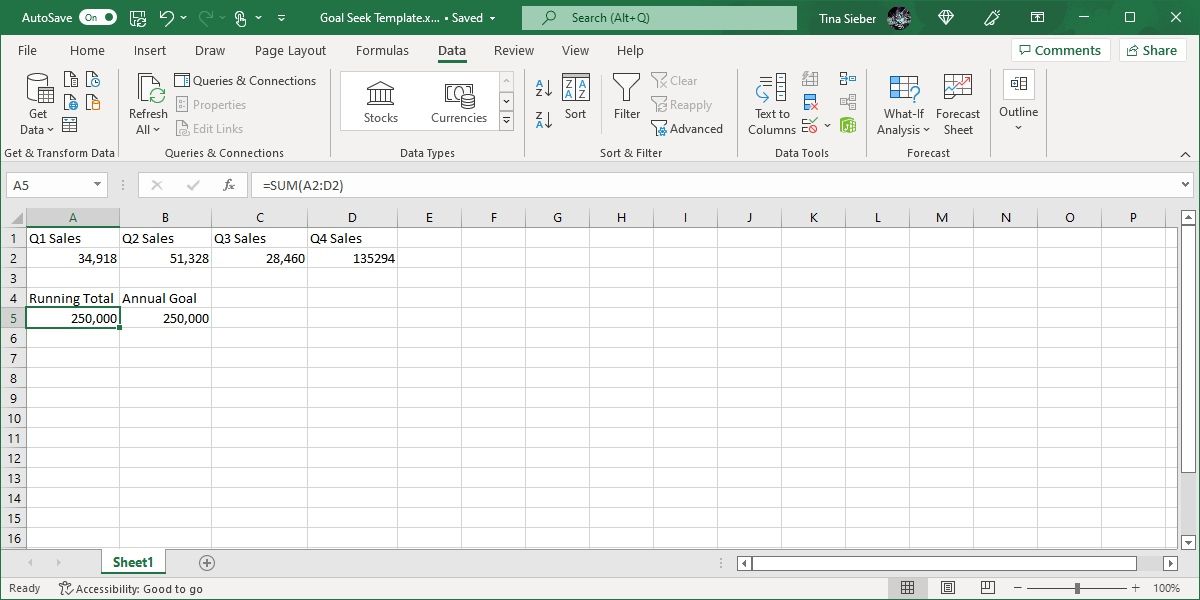


In our case, the solution is 135,294 units. Of course, we could have just found that by subtracting the running total from the annual goal. But Goal Seek can also be used in a cell that already has data in it. And that's more useful.
Note that Excel overwrites our previous data. It's a good idea to run Goal Seek on a copy of your data. It's also a good idea to make a note on your copied data that it was generated using Goal Seek. You don't want to confuse it for current, accurate data.
So Goal Seek is one of the most useful Excel functions, but it's not all that impressive. You can only use it on a single cell at a time. If you want to use Excel's Goal Seek on multiple cells simultaneously, you'll need a much more powerful tool. Fortunately, one such tool comes with Excel. Let's have a look at the Solver add-in.
What Does Excel's Solver Do?
In short, Solver is like a multivariate version of Goal Seek. If you were wondering how to use Goal Seek in Excel for multiple cells at once, this is it. It takes one goal variable and adjusts a number of other variables until it gets the answer you want.
It can solve for a maximum value of a number, a minimum value of a number, or an exact number. And it works within constraints, so if one variable can't be changed, or can only vary within a specified range, Solver will take that into account.
It's a great way to solve for multiple unknown variables in Excel. But finding and using it isn't straightforward. Let's take a look at loading the Solver add-in, then jump into how to use Solver in Excel's current Microsoft 365 version.
How to Load the Solver Add-In
Excel doesn't have Solver by default. It's an add-in, so you have to load it first. Fortunately, it's already on your computer.
Head to File > ( More... >) Options > Add-Ins. Then click on Go next to Manage: Excel Add-Ins. If this dropdown says something other than "Excel Add-Ins," you'll need to change it:
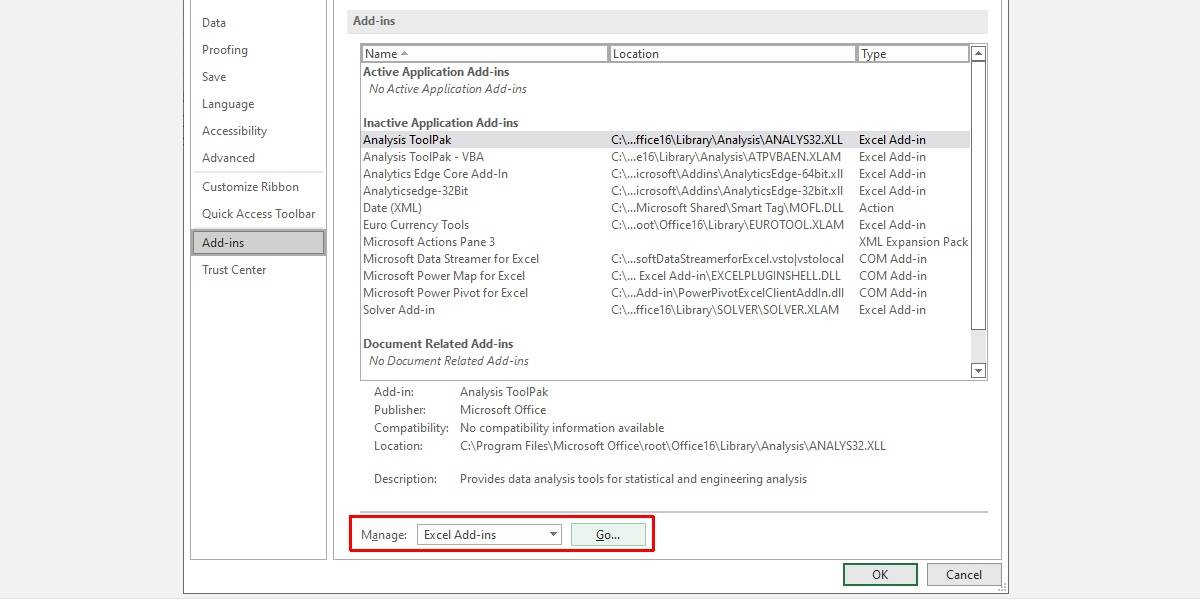
In the resulting window, you'll see a few options. Make sure the box next to Solver Add-In is checked, and hit OK.

You'll now see the Solver button in the Analysis group of the Data tab:

If you've already been using the Data Analysis Toolpak, you'll see the Data Analysis button. If not, Solver will appear by itself. Now that you've loaded the add-in, let's take a look at how to use it.
How to Use Solver in Excel
There are three parts to any Solver action: the objective, the variable cells, and the constraints. We'll walk through each of the steps.
-
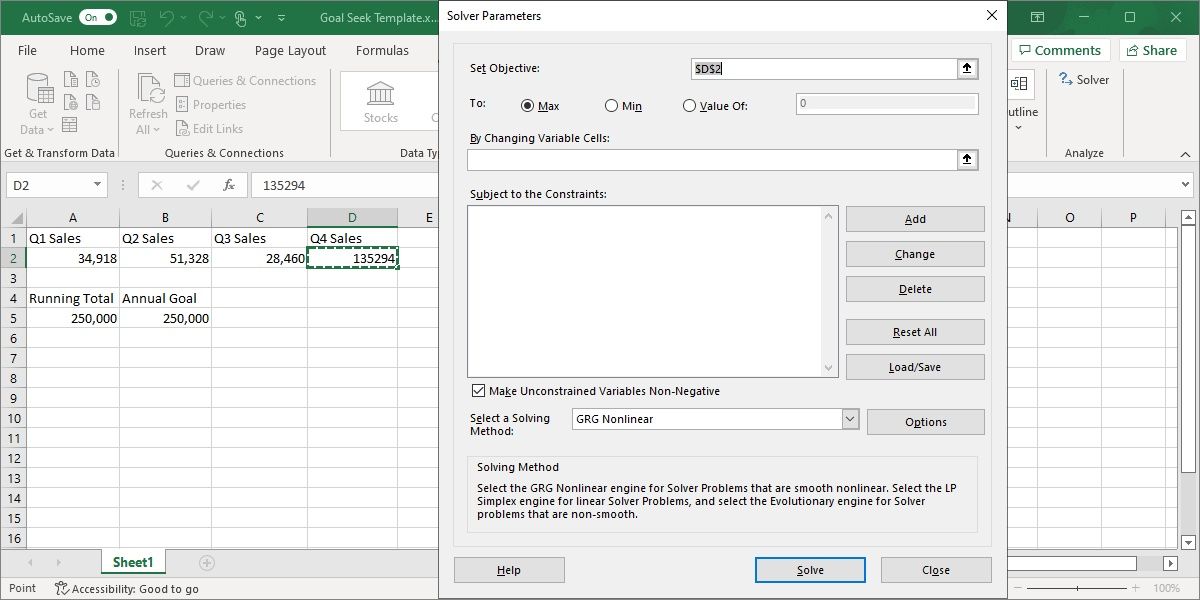
Click Data > Solver. You'll see the Solver Parameters window below. (If you don't see the solver button, see the previous section on how to load the Solver add-in.)
-
Set your cell objective and tell Excel your goal. The objective is at the top of the Solver window, and it has two parts: the objective cell and a choice of maximize, minimize, or a specific value.
If you select Max, Excel will adjust your variables to get the largest number possible in your objective cell. Min is the opposite: Solver will minimize the objective number. Value Of lets you specify a specific number for Solver to look for.

-
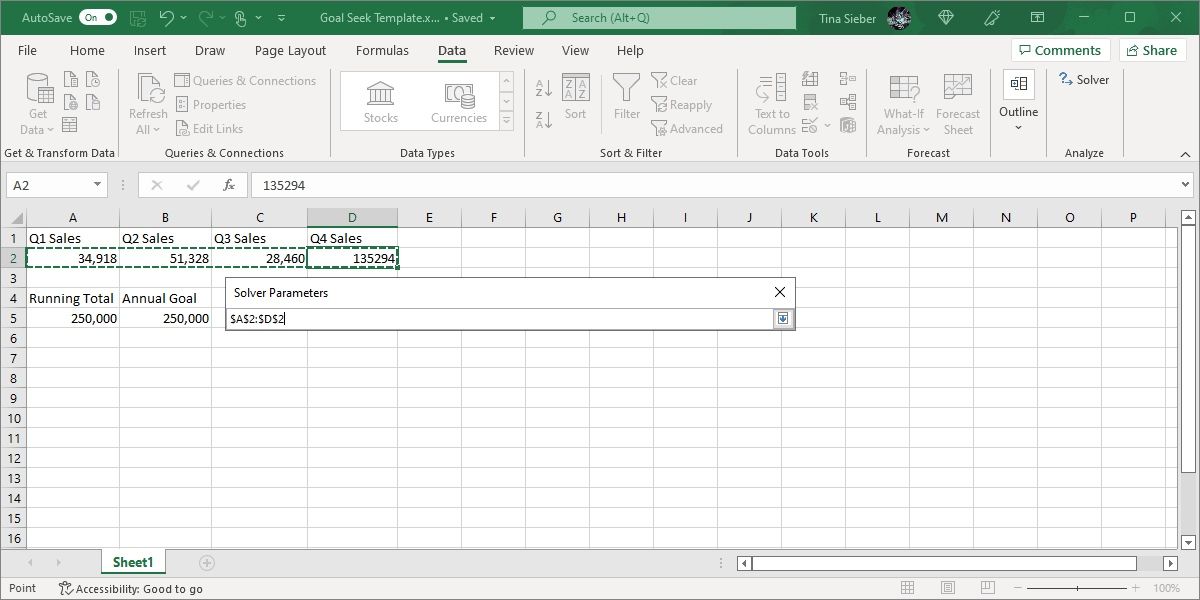
Choose the variable cells that Excel can change. The variable cells are set with the By Changing Variable Cells field. Click the arrow next to the field, then click and drag to select the cells that Solver should work with. Note that these are all the cells that can vary. If you don't want a cell to change, don't select it.
- Set constraints on multiple or individual variables. Finally, we come to the constraints. This is where Solver is really powerful. Instead of changing any of the variable cells to any number it wants, you can specify constraints that have to be met. For details, see the section on how to set constraints below.
- Once all of this information is in place, hit Solve to get your answer. Excel will update your data to include the new variables (this is why we recommend you create a copy of your data first).


You can also generate reports, which we'll look at briefly in our Solver example below.
How to Set Constraints in Solver
You might tell Excel that one variable has to be greater than 200. When trying different variable values, Excel won't go under 201 with that particular variable.

To add a constraint, click the Add button next to the constraint list. You'll get a new window. Select the cell (or cells) to be constrained in the Cell Reference field, then choose an operator.
Here are the available operators:
- <= (less than or equal to)
- = (equal to)
- => (greater than or equal to)
- int (must be an integer)
- bin (must be either 1 or 0)
- AllDifferent
AllDifferent is a little confusing. It specifies that every cell in the range that you select for Cell Reference must be a different number. But it also specifies that they must be between 1 and the number of cells.
So if you have three cells, you'll end up with the numbers 1, 2, and 3 (but not necessarily in that order). Finally, add the value for the constraint.
It's important to remember that you can select multiple cells for Cell Reference. If you want six variables to have values over 10, for example, you can select them all and tell Solver that they must be greater than or equal to 11. You don't have to add a constraint for each cell.
You can also use the checkbox in the main Solver window to ensure that all the values you didn't specify constraints for are non-negative. If you want your variables to go negative, uncheck this box.

A Solver Example
To see how all of this works, we'll use the Solver add-in to make a quick calculation. Here's the data we're starting with:

In it, we have five different jobs, each of which pays a different rate. We also have the number of hours a theoretical worker has worked at each of those jobs in a given week.
We can use the Solver add-in to find out how to maximize the total pay while keeping certain variables within some constraints. Here are the constraints we'll use:
- No jobs can fall below four hours.
- Job 4 must be greater than 12 hours.
- Job 5 must be less than eleven hours.
- The total hours worked must be equal to 40.
It can be helpful to write out your constraints like this before using Solver. Here's how we'd set that up in Solver:

First, note that I've created a copy of the table, so we don't overwrite the original one, which contains our current working hours.
And second, see that the values in the greater-than and less-than constraints are one higher or lower than what I mentioned above. That's because there are no greater-than or less-than options. There are only greater-than-or-equal-to and less-than-or-equal-to.
Let's hit Solve and see what happens.

Solver found a solution! As you can see to the left of the window above, our earnings have increased by $152. And all the constraints have been met.
To keep the new values, make sure Keep Solver Solution is checked and hit OK. If you want more information, though, you can select a report from the right side of the window. Select all the reports that you want, tell Excel whether you want them outlined (I recommend it), and hit OK.
The reports are generated on new sheets in your workbook and give you information about the process the Solver add-in went through to get your answer.
In our case, the reports aren't very exciting, and there's not a lot of interesting information there. But if you run a more complicated Solver equation, you may find some useful reporting information in these new worksheets. Just click the + button on the side of any report to get more information:

Solver Advanced Options
If you don't know much about statistics, you can ignore Solver's advanced options and just run it as-is. But if you're running large, complex calculations, you may want to look into them.
The most obvious is the solving method:

You can choose between GRG Nonlinear, Simplex LP, and Evolutionary. Excel provides a simple explanation regarding when you should use each one. A better explanation requires some knowledge of Excel statistics and regression.
To adjust additional settings, just hit the Options button. You can tell Excel about integer optimality, set calculation time constraints (useful for massive datasets), and adjust how the GRG and Evolutionary solving methods go about making their calculations.
Again, if you don't know what any of this means, don't worry about it. If you want to know more about which solving method to use, Engineer Excel has a good article that lays it out for you. If you want maximum accuracy, Evolutionary is probably a good way to go. Just be aware that it will take a long time.
Goal Seek and Solver: Taking Excel to the Next Level
Now that you're comfortable with the basics of solving for unknown variables in Excel, an entirely new world of spreadsheet calculation is open to you. Goal Seek can help you save time by making some calculations faster, and Solver adds a huge amount of power to Excel's calculating abilities.
It's just a matter of getting comfortable with them. The more you use them, the more useful they'll become.