Here is a cool Excel feature that even regular users may have missed: Excel custom views.
Excel custom views allow you to manipulate a spreadsheet's display or print settings and save them for fast implementation later.
We'll look at four ways to use Excel custom views to your advantage. Before that, though, you need to know how to create one.
How to Create Custom Views in Excel
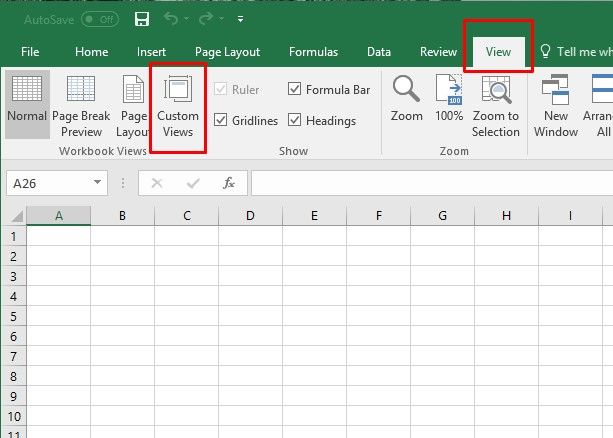
Open an Excel workbook and look for the View tab at the top of the screen. When you click that, you'll see the option for Custom Views. Click it.
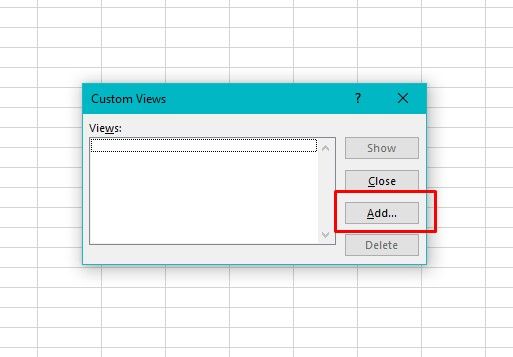
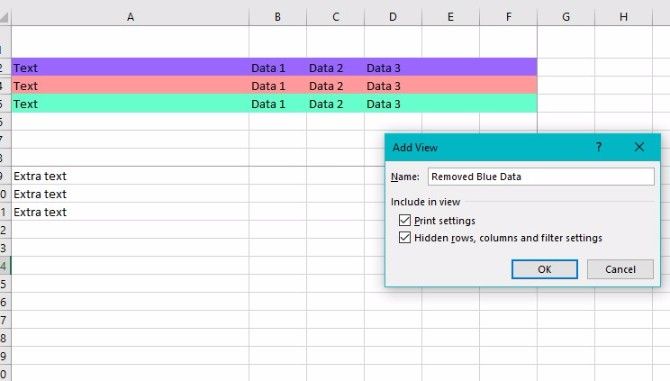
In the dialog box that appears, click Add and enter a name for the custom view. If desired, you can include all or part of the open workbook's name in it. (Taking that approach could make it easier to find a certain custom view later!)
You'll see a pane with several checkboxes to select or deselect. They relate to the document's print settings, hidden rows, columns, and filters. Change the settings if needed depending on the scope of your project.
There you have it: the basic process of creating a custom view in Excel. If you want to save yourself these steps in the future, just save the workbook as a template!
How to Use Excel Custom Views
The custom views feature isn't one of the most known capabilities of the program, but it's quite useful, which will give you an edge over your coworkers who might be less familiar with it.
1. Eliminate Spreadsheet Setup Time for Good
Excel offers many ways to specify how a spreadsheet looks when you work with it.
For example, if you're typing long sentences into a cell, you may want to widen the rows. Doing that makes it easier to see more of the cell's contents.
If each cell only contains a couple of numbers, you may not need to change the width. However, you might want to change the row height. That's especially true depending on the chosen font and how it looks in a non-altered cell.
A custom view lets you nearly eliminate time spent setting up worksheets to meet particular needs.
Instead of going through the same setup process for each spreadsheet, you can make a custom view. It includes your specifications and prevents repetitive settings changes. Plus, as I mentioned above, you can save this custom view as a template for multiple uses, so you don't even have to create that custom view again.
This simple tip is extremely useful if you have to make multiple, similar spreadsheets. If they all have identical settings but different information in each one, create a custom view template first. Then, just add the data.
2. Quickly Print Only the Cells You Need
When working with data in a massive spreadsheet, you may need to restrict the print area. Otherwise, extraneous or confidential information might be visible to others who shouldn't have access to it.
Excel makes this pretty easy, but you can make it even easier with custom views.
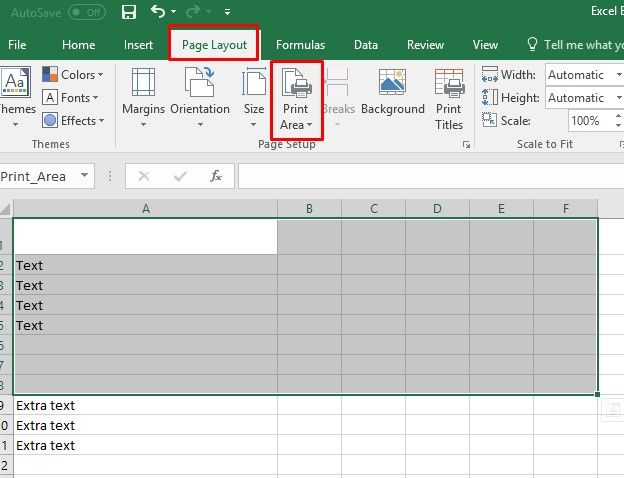
To create a custom view with this goal in mind, simply highlight the cells you want printed. Then, go to the Page Layout tab and click Print Area. Selected the option Set Print Area.
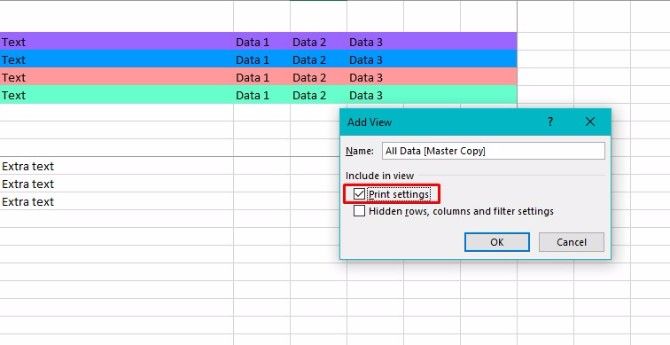
Then go through the steps for creating a custom view as discussed above. Remember the dialog box that appears after you enter a name for the view? Pay attention to the Print Settings field within it and make sure it has a checkmark.
Great! Now, when you go to print this sheet, you can feel good knowing that only the information contained in the print field will be printed.
Here's what my print preview for this sheet looks like:
This custom view is great for drafting up reports for clients or your boss. You can keep all of your supporting data and computations in the same Excel sheet as your official report, but only include the most necessary information in your final document.
3. Create Multiple Reports From One Spreadsheet
Professionals often depend on Excel to create reports. But what if you need to use it for a report distributed to several different groups? In that case, you can use a custom view to easily hide or show columns and rows.
This will allow you to efficiently create multiple reports for different audiences, all using the same data. However, each report will only have the appropriate data for each audience. Pretty handy, right?
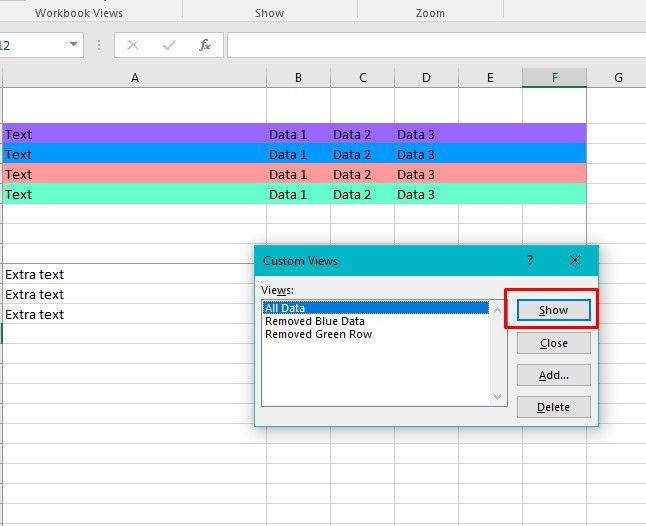
To set up these custom views, save a custom view of your sheet with all rows and columns in plain view. (If you want to keep the select print area tip from the last point, make sure you still have the Print settings option checked.) I named mine "All Data" to make it easy to find later.
After that, it's easy to use a few keyboard shortcuts to hide rows or columns. Ctrl + 0 (zero) conceals columns, while Ctrl + 9 removes rows from view.
Save a custom view for the different reports you'll need to create, hiding the appropriate rows or columns each time. When you save the custom view, make sure that the box for Hidden Rows, Columns, and Filter Settings is checked.
The real power of this trick comes from the fact that you can easily switch between all of these custom views. Just click on the Custom Views button, select the view you want to see and click Show.
Try this trick when working with sensitive data containing material not fit for everyone to see. Using custom views in this way prevents you from making a dedicated spreadsheet for each group receiving the material, but still allows you to keep necessary information confidential.
For example, if you have to send information to multiple departments in your company, maybe it's not appropriate for the Sales team to see the Marketing team's report or vice versa.
You might also apply this custom view when creating spreadsheets used for training purposes in your office. People often feel overwhelmed by initially looking at unfamiliar cells and the data they contain. By filtering out the unnecessary ones, you can help individuals focus on the most relevant information.
4. Select Your Saved Custom Views Even Faster
As I've already mentioned bringing up the desired custom view on your screen involves going to the View menu. It's at the top of Excel, in a section also known as "the ribbon."
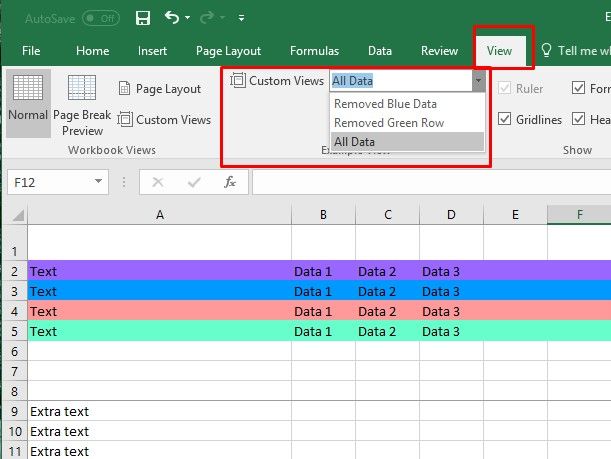
The steps we've been using to pull up our saved custom views get the job done. However, they're not as streamlined as possible. Adding a custom view command to the Excel ribbon to quickly see your custom views in a dropdown format.
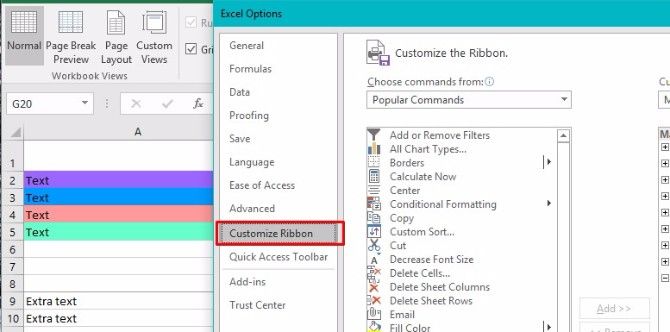
To add the command to the ribbon, click on File in the upper left of the Excel screen, then select Options.
Once you see categories appear on the left, choose Customize Ribbon.
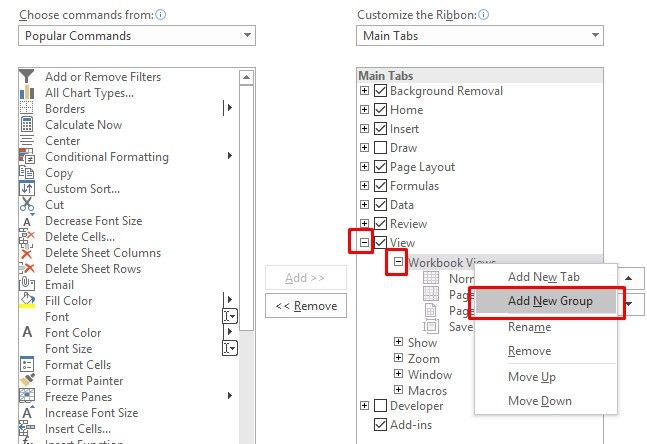
On the right, you'll see a section with the heading Main Tabs. Find the View tab and look for the plus sign (+) to the left of it.
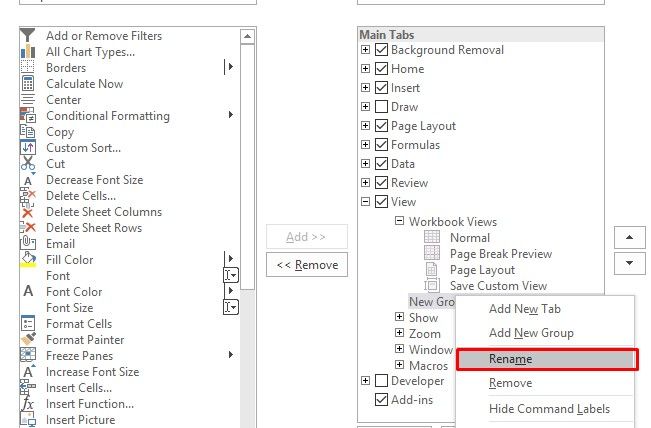
Clicking the plus sign shows a group called Workbook Views. Select it, then click on Add New Group (not to be confused with the Add New Tab option right next to it).
Right-click on the new group and select Rename. A title related to custom views makes the most sense so that you can find it later.
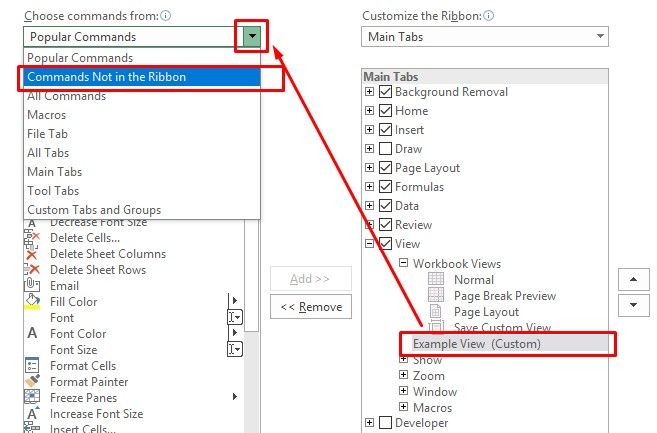
After selecting your group, click on the dropdown menu underneath the Choose Commands from the header on the upper left of this main settings interface. Select Commands Not in the Ribbon.
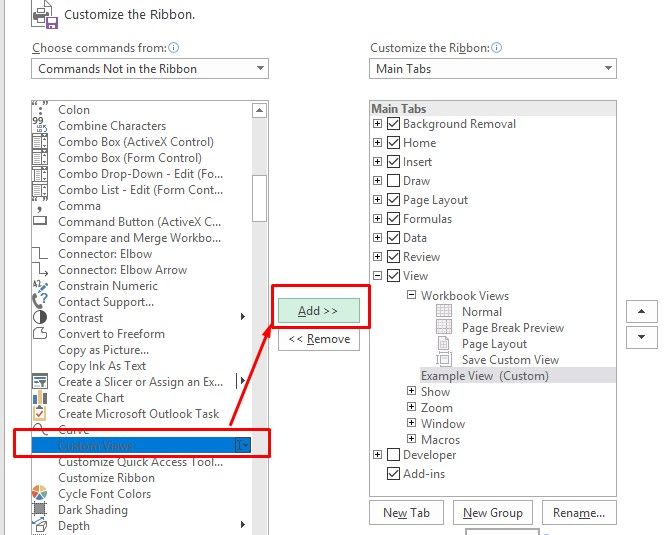
Finally, scroll down and find Custom Views. Then click the Add button, so you move that command to your new group. Hit OK to finalize the setting.
Now you'll be able to quickly select any of your custom views from the main View pane.
This will save you tons of extra time for sheets and reports that you have to recreate every month.
Custom Views Make You a Superstar at Work
Before reading everything here, perhaps you felt doubtful that one Excel function could offer so much convenience. If you're not convinced yet, trying any one of these suggestions should open your mind.
Share your new knowledge with coworkers to improve the whole company's productivity. Or keep this information to yourself so you look even better compared to your peers.
What do you most commonly use Excel for at work? How could you apply custom views to make that task easier?
Image Credit: Rawpixel/Depositphotos


