Want a free copy of Windows XP? It's possible using a virtual machine.
Windows XP is old, and Microsoft no longer provides official support for the venerable operating system. But despite the lack of support, Windows XP is still running on millions of computers worldwide. So why are people still using Windows XP? Mostly due to work, research, or entertainment.
Finding a copy of Windows XP isn't easy. Finding some hardware to run it on is just as difficult. That's why the best option is to install Windows XP on a virtual machine so you can always keep it on hand. Here's how you do it!
Is Windows XP Available for Free?
For a long time, Microsoft provided Windows XP Mode, a full version of XP that runs within Windows 7. However, most of us have long since moved on from Windows 7, making this compatibility fix... well, a little unhelpful.
Unfortunately, Microsoft has since removed the option to download Windows XP Mode directly. However, that doesn't mean you're out of luck, and you can use the Windows XP Mode download link below to grab a copy.
Before continuing with this Windows XP Mode tutorial, you need a few things:
- Download and install the latest version of VirtualBox.
- Download and install a file archive tool. This tutorial uses 7-Zip.
- A copy of Windows XP Mode (see below).
1. Download Windows XP Mode Virtual Hard Disk
Download the Windows XP Mode virtual hard disk.
When it completes, don't install it yet!
-
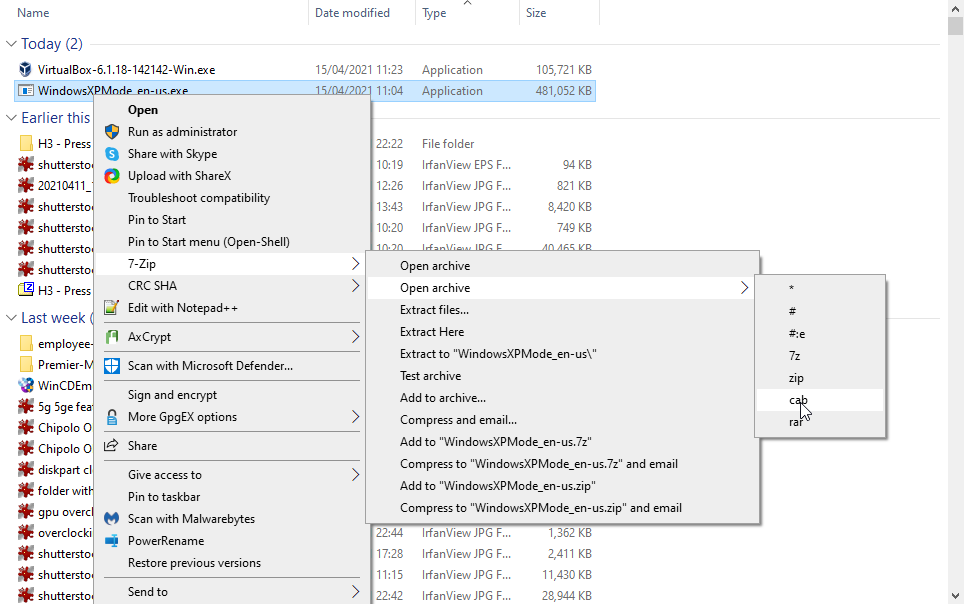
Instead, browse to the executable, then right-click and select 7-Zip > Open archive > cab from the context menu.
-
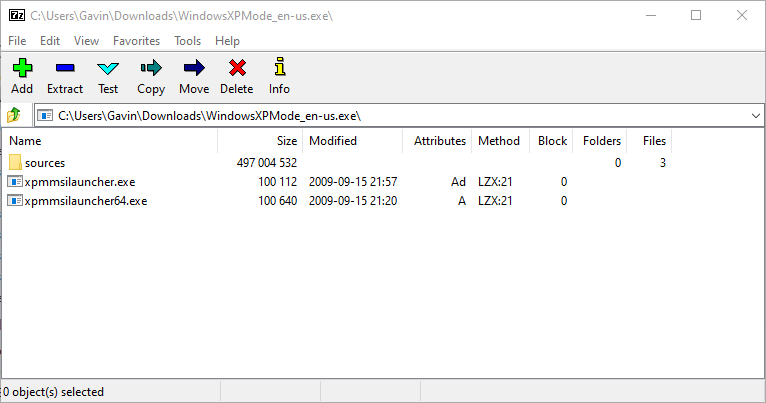
This immediately opens the executable in 7-Zip for you to have a poke around. There are three files:
-
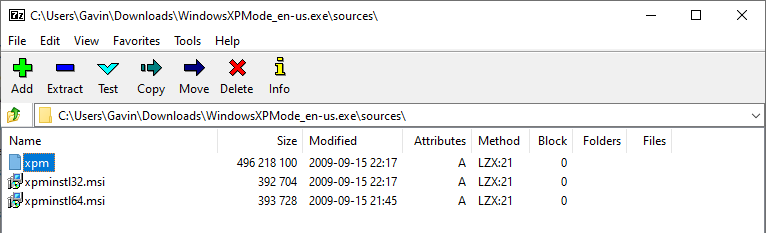
Open Sources to reveal another three files:
-
Double-click xpm. This is the XP Mode virtual hard drive folder. It should look the same as the image below:
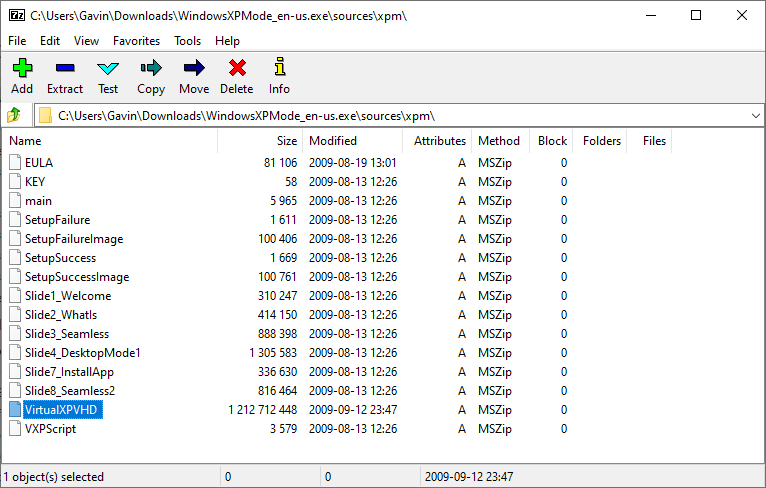


These are the files you need to create the XP Mode virtual hard disk. Unfortunately, they're Archive files and not executable files, meaning they're currently Read-only.
You need to extract these files to a new folder.
Select Extract from the toolbar, then press the ellipsis icon next to the address bar. Browse to where you'd like to extract the files—your C: drive is fine—and select Make New Folder.
I've called my folder "Windows XP Mode," but the choice is yours. When you're ready, press OK, then OK again to start the extraction process. This can take a minute or two.
Head to the folder you created when the extraction process completes. You'll see the same list of files. The difference is that you can now edit these files as you see fit.
Select the file named VirtualXPVHD. Press F2 to rename. Insert a period between the "P" and the "V," and press Enter, now reading VirtualXP.VHD. The file should immediately change into a virtual hard disk and the icon to boot.
2. Install Windows XP Mode in a Virtual Machine
Before we completed the XP Mode virtual hard disk extraction, I asked you to download and install VirtualBox. VirtualBox is a free virtual machine app that allows you to run different operating systems on your host machine. For example, using VirtualBox, you could try a Linux distro on Windows without installing it on your actual hardware.
We're going to install the Windows XP Mode virtual hard drive in VirtualBox.
- Open VirtualBox. Select New.
- At the bottom of the Create Virtual Machine window, select Expert Mode (if your window shows an option for Guided Mode, you're already using Expert Mode).
- Now, give your virtual machine a suitable name. If you include "XP" in the virtual machine name, the Version will automatically change to reflect that. Even so, double-check the Version is Windows XP (32-bit).
- Assign the virtual machine some memory. Memory is a shared resource, meaning both the host (your PC) and the guest (the virtual machine) use it concurrently. Luckily, Windows XP is old and doesn't require buckets of RAM to run. I would advise assigning a minimum of 512 MB (but you won't need more than 2048 MB).
- Finally, you need to assign the virtual hard disk we extracted from the Windows XP Mode executable earlier. Under Hard disk, select Use an existing virtual hard disk file. Then, hit the folder with the green arrow. Browse to the folder we extracted our files to, select VirtualXP, then Open.
When you're done, your new virtual machine setup should look like this:

Okay? Hit Create.
3. Windows XP Mode Disk Settings
Before you boot up your shiny new Windows XP virtual machine, you need to tweak a few settings.
On the VirtualBox toolbar, press Settings. Head to System. Look at the Boot Order. Uncheck Floppy, and move it down the list. Promote Hard Disk to the top of the pile. Just like your host PC, the virtual machine has a specific boot order. You need the virtual hard disk at the top of the list so it boots first:

Under Display, increase Video Memory to 128 MB:

4. Windows XP Virtual Machine Network Settings
Next, check the Windows XP virtual machine network settings. Older versions of VirtualBox required a more manual approach to network configuration. The software is smarter these days (read: automated) and usually picks up your network settings without prompt.
For instance, my Windows XP Mode virtual machine uses the default configuration: NAT, the VirtualBox-specific adapter, and ensuring Cable Connected is checked.

However, if it doesn't work (and you'll realize the good or bad news when you fire up the virtual machine), you can try an alternative configuration.
- Set Attached to: Host-only Adapter
- Set Name: VirtualBox Host-Only Ethernet Adapter
- Set Promiscuous Mode: Deny
- Check Cable connected
Using the Start Menu search bar, type network and select the Network and Sharing Centre. In the left-hand column, select Change adapter settings. Next, hold CTRL and select both your Ethernet/wireless card and the VirtualBox Host-Only Network. Then, right-click and select Bridge Connection.

"Combining" the adapters creates a network bridge, allowing the virtual machine to connect to a network even though it doesn't have direct access to the router (or alternative switch).
When you enter the Windows XP virtual machine, you'll have to update your network adapter settings:
- Head to Control Panel > Network and internet Connections > Network Connections.
- Then, right-click the Local Area Connection and select Properties. Highlight Internet Protocol (TCP/IP), then select Properties.
- Select Use the following IP address, and enter an available IP address for your home network. For instance, I will enter 192.168.1.10. Enter your Subnet mask and Default gateway.
- Unsure what they are? On your host machine, press Windows Key + R, then type CMD, and hit Enter. Now, type ipconfig /all. You'll find the information you need listed under your Ethernet or wireless adapter name.
- Enter the same DNS server addresses as the host. I use Google DNS, so I'll enter 8.8.8.8 and 8.8.4.4.
- Hit OK.

5. Run the Windows XP Virtual Machine
You extracted the virtual hard disk. You created a virtual machine, fiddled with the settings, and now you're ready to hit the power switch.
Highlight your Windows XP Mode virtual machine on the main VirtualBox window. Double-click it and wait for Windows XP to burst into life:

Looks like you made it!
There is a strong possibility that your mouse will not immediately work with the Windows XP Mode virtual machine. Navigate the operating system installation pages using the Tab key, arrow keys, Spacebar, and Enter key.
Complete the installation. You'll arrive at a completely black screen. Don't worry! Press Right Ctrl + R to restart the virtual machine.
When it reboots, you can Cancel the New Hardware Installation and Microsoft Automatic Update wizards.
Install the VirtualBox Guest Additions CD Image
Instead, head to Devices > Install Guest Additions CD Image. The VirtualBox Guest Additions CD Image adds some handy functionality to VirtualBox, including custom resolutions and mouse options.
If the installation doesn't begin automatically, use the keyboard to navigate to My Computer. Press the Windows Key to open the Start menu, then the arrow keys to My Computer. Use the default installation location and wait for the setup to complete

You will encounter warnings that you are attempting to install unsupported software and/or drivers. Select Continue Anyway. The installation process does take a little while, needing periodic input to move past the software warnings.
Once the Guest Additions installation completes, select Reboot now.

If it fails to reboot, restart the virtual machine again.
And there you have it. A working, fully-featured Windows XP installation to call your own.
What About Windows XP Product Keys?
The Windows XP Mode virtual machine has a temporary license that expires after 30 days.
If you have an old Windows XP license, dig it out and enter it to try to keep the virtual machine alive. I say "try" because the Windows XP activation servers are long offline, but you can try a phone activation.
If you feel devious, you could try the old Windows activation loop, whereby you reset the trial license back to its original 30-day counter. However, I haven't tried it with the Windows XP Mode virtual machine, so you will have to conduct a private experiment.
But the easier solution is to create a snapshot of the Windows XP Mode virtual machine straight after installation. Then, when the license expires, you can revert to your fresh snapshot (but you'll lose all the data on the virtual machine, so bear that in mind).
Without snapshots, you'll have to keep reinstalling the Windows XP Mode virtual machine.
Windows XP Is Not Secure
Note that just because you have Windows XP working doesn't mean you should use it! Windows XP is no longer suitable as a primary operating system because of the security risks. If you are still running Windows XP on your home computer or laptop, you should consider upgrading to a modern operating system.