You can improve Windows 10's speed in lots of ways. For example, you can get rid of any pre-installed bloatware, refresh the operating system (OS), add more RAM, perform system maintenance tasks, or change the power settings.
However, one tweak many people overlook is the HomeGroup feature. Disabling the HomeGroup can not only improve the performance of your OS, it can also dramatically increase your network connection speed.
But how do you disable and remove the HomeGroup? Here's how.
What Is a HomeGroup?
A Windows HomeGroup lets you share files and devices (such as printers) between trusted computers on the same local network. It means you don't need to install drivers on multiple machines or make unnecessary copies of photos and music on all your computers. It's also compatible with Xbox, meaning you can stream locally-saved media straight to your TV.
The feature has been part of Windows for years. It made its debut with the launch of Windows 7 in 2009 and survived the rise and fall of Windows 8 to maintain its position as a key networking tool in Windows 10.
Unlike the much-criticized Guest Mode in Windows XP, HomeGroups are password protected, all communication over the HomeGroup is encrypted, and users can share files with either the entire group or on a person-by-person basis.
Ultimately, if you're not network-savvy and you need HomeGroup to easily share content, it's an exceptionally useful feature. If you don't use it, you will be better served by disabling and removing it.
Leave Your HomeGroup
Before you can remove HomeGroup from your system, you need to leave your existing HomeGroup if your machine is part of one. Luckily, this is the easiest part of the entire process.
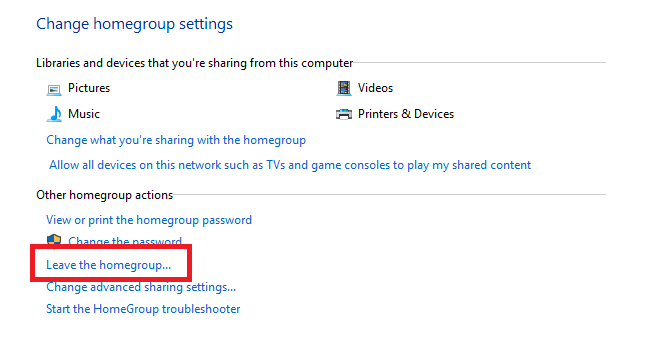
To access your HomeGroup settings, either search for "HomeGroup" using the Windows search feature or navigate to Control Panel > HomeGroup.
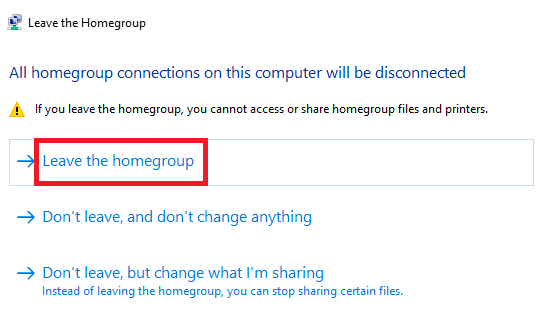
If you're in a HomeGroup already, you'll see an option called Leave the HomeGroup. Click the link and select Leave the HomeGroup for a second time to confirm your selection. Click Finish to complete the process.
Simply going this far and then stopping should give you an immediate and noticeable improvement in your network speed.
Turn Off the HomeGroup Service
From this point on, the process becomes more complicated. The next step is to disable the HomeGroup service. This is where you'll start to see improvements to the core speed of your OS.
The Services menu can be a tricky beast -- disable or pause the wrong thing, and your machine can quickly start to unravel.
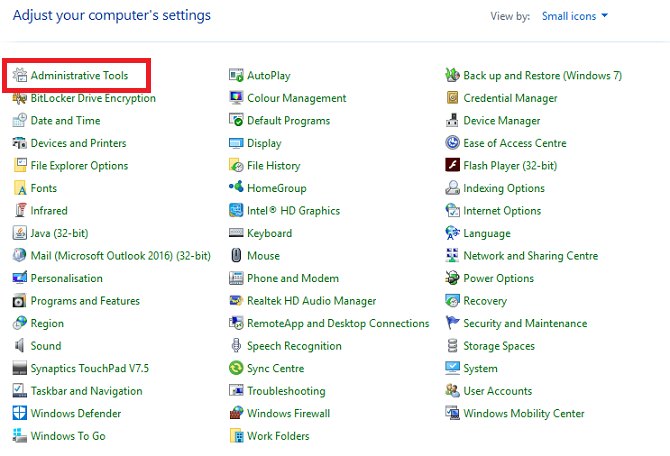
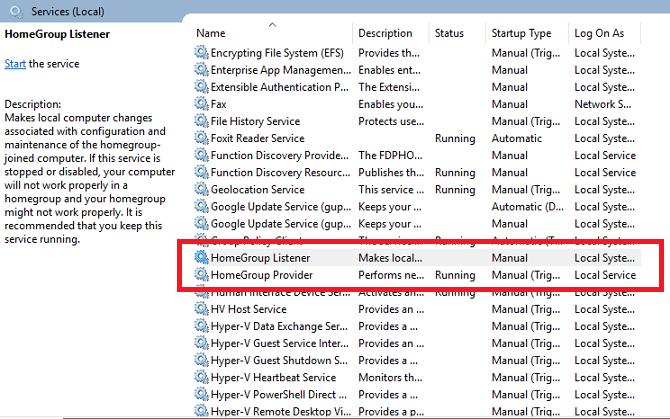
To access the services menu, either search for "Services" or go to Control Panel > Administrative Tools > Services. You'll now see a list of all the services running on your machine.
There are two services relating to HomeGroups: HomeGroup Listener and HomeGroup Provider. You need to disable both of them.
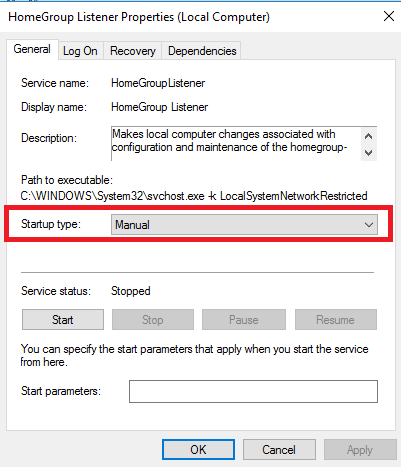
To disable a service, double-click on the item in question or choose Properties from the right-click context menu. In the Properties window, make sure you're looking at the General tab, then select Disabled from the drop-down menu next to Startup Type. Click Apply to confirm the changes.
Repeat the above steps for both the HomeGroup services.
The HomeGroup services will be permanently disabled and, if you're using Windows 7, it will also be removed from the File Explorer and context menus. However, if you're running a newer version of Windows, there's one more step to take before every trace of the feature is gone from your system forever.
Edit the Registry
Unfortunately, completing the process is also the most complicated part: you'll need to edit the registry.
Remember, the registry is very delicate. It underpins your entire Windows OS and accidentally changing something can brick your machine. If you're not confident, you should stop here. However, if you're reasonably familiar with how the registry works, keep reading.
Note: Even if you're competent in using the registry, it's always wise to make a backup before making any changes.
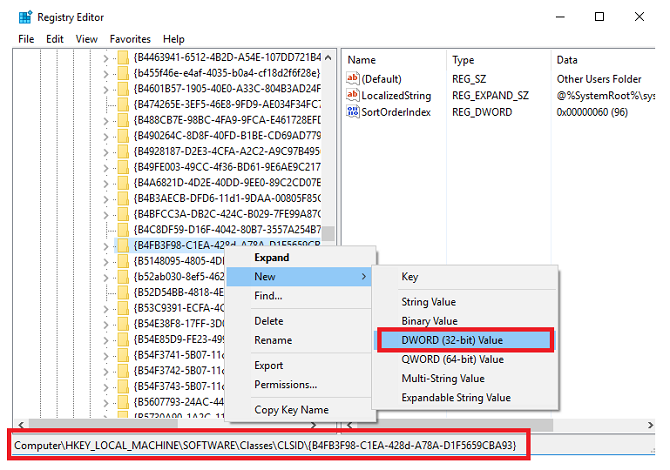
To fire up the registry editor, run a search for "regedit." The editor is divided into two panes. In the left-hand pane, navigate through the file tree to this location:
HKEY_LOCAL_MACHINE\Software\Classes\CLSID\{B4FB3F98-C1EA-428d-A78A-D1F5659CBA93}
Make sure you navigate to CLSID and not .CLSID -- they are two separate entries.
Once you've located the registry entry, right-click on it and go to New > DWORD (32-bit) Value. Call the new value System.IsPinnedToNameSpaceTree. Ensure you include the period after "system".
Windows automatically sets the value of the new DWORD to zero. As such, the HomeGroup will no longer be part of the File Explorer menu.
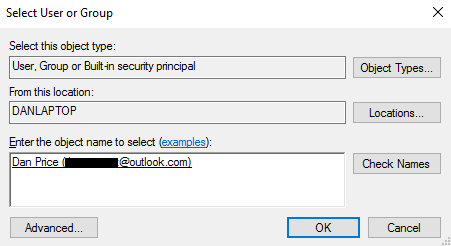
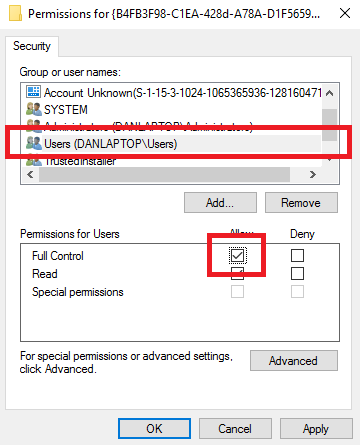
If Windows will not let you create a new DWORD value, right-click on the registry entry and go to Permissions > Advanced > Change, enter your Windows user account name in the box next to Check Objects, and click OK.
Next, return to the first permissions screen, highlight the Users line, and mark the checkbox next to Full Control.
Re-Enable HomeGroup
If you ever want to turn the HomeGroup back on in the future, it's easy. There are only two steps you need to follow.
Firstly, delete the registry entry you made, and secondly, change the two HomeGroup services from Disabled to Manual.
Doing to so will reintroduce HomeGroup to your File Explorer and allow you to join and create groups from your computer.
Have You Removed HomeGroup?
Hopefully, the article has provided you with enough information to make an educated decision about HomeGroups. You should now understand what they are, what benefits they offer, and how to remove them if you don't use them.
Do you use the feature? If not, have you removed it? And most importantly, if you did remove it, did you notice an improvement in your computer and network speed?

