From simple tweaks like adding hidden stacks for recent items to only displaying currently open applications, you’ve got multiple ways to change the way the Mac’s Dock behaves. So if you’re tired of the same old Dock, we’ll show you how to spruce it up below.
All of the following tweaks come built into macOS by default, but you can only activate them using Terminal.
Using Terminal to Customize Your Dock
If you’re pretty fond of your Mac’s Dock, replacing it entirely is unnecessary—particularly when there are so many great little tweaks just a Terminal command away.
To execute these changes, you’ll need to use the Terminal, which you can find in the Utilities folder with your Applications. You can also launch it using Spotlight by hitting Cmd + Space and typing “Terminal” followed by pressing Enter.
All of these commands have been tested as working on macOS Monterey. They should also work on older macOS versions such as Big Sur, Catalina, and Mojave.
1. Only Show Active Apps
If you’d rather your Dock was more like the Windows taskbar (and you’re OK using Spotlight to launch applications), you can instruct it to only show currently active applications.

When you quit an app, the icon will disappear from your Dock. So if you’re after a minimalist look, then this might be the tweak for you. Enter the following in Terminal to enable the feature:
defaults write com.apple.dock static-only -bool TRUE; killall Dock
To get your old dock back, simply change “TRUE” to “FALSE”. Note that the “killall Dock” segment of the command is used to restart the Dock and activate your changes. If you’re going to use this, you’ll probably want to disable Show indicators for open applications under System Preferences > Dock & Menu Bar.
2. Enable “Single App” Mode
If you don’t like using more than a single desktop on your Mac, then single app mode might be the answer. To enable it, enter the following into Terminal:
defaults write com.apple.dock single-app -bool TRUE; killall Dock
After enabling it, clicking on an app in your Dock will automatically hide other open applications. However, the only problem with this tweak is that it makes dragging files from a Finder window into another application difficult. To disable it, run the command again but change the “TRUE” to “FALSE”.
3. Add Application Spacers
If everything looks a little squished together, then it’s possible to add some spacers to your Dock to space the items. This is good for keeping system applications like Finder and Calendar separate from your other software.

To add a spacer, simply paste the following into Terminal:
defaults write com.apple.dock persistent-apps -array-add '{"tile-type"="spacer-tile";}'; killall Dock
Each time you paste that command a new blank spacer will be added, which you can drag into the desired position. To remove a spacer, simply click and drag it out of the dock or Control-click and choose Remove from Dock.
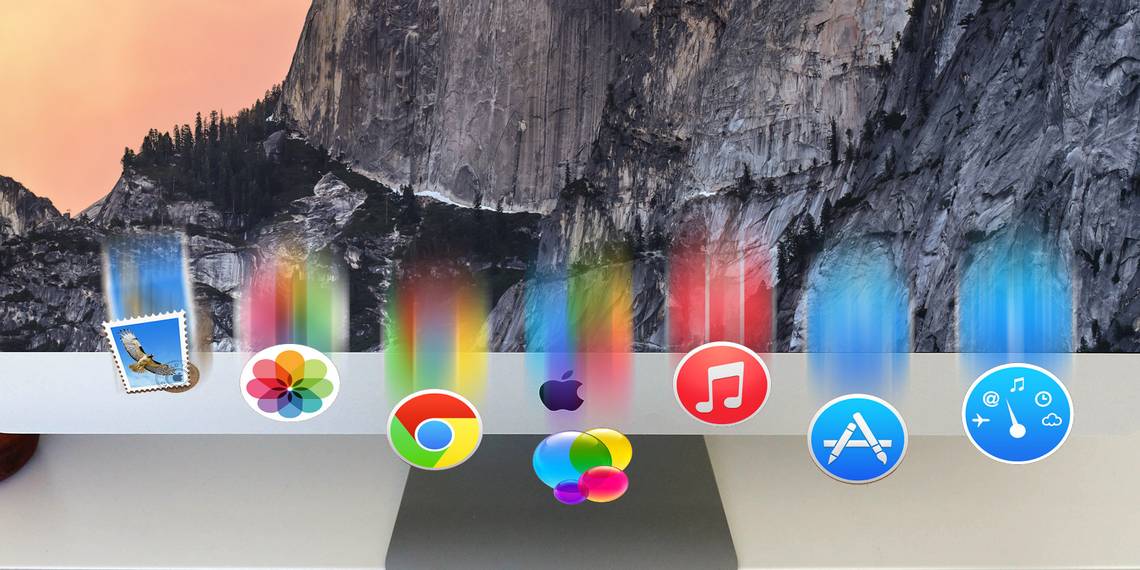
4. Indicate Hidden App Icons
Here’s one tweak you probably won’t be turning off once you’ve enabled it. By default, there is no way of telling if an app is hidden in macOS, which can be confusing at times. For some reason Apple has added the option to do so, but neglected to add a toggle for it under System Preferences.

Check out the screenshot above to see what the Chrome, Mail, and Notes icons look like when these apps are hidden. To enable this effect, paste the following into Terminal:
defaults write com.apple.dock showhidden -bool TRUE; killall Dock
To disable it, use the same command but change the “TRUE” to “FALSE”.
5. Change or Disable Auto-Hide Delay
If you like a clean desktop with the maximum amount of usable space dedicated to your applications, there’s a good chance you’ve enabled the option to auto-hide the dock under System Preferences > Dock. One thing this interface doesn’t give you control over is the auto-hide time delay.
Fortunately, you can change this with a simple command. The command below will revert the hiding speed to normal, as “1” is the default value. “0” would remove the delay altogether, while “2” would double it. Experiment to see what’s best by pasting the following into Terminal and changing the value to suit your preferences:
defaults write com.apple.dock autohide-time-modifier -float 1; killall Dock
6. Use Scroll Gestures
It is also possible to use your touchpad or mouse scroll wheel to interact with Dock items. When enabled, this command allows you to use an upward scrolling gesture to open stacks, or use the same gesture on applications that are already running to show all windows associated with that application (also known as Exposé, as pictured).

Enable it by pasting the following into Terminal; to disable, simply change “TRUE” to “FALSE”:
defaults write com.apple.dock scroll-to-open -bool TRUE; killall Dock
7. Enable the Hidden “Suck” Animation
Your Mac comes with a hidden minimize and maximize gesture called Suck that you may or may not like. Just activate it and see for yourself.

To enable the animation, run the following command in Terminal:
defaults write com.apple.dock mineffect suck; killall Dock
You can change “Suck” to “Genie” or “Scale” to revert to one of the default effects.
8. Magnify Dock Icons
If you go to System Preferences > Dock & Menu Bar, you can use the Magnification slider to increase the magnification level for Dock icons. However, the setting maxes out at 128 pixels.

Use this Terminal command to increase the magnification level all the way up to 512 pixels. Just replace 512 (which generates absurdly massive icons) with the numerical value you want before executing it:
defaults write com.apple.dock largesize -int 512; killall Dock
9. Quickly Customize the Dock With TinkerTool
Some (but not all) of these tweaks can be quickly enabled using a handy application called TinkerTool, which puts many of Apple’s hidden settings within your grasp. Use it to customize the dock, desktop, and many other aspects in macOS.

All this application does is run the commands you’ve been entering manually, only with slightly less control and the “killall Dock” command assigned to the Relaunch Dock button.
10. Reset Your Dock to Default
Made too many changes and can’t remember what they were? Fortunately, you can reset your Dock to its defaults with this simple command:
defaults delete com.apple.dock; killall Dock
Make the Mac’s Dock Your Own
The above tweaks hopefully helped you add a dash of personality to the Mac’s Dock. Don’t be afraid to use them—you won’t break anything, and it’s super easy to revert changes to the default settings if you want.
Having said that, how about customizing Terminal itself to make it more useful next?