Whether they're a recording of something amazing or utterly mundane, time-lapse videos are always stunning. Watching the staccato motion and seeing several hours of footage compressed into a few seconds or minutes makes for compelling viewing.
Making a time-lapse video usually takes a lot time. You need a suitable camera, storage for the footage, a reliable stand or tripod, and good weather if you're outside. Time-lapse videos can take a while to get right, and this might require several attempts.
However, you can use an app to create a time-lapse video from a standard video. And in this article we'll explain how to do that...
Post Production Time-Lapse vs. True Time-Lapse
You basically have two choices when it comes to recording a time-lapse video.
- Spend time preparing and then record a time-lapse video as the events happen.
- Convert a standard video into a time-lapse movie.
But are there any differences in quality? It depends on what you're using as a camera.
With a dedicated time-lapse camera (or one with a time-lapse mode) and the right lighting, the results should be good. Just make sure the delay between snaps is right for the subject!
Meanwhile, mobile devices used for recording time-lapse (or recording the footage to convert to time-lapse) might yield slightly inferior results. This might be due to a slightly unstable tripod or simply the device's weight. Meanwhile, issues with auto-focus can affect the quality of the video.
To convert the footage you've recorded into a time-lapse video, you have two main options: desktop and mobile.
Not Just Time-Lapse: Hyperlapse Too!
It isn't just time-lapse videos that you can produce in this manner. Hyperlapse, a similar technique that features small camera movements, is another option.
If you're converting video that already features camera motion, the results are going to be more hyperlapse than time-lapse. In short, you have two output options, both of which will deliver striking results.
Just make sure that any video you have earmarked as a hyperlapse doesn't feature too much camera movement. Any motion should be extremely slow, and smooth enough to be imperceptible in the finished video.
Hyperlapse is gaining in popularity, and there are more ways to create videos using this visual technique.
Convert Video to Time-Lapse on Your Desktop
Many desktop video editing suites have built-in tools that make converting a standard clip into a time-lapse movie very simple.
But if you're looking for free software to create time-lapse videos, there's no better option than VLC. This versatile media player (check out the best VLC features) is one of those cross-platform apps everyone should be using. It's available for Windows, macOS, and Linux.
Download: VLC Media Player (Free)
Note that if you're doing this on Windows 10, make sure you launch VLC Media Player with elevated privileges. Simply right-click the app icon and select Run as administrator and agree to the User Access Control notification.
Next, open Tools > Preferences, and at the bottom of the screen, find the Show Settings radio buttons. Select All (#1 in the image below), then in the new view that appears, look for Video. You can use the search box at the top if you can't find it.

Expand Filters and select FPS Converter. In the right-hand pane, input the new Frame rate. At 30 or more frames per second in your original video, 10 FPS is a good option. Too high and the time-lapse video will look too smooth; too low and it will seem jerky. Experiment to get the best results.

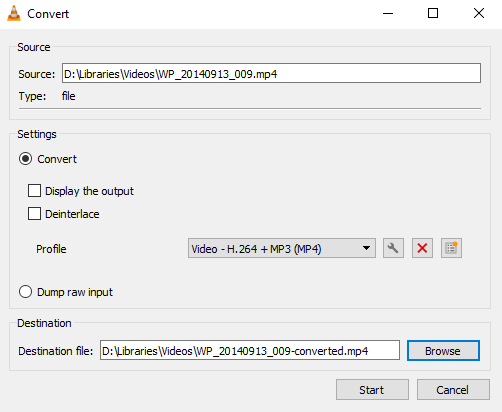
To finish, click Save. Then go to Media > Convert/Save, click Add, then browse for the video you wish to convert.
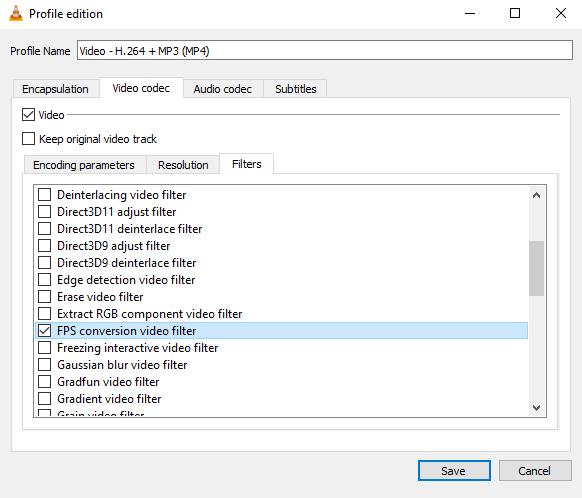
Click the arrow beside the Convert/Save button and choose Convert. In the Settings panel click the spanner icon, then Video codec > Filters and check FPS conversion video filter.

Click Save, then use the Destination file field to set a location to save the compiled time-lapse video. Name it, then click Start.

A few moments later, you'll see a compiled time-lapse movie, ready to view in any video player or share online.
Turn a Mobile Video Into a Time-Lapse Movie
So many time-lapse apps are available for iOS and Android. But what if you want to make a time-lapse movie from some footage you've already recorded with a standard video camera mode? The answer, of course, is a dedicated app, designed to convert the footage to time-lapse.
Make a Hyperlapse on Android
Probably the best mobile hyperlapse app is Microsoft Hyperlapse Mobile, capable of recording hyperlapse and converting existing videos.
Download: Microsoft Hyperlapse Mobile (Free)
Upon launch, you'll see two options in this landscape-only app. Choose Import existing video and browse for a suitable video on your phone.

In the next screen, you'll a preview of the video, with several options.
Tap the menu in the top-right corner to view the settings, where you'll have the choice to Export videos at 1080p and Export to SD storage. These options are both disabled by default. Note that it isn't possible to import video clips greater than 1080p resolution, so 2K and 4K videos are out.
At the top of the screen, you'll see information about the duration and speed of the video. At the bottom, meanwhile, look for the handles. These can be dragged to trim the length of the video down. Dragging these handles reduces the duration of the video.

When you're happy, click the check button, and wait while the video is imported. This may take a while depending on the length of the video. I've saved the results as a GIF to give you an idea how it might look.

How to Create a Hyperlapse With iOS
On iPhone you can use the Time-Lapse photo mode in the camera app to create a hyperlapse. This video tutorial demonstrates how simple it is:
As long as you have a steady hand (or use one of the best iPhone gimbals) you should get great results.
Making a Time-Lapse Without Any Setup Is Easy!
It might be the lazy alternative to creating a genuine time-lapse, but if you want to make a time-lapse video as an afterthought, employing one of these methods is the answer. You could always head back to the location and shoot the same scenes with an app or dedicated camera, but converting the standard video into a time-lapse is quicker.
And with the tools we mentioned above, you can do it in just a few minutes. So why not share your work online? After all, time-lapse videos are one of the most popular types of YouTube video.