Ready to give coding a go? Codea can help.
Creating an iPad app isn't easy, but it's certainly not impossible. Everyone has to start somewhere, and there are various apps and services that set out to make your first steps as agreeable as possible.
Codea is one such option. It's a $15 purchase from the App Store, but it transforms your iPad into a rather capable app creation suite. If you find the idea of coding daunting but you're eager to give it a go, this may well be the answer.
First Steps
When you start a new project in Codea, you'll see a basic Hello World script. Whether you're new to coding or just new to the program, it's worth tinkering with it for a little while.

This is all pretty basic stuff. The setup function is called once, while the draw function is called continuously. This is an important consideration when you come to decide where to place your own code in the script.
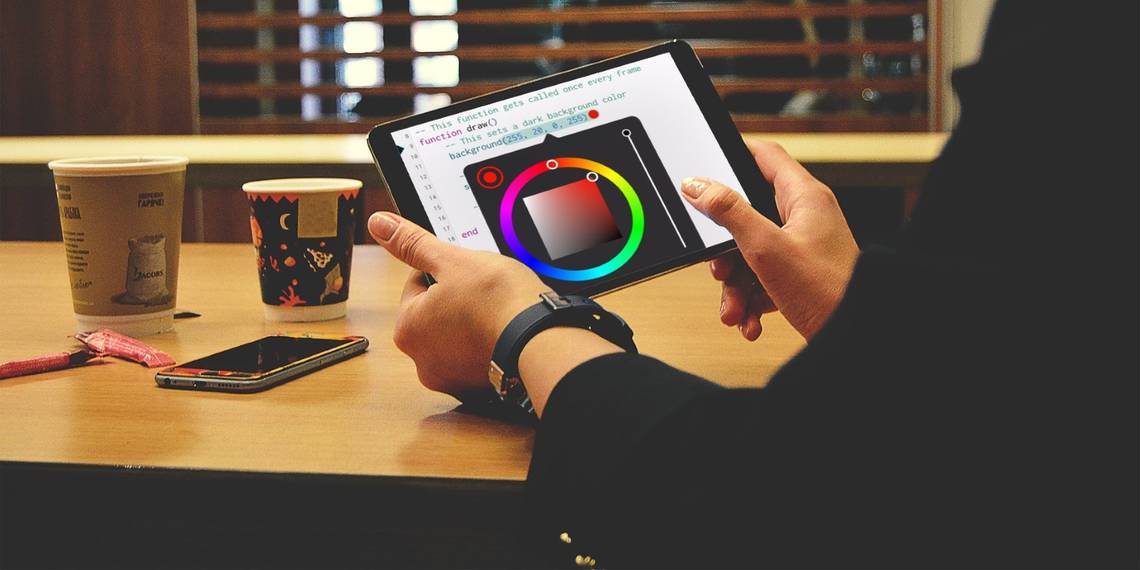
Line 5 simply displays Hello World! as text in the console. Meanwhile, line 11 sets the background color, and line 13 sets the width of the stroke we're going to draw with in a moment, as described in the author's notes.

Tap the numbers that dictate the background color and you'll see one of the ways that Codea differs from a standard code editor. This color picker is an easy way to select the exact shade you want using a touch interface.
Click the play button in the bottom right-hand corner of the interface to run the code.

As you can see, there's not much going on at the moment. But Hello World! is being displayed in the console, and the background has changed to our chosen shade of red. Now that we're a bit more familiar with the interface, we can start making some bigger changes.
Drawing a Shape
Next, we're going to draw a circle using code. Use the back arrow in the bottom left hand corner of the screen to return to the script editor. Then, add the following code to the draw function:
ellipse(WIDTH/2, HEIGHT/2, 200)
Let's unpack that briefly. The ellipse command states that we're looking to draw a circle. WIDTH/2 and HEIGHT/2 handle its position on the screen -- we're using a shortcut to place it in the dead center by dividing the screen's total width and height by two. Alternatively, you could just state a numerical reference. Finally, the number 200 stipulates the size we want. The stroke width is already set earlier in the script.

Above, you can see how your script should look. Press the play button on the virtual keyboard to run the code.

Our circle looks just how it ought to. Feel free to spend a bit of time tweaking our code to see how it changes the outcome. Next, we're going to make things a little more interactive.
Adding Some Interaction
Now that we've drawn a shape, let's edit our code so that the user can actually do something with it. Just by changing one line of code, we can allow them to interact with the shape via the touchscreen.
We simply need to change line 18 to the following:
ellipse(CurrentTouch.x, CurrentTouch.y, 200)
Which should look like the image below in the script editor.

We're simply saying that the X and Y coordinates of the circle should correspond to wherever the user's finger is on the touchscreen. We're putting this in the draw function, so it'll update constantly, allowing the user to drag the shape around.
Press the play button, and see whether you can move the circle around successfully.

We're up and running. We have a very simple app, and we can actually do something with it. The only problem is, it's not actually all that useful. Next, we're going to create an app that actually serves some kind of purpose.
Next Steps
The really powerful thing about Codea is that it gives you access to some of the iPad's most useful features and makes it easy to implement them in your project. We're going to work with its location services.
For my money, the best curry you can get anywhere is served at the Mosque Kitchen in Edinburgh, Scotland. As such, I often wish I knew exactly how far I would need to travel to eat there. We're going to code a simple app that gives us that information.
The first thing we need to do is give our app access to location services. To do so, start a new project, and insert this code into the setup function.
location.enable()
Note that we're putting this in setup rather than draw, because we only need it to run once. We can test whether this is working by running our app, and seeing whether or not we're asked to give it access to our location.

Next, we're going to add some code that grabs the distance between the chosen location and the device, and presents that as text. If you want to set up an app that uses a different location, grab the latitude and longitude for that place now.
Then, add the following code into the draw function:
            text("You are...", WIDTH/2, 250)
text((location.distanceTo(55.945, -3.185)), WIDTH/2, 200)
text("...meters away from the best curry around.", WIDTH/2, 150)
The first and third lines of this code are just text, again using the screen's maximum width divided by two to make sure that they're centered, but using a specific numeric reference so that all three lines of text can be arranged nicely.
The location.distanceTo command just needs the latitude and longitude of the desired location. It'll calculate how far away the iPad is situated, and since we placed it where text would normally go, it'll display that number on screen.
Let's press the play button and test out our app.

There we go. It's simple, but it works. Codea really does make coding for iOS accessible: we've just started out, and already we've managed to implement touchscreen controls and utilize location services. The sky is the limit for here on out.
Do you have tips on how to get the most out of Codea? Or are you looking for help with a particular project? Either way, why not join the conversation in the comments section below?