Over time, the grime of everyday life takes a toll on a laptop. It goes from that shiny new gizmo to a gadget with odd smudges and a buildup of dust. Let's get precious looking good again, shall we?
This guide will be especially useful if you are in the market for a used laptop or looking to sell one. You'll be able to drive the price up if the notebook looks like it's well taken care of, so give it a good cleaning outside when you also format the hard drive.
What You Will Need
The items you need to clean a laptop are easy to find and cost very little. Chances are, you probably already have them.

-
- Microfiber cloths -- I used 3M's Scotch Brite mirror cleaning cloth, but other users on the internet have had success with spectacles-cleaning microfiber cloths as well as soft towel-like microfiber cloths. Get as large a pack as you can, we'll go through at least 10 of them in this guide. Yes, it's a bit overkill, but these microfiber cloths are cheap.
- Distilled/filtered water -- No, you don't need any fancy cleaning solutions. Filtered water will usually get the job done. Even Apple recommends using clean, dirt-free water.
- Spray bottle -- That water needs to go into a spray bottle. Any standard bottle with a spray will do. You could even repurpose an old cleaning bottle.
- Disinfecting wipes -- Any standard set of disinfecting wipes will do, as long as they don't contain bleach, says Orange County Public Schools. Get scented ones if you want your Macbook to smell lemony fresh.
- Cotton swabs -- You can use a standard pack of Q-tips, even the ones that you already have.
- Squeeze blower -- These hand-squeezed blowers are mostly used for cameras. Again, go with any brand you like. Just don't use a hair dryer, electric air blower, or anything that is going to blow hot air or air at high speed.
- Compressed air can -- You'll need a can of compressed air to blow off all the dirt. Remember, compressed air only!
- (Optional) Rubbing alcohol -- Get a standard bottle of isopropyl alcohol or rubbing alcohol. You probably won't need it, but in case your screen has some serious gunk, this will help you clean it.
What You Will Not Need
You'll find plenty of guides online talking about disinfectant sprays, aerosol cans, and specialized cleaning solutions. Disregard everything.
In cleaning guides, HP and Apple both recommend only using compressed air and no aerosol sprays. In fact, Apple explicitly states, "Don't use aerosol sprays, solvents, abrasives, or cleaners containing hydrogen peroxide that might damage the finish."
More importantly, as this guide will show, it's just a waste of your money. You don't need any of those elements.
Switch It Off!

Before you start cleaning, the first thing you need to do is to remove anything plugged into the laptop and power it down completely. No, not sleep mode. You need to shut it down.
Step 1: Cleaning the Shell
In this guide, we will cover laptops with both plastic bodies (like most HP and Dell laptops) as well as aluminum bodies (like MacBooks). The material makes a slight difference.
Start by shutting the lid of your laptop. Then use a clean, damp microfiber cloth to wipe the outside. What's "damp" you ask? Grab that spray bottle and fill some water in it. Spray the water lightly (a couple of sprays, not more) on one side of your microfiber cloth. Make sure there is no excess water (i.e. it isn't wet or dripping).

Don't go up-down or side-to-side. The proper way to clean a laptop is in circular strokes. This avoids streaks and doesn't put undue pressure on edges.
Pro Tip: Don't use your hand to apply pressure. This can damage the body if you inadvertently apply too much pressure. Instead, use your fingers for pressure, and only move in circular patterns.
Do the same thing on the bottom of the laptop, and the sides. Avoid the open ports and the charging port! Don't take your damp cloth anywhere near it. We'll go into details about the ports in a bit.

Finally, use a cotton swab to clean all the nooks and crannies that the microfiber cloth is missing. You'll need it for any grooves or corners, since you weren't applying pressure there with the cloth.
Step 2: Cleaning the Keyboard and Trackpad
Grab a fresh microfiber cloth and clean the trackpad, again in circular patterns. Next comes the tough part, the keyboard.
In case you didn't know, your keyboard is the dirtiest part of your laptop. This is why you need the disinfectant wipes.
First, use the squeeze blower on the keyboard. If you have a chiclet keyboard (like with MacBooks), this won't do much. If you have an open keyboard (you can see the dust below the keys), this will blow out a lot of dust. Make sure you angle the blower in one direction, and use it in that direction only.

Next, grab a new microfiber cloth and run it over all the keys to drag up any loose dust on them. We'll call this one the "dust microfiber" -- keep it handy, you'll need it again later.
Then, clean each key with a disinfectant wipe, changing the wipes as they get dirty. Be gentle! Your keyboard doesn't need too much force.
Once you're done disinfecting, take a new microfiber cloth. Like with the shell, make it damp with some sprayed water and clean all the keys. Again, be gentle, but get all the sides.
Step 3: Cleaning the Ports
For the open ports on the laptop, first use the squeeze blower to blow out any dust in those. Be careful, you don't need to go nuts here.

Next, use a cotton swab and gently clean the insides as much as you can. Don't apply any pressure at all! These parts of the laptop are quite fragile, and the slightest pressure can affect the tiny pins here.
After the squeeze blower and cotton swab have taken out most of the dust, and only if you spot more dust in the ports, then use the compressed air can to clean it up. Remember, compressed air cans should be used at an angle.
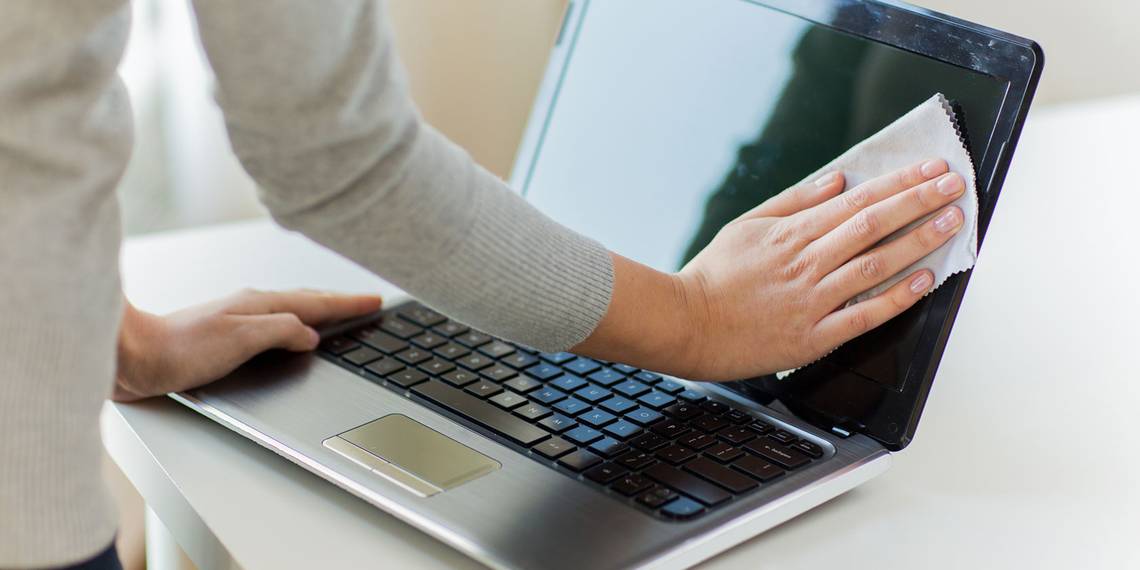
Step 4: Cleaning the Screen
This is the part of your cleaning expedition where you have to be the most careful. Before you start, know one thing. If you press too hard on a panel, you might end up with a dead pixel on your screen, so be gentle at this stage.
Depending on the laptop, it will have either a TN or IPS panel for the LCD screen. Without getting into the jargon, TN panels are a little more fragile, while IPS panels usually have a glass protection panel.
Pro Tip: To clean the laptop's screen, flip it on its back. Find a stable, flat surface and place your laptop screen's back on it, so that your keyboard is in the air. As Tom Strong Reviews points out, this lets you apply gentle pressure on the screen without having the screen go back with your force.
Once it's in position, start off with your trusty "dust microfiber" to wipe away all the excess dust on the screen. Run it lightly around the four edges by folding it and resting the corner against the screen. Do not stick your finger in the microfiber and run it along the edges. To get the edges, use a cotton swab again.

Next, like with the earlier steps, dampen a new microfiber cloth with a few sprays of distilled water, and again, wipe the screen in concentric circles. Like with the dust microfiber, fold it and use the corner to lightly run around the edges.
In 90 percent of cases, this will clean up your screen. In case it doesn't, you'll need that rubbing/isopropyl alcohol, since it is effective in cleaning LCD monitors. Mix equal parts rubbing alcohol and water in the spray bottle, dampen a new microfiber cloth (yup, you'll need a new one), and clean the screen like earlier. This mixture is more effective than plain water at cleaning up gunk.
Step 5: Cleaning the Fans and Insides
That takes care of the outside, but you might need to clean the insides too. No matter what, you need to clean dust from the fans or heat ducts. It's a good way to fix an overheating laptop and to silence any noisy fans.
For Laptops That Open
Some laptops have a bottom panel that opens up. Take apart a few screws and you'll see the guts of your machine. If your laptop allows for that, use the manufacturer's manual to open it up. It's the same procedure as what you would do when upgrading the RAM of your laptop.
Warning: This will most likely void your warranty.

Once the laptop is open, use the can of compressed air to blow all the dust. Don't stick the tip of the straw all the way inside, that can damage some components. And don't touch the fans at all. Blow as much as you can, and try to blow in the direction of the exhaust vents.
For Laptops That Don't Open

In case your laptop doesn't open, like most MacBooks, then your cleaning job is simpler. Aim the can of compressed air at the exhaust vents of the laptop and let it rip. Remember, no direct contact, but put in as much air as you can.
Enjoy Your Clean Laptop!
That's it! By the end of this exercise, your laptop should be looking as good as new. It's a good idea to keep using those microfiber cloths regularly to clean up the laptop rather than wait till it gathers so much gunk again. The screen, especially, should be cleaned regularly.
Next, you might want to learn how to clean your tablet or mobile phone touchscreen safely.
Image Credits: Syda Productions/Shutterstock